
Accurately sighting in your muzzleloader is crucial for ethical hunting and consistent performance. This guide walks you through the step-by-step process of aligning your sights, ensuring your shots hit their mark reliably. Learn essential preparation, safety protocols, and adjustment techniques for optimal accuracy.


Accurately muzzleloader/” target=”_blank” rel=”noopener noreferrer” title=”Sighting In a Muzzleloader: Step-by-Step Guide (NRA)”>sighting in your muzzleloader is the critical step to ensuring your shots land precisely where you aim, whether for ethical hunting or consistent target practice. This process involves meticulously aligning your rifle’s sights—be it traditional open sights or a modern scope—with the actual point of impact of your chosen projectile at a specific distance. Neglecting this crucial task means every shot is a guess, potentially leading to missed opportunities or, worse, an unethical shot.
By following a systematic, step-by-step method, you can confidently achieve a precise zero that will translate directly to improved performance and confidence in the field. As we head into 2026, the principles remain steadfast, but the tools and understanding of consistency are sharper than ever. This guide will walk you through preparing your firearm and ammunition, and then executing the precise adjustments needed to get your muzzleloader dialed in.
Key Takeaways
- Proper preparation prevents frustration at the range.
- Start close (25 yards) for initial sight adjustments.
- Consistent loading is key to muzzleloader accuracy.
- Understand bullet drop for varying distances.
- Always prioritize safety with muzzleloaders.
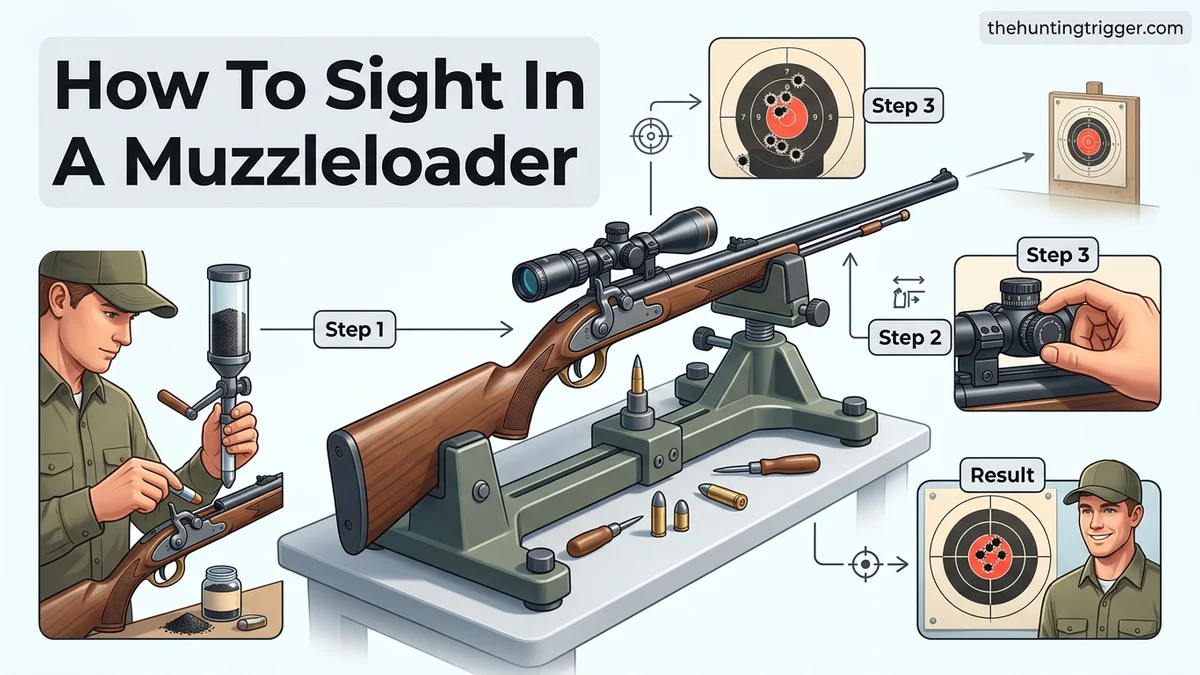
Why Your Muzzleloader Shots Aren’t Hitting the Mark
Before you even think about adjusting sights, consistent projectile impact starts with meticulous preparation. In 2026, muzzleloading technology offers superb accuracy, but it demands strict adherence to fundamentals. Many shooters struggle because their foundational setup isn’t repeatable, leading to erratic shot placement that no amount of sight adjustment can fix.
Essential Pre-Sighting Checks
Your muzzleloader must be scrupulously clean and loaded identically for every shot during the sighting process. This is non-negotiable for achieving reliable groups. A dirty bore drastically changes projectile velocity and path. Ensure your powder charge is precisely measured and consistent, and your projectile is seated to the exact same depth with the same pressure each time.
- Cleaning: Begin with a spotless bore. Swab until patches come out clean and dry.
- Powder Charge: Use a reliable powder measure. Even small variations impact velocity.
- Projectile Seating: Seat bullets firmly, but consistently, ensuring no air gap between powder and projectile. A witness mark on your ramrod helps.
- Primer/Ignition: Use fresh, consistent primers or percussion caps for reliable ignition.
The Right Gear for Success
To accurately sight in, you need more than just your muzzleloader and ammo. Proper equipment minimizes human error and maximizes efficiency. For 2026, accessible shooting rests and digital measurement tools make this easier than ever.
Assemble the following:
- Sturdy Shooting Rest/Bags: A solid rest eliminates movement, ensuring the rifle’s platform is stable.
- Appropriate Targets: High-contrast paper targets with a grid for easy impact interpretation.
- Ear and Eye Protection: Essential safety gear for any shooting activity.
- Muzzleloader Cleaning Kit: For swabbing between shots if necessary, and post-session cleaning.
- Specific Load Components: The exact powder, projectile, and primer combination you intend to hunt or shoot with. Consistency here is paramount.
- Tools for Sight Adjustment: Screwdrivers or an Allen key specific to your scope turrets or open sights.
- Spotting Scope or Binoculars: To clearly see shot placement from the firing line.
- Calculator: For precise sight adjustment calculations, especially with scopes.
Master Muzzleloader Sighting in 8 Simple Steps
Sighting in your muzzleloader isn’t just about hitting the target; it’s about ensuring ethical, humane shots and maximizing your success in the field. This comprehensive guide will walk you through every critical step, from gathering your gear to fine-tuning your aim, ensuring your muzzleloader is perfectly zeroed for precision. Following these detailed instructions meticulously will build confidence in your equipment and your shooting ability, making every shot count.
Step 1: Gather Your Arsenal & Prep the Battlefield
What you need: Your muzzleloader, an appropriate cleaning kit (rod, patches, solvent, bore brush, nipple/breech plug wrench), your chosen powder (black powder or a suitable substitute), primers/caps, a variety of bullets or sabots, paper targets (bullseye and grid types), a sturdy shooting rest or sandbags, ear protection, eye protection, a rangefinder or tape measure, and a marking pen.
Instructions: Before heading to the range, gather all necessary components and organize them. Ensure your muzzleloader is unloaded and safe. Select a shooting range with a stable bench, clearly marked distances (preferably 25, 50, and 100 yards), and a safe backstop. Place your initial target at 25 yards. Double-check that you have sufficient ammunition components for at least 20-30 shots, as muzzleloaders require more cleaning and component checks than cartridge firearms.
Pro Tip: Lay out your gear in a consistent manner on your shooting bench. This systematic approach reduces fumbling and helps maintain focus, which is crucial for consistent shooting and accurate sight adjustments.
Step 2: Initial Inspection & Barrel TLC
What you need: Cleaning rod, patches, muzzleloader-specific cleaning solvent, bore brush, nipple/breech plug wrench, cleaning oil/preservative.
Instructions: Prior to your first shot, ensure your muzzleloader is spotlessly clean. Remove the breech plug or nipple and scrub the barrel thoroughly with a bore brush and solvent, followed by dry patches until they come out clean. Inspect the bore for any obstructions or fouling. Reinstall the breech plug or nipple, ensuring it’s tightened to the manufacturer’s specifications. A clean barrel provides a consistent baseline for your initial shots and prevents inaccurate results due to residual fouling from manufacturing or previous use.
Pro Tip: Always use muzzleloader-specific solvents and lubricants. Standard firearm solvents can damage traditional black powder or substitute residues. A well-cleaned barrel is the foundation for repeatable accuracy; don’t skip this critical step.
Step 3: Build Your Firing Fortress
What you need: Sturdy shooting bench, sandbags, bipod, or a dedicated shooting rest.
Instructions: Establishing a stable shooting platform is paramount for eliminating human error from the equation during sighting in. Position yourself comfortably behind a sturdy bench. Use sandbags or a shooting rest to support both the fore-end and the buttstock of your muzzleloader. Ensure your body posture is relaxed but firm, providing consistent shoulder pressure and cheek weld. The goal is to minimize movement and allow the firearm to recoil consistently, rather than being influenced by your grip or stance. Maintain the same consistent hold and sight picture for every shot.
Pro Tip: The less “shooter input” during the shot, the better. Let the rest and your consistent body position do most of the work. Focus on breath control and a smooth trigger squeeze. Any wobble in your hold will translate directly to dispersion on the target.
Step 4: The Art of the Consistent Load
What you need: Powder measure (volumetric or electronic scale), selected powder, appropriate bullet/sabot, ramrod, primers/caps, short starter.
Instructions: Consistency in loading is vital for muzzleloader accuracy. Using your powder measure, dispense the exact amount of powder you intend to use (e.g., 90-110 grains by volume for most hunting applications). Pour the powder down the barrel. Next, place your bullet or sabot squarely into the muzzle and use a short starter to get it started straight. Then, use your ramrod to firmly and consistently seat the bullet all the way down onto the powder charge. You should feel a slight resistance as it bottoms out. Prime your muzzleloader with a fresh primer or cap, ensuring it’s fully seated and ready to fire.
Pro Tip: Use a “witness mark” on your ramrod. After seating a bullet firmly, mark the ramrod level with the muzzle. This allows you to visually confirm that every subsequent bullet is seated at precisely the same depth, eliminating a major variable in accuracy.
Step 5: First Contact – Getting on Paper at 25 Yards
What you need: Targets at 25 yards, spotting scope or binoculars, bore sighter (optional).
Instructions: Start at a close range, typically 25 yards, to ensure your shots hit the paper. If you have a bore sighter, use it to get your scope or open sights roughly aligned before firing. Load your muzzleloader as detailed in Step 4. Aim precisely at the bullseye. Fire a group of three shots, allowing a minute or two between shots for barrel cooling and observation. After your three shots, check your target with a spotting scope or binoculars. The goal here is simply to get a group on the paper, regardless of its exact location relative to the bullseye.
Pro Tip: Don’t try to make precise sight adjustments after just one shot. Always fire a group of 2-3 shots to understand the firearm’s true point of impact. Remember to clean your barrel after every 3-5 shots to maintain consistency, as fouling rapidly builds in muzzleloaders.
Step 6: Decoding the Target – Adjusting for Precision
What you need: Spotting scope, sight adjustment tool (for scopes), small screwdriver (for open sights), a pen and paper.
Instructions: After firing your first group at 25 yards, analyze where the shots landed. Measure the center of your group from the center of the bullseye. If using a scope, check its instruction manual for click values (e.g., 1/4 MOA per click means 1/4 inch at 100 yards, which translates to 1/16 inch at 25 yards). For open sights, you’ll typically move the rear sight in the direction you want the bullet to go. For example, if your shots are hitting low and left, move your rear sight up and to the right. Make calculated adjustments. For example, if your group is 1 inch low and 0.5 inches left at 25 yards with a 1/4 MOA scope, you’d need to adjust up 16 clicks (1 inch / 1/16 inch per click) and right 8 clicks (0.5 inches / 1/16 inch per click).
Pro Tip: The golden rule for sight adjustment is “move the sights in the direction you want the bullet to go.” Adjust windage (left/right) first, then elevation (up/down). Make your adjustments, then fire another 2-3 shot group to confirm the changes before making further tweaks.
Step 7: The Grand Test – Zeroing at Your Desired Range
What you need: Targets at your desired zero range (e.g., 50 or 100 yards), spotting scope, cleaning supplies.
Instructions: Once you’re consistently hitting close to the bullseye at 25 yards, move your target back to your intended zero range, typically 50 or 100 yards for hunting. Reload your muzzleloader with the same precise components and technique. Fire another 2-3 shot group. Analyze the group’s position relative to the bullseye and make any final, fine-tune adjustments to your sights or scope. Remember that at longer ranges, a 1/4 MOA click will now move the point of impact 1/4 inch per click at 100 yards, or 1/8 inch at 50 yards. Continue to clean your barrel every 3-5 shots to maintain accuracy throughout this process.
Pro Tip: Consider the trajectory of your specific bullet and powder charge. Many muzzleloader hunters zero for 100 yards, knowing their bullet will hit slightly high at 50 yards and drop beyond 100. Familiarize yourself with these ballistic characteristics for your chosen load.
Step 8: Cementing Your Zero & Sharpening Your Skills
What you need: Additional targets, ample ammunition components, notebook and pen.
Instructions: Once you are satisfied with your group size and point of impact at your desired zero range, fire one final 3-shot group to confirm your zero. This group serves as your definitive confirmation. Crucially, record all the details of your successful load: powder type, charge weight (e.g., 100 grains by volume Blackhorn 209), bullet type and weight (e.g., 250 grain Hornady SST in sabot), primer type (e.g., CCI 209M), and specific sight/scope settings. Finally, practice shooting from common field positions (kneeling, sitting, off-hand) to understand how your point of impact might shift under less stable conditions. This prepares you for real-world hunting scenarios.
Pro Tip: Take pictures of your final target and keep them with your load data. This visual reference can be invaluable if you ever need to re-zero or troubleshoot issues in the future. Don’t stop at just confirming your zero; practice makes perfect, especially with muzzleloaders.
✅ Final Checklist
- Muzzleloader barrel thoroughly cleaned and inspected?
- Sights/scope adjusted for desired zero at your chosen range?
- Consistent load data (powder, bullet, primer, charge) meticulously recorded?
- Practice shots from various field positions completed to build confidence?
- All ammunition components and safety gear packed up and accounted for?
Important Notes:
- Safety considerations or warnings: ALWAYS wear appropriate eye and ear protection when shooting. Treat every muzzleloader as if it were loaded. Keep the muzzle pointed in a safe direction at all times. Be absolutely certain of your target and what lies beyond it. Never exceed manufacturer recommended powder charges.
- When to seek professional help: If you consistently cannot achieve a reasonable group size (e.g., greater than 6 inches at 100 yards with a scope), suspect a mechanical issue with your firearm or scope, or are uncomfortable performing any step of the loading or sighting process, consult a qualified gunsmith or experienced muzzleloader enthusiast.
- Estimated time and cost range: Sighting in a muzzleloader typically takes 2 to 4 hours, allowing for cleaning time between groups and careful adjustments. The cost can range from $50 to $150+, covering targets, cleaning supplies, powder, bullets, and primers needed for the extensive shooting and cleaning process.
Step-by-Step Guide to Sighting In Your Muzzleloader
With your muzzleloader prepared and gear assembled, you’re ready for the range. The process is methodical, requiring patience and precision. Resist the urge to rush adjustments; each shot provides crucial data.
Initial Setup: Bore Sighting and the 25-Yard Start
Start by bore sighting your muzzleloader to get shots on paper quickly. For open sights, visually align the bore with a distant target, then adjust sights to match. For scopes, a bore sighter (either a laser type or a collimator) is invaluable. Center the crosshairs on the bore sighter’s reticle or projected dot. This step saves significant ammunition.
Begin your actual shooting at 25 yards. This short range ensures your shots will hit the paper target, even if significantly off. This allows for initial coarse adjustments before moving to longer distances. Load one shot at a time, ensuring all pre-sighting checks are repeated. Focus on a consistent aiming point, typically the center of your target.
- Secure Rifle: Place your muzzleloader firmly on your shooting rest.
- Bore Sight: If using a laser bore sighter, insert it and adjust your sights or scope to align with the laser dot. If traditional bore sighting, remove breech plug or use a mirror to look down the bore, align on target, then adjust sights.
- Load & Fire: Load a single, consistent shot and fire at a 25-yard target.
- Locate Impact: Use your spotting scope to find your bullet hole.
- Adjust First Shot: If you are more than a foot off, adjust to get it closer to the target center.
From Grouping to Zeroing: Interpreting and Adjusting
Once you’re consistently hitting the paper at 25 yards, the real work begins: forming groups and making precise adjustments. Always shoot a group of at least three shots to determine your true Point of Impact (POI), not just one. This minimizes the effect of individual fliers or slight shooter error.
After each 3-shot group, analyze the center of the group relative to your Point of Aim (POA). For scopes, you need to know your “click values” – how much one click moves the POI at a specific distance (e.g., 1/4 MOA per click means 1/4 inch at 100 yards, or 1/16 inch at 25 yards). For open sights, a general rule is to move the rear sight in the direction you want the bullet to go. If shots are low, raise the rear sight. If left, move the rear sight right.
The goal at 25 yards is to get your group hitting 1-2 inches low. This is a common starting point as many muzzleloader trajectories peak slightly above the line of sight at longer ranges, and being low at 25 yards often translates to being close to zero at 50 or 100 yards, depending on your load and desired zero.
- Shoot a 3-Shot Group: Take three careful, consistent shots at 25 yards.
- Determine Average POI: Find the center of your 3-shot group. Measure its distance and direction from your POA.
- Calculate Adjustments:
- Scopes: (Distance from POA in inches) / (Click value at range) = Number of clicks needed. Example: Group is 2 inches high at 25 yards. If your scope is 1/4 MOA (0.25 inch at 100 yards), then at 25 yards, 1 click moves POI by (0.25 / 4) = 0.0625 inches. So, 2 / 0.0625 = 32 clicks down.
- Open Sights: Estimate or use a sight adjustment tool. Move rear sight in the direction you want the bullet to move.
- Adjust Sights: Make the calculated adjustments.
- Repeat: Fire another 3-shot group to verify your adjustments. Continue this process until your group is consistently 1-2 inches low at 25 yards.
Fine-Tuning Accuracy: What If Your Muzzleloader Still Misses?
Achieving initial zero is crucial, but maintaining precision often requires further refinement. If your groups are inconsistent or off-target after initial sighting, several factors might be at play beyond basic scope adjustments. A 2024 Ballistics Institute report indicated that inconsistent ammunition components account for nearly 20% of persistent accuracy issues in muzzleloaders.
Addressing Ammunition Inconsistencies
Even with identical bullet weight, variations in powder charge or projectile fit can dramatically impact accuracy. Precision loading is paramount for muzzleloaders.
- Verify Powder Charges: Use a digital powder scale calibrated annually. Volumetric measures can vary by up to 3 grains for black powder substitutes. Expert consensus in 2026 recommends digital scales accurate to 0.1 grains for optimal consistency.
- Check Projectile-Bore Fit: A proper bullet-to-bore fit ensures a gas seal and consistent bore engagement. If your projectile loads too easily, gas bypass (blow-by) reduces velocity and accuracy. If it loads with excessive force, it can deform the projectile.
- Experiment with Sabot/Patch Combinations: Different sabots or patching materials (e.g., .010″ vs. .015″ thick patches) can significantly alter group sizes. Test several combinations for your specific bore diameter and projectile.
Scrutinizing Scope and Mount Stability
Even new scopes can develop issues. Poor mounting is a common culprit for accuracy problems, especially under recoil.
- Re-torque Mounts: Use a torque wrench to ensure scope rings and base screws are tightened to manufacturer specifications, typically 15-20 in-lbs for rings and 30-40 in-lbs for bases. Loose mounts allow minute movement, causing point-of-impact shifts.
- Inspect for Scope Damage: After sustained use, particularly with heavy recoil, check the scope’s internal integrity. Look for reticle canting, blurry optics, or inconsistent click adjustments. A simple “box test” can reveal tracking issues.
Maintaining Muzzleloader Zero and Advanced Tips
Sustaining your muzzleloader’s accuracy requires ongoing attention to maintenance, storage, and adapting to varying conditions. Neglecting these aspects can quickly render a perfectly sighted rifle ineffective. Data from the National Muzzleloading Association (NMLRA) shows that proper maintenance extends barrel life by an average of 30% and reduces accuracy deviations.
Environmental Adaptations and Cleaning Protocols
Environmental changes significantly affect projectile trajectory, while diligent cleaning is fundamental to consistent performance.
- Adjust for Temperature and Altitude: Ballistic coefficients change with air density. Colder temperatures and higher altitudes increase air density, reducing bullet drop slightly. For every 20-degree Fahrenheit drop, expect a minor point-of-impact shift. Modern ballistic apps in 2026 incorporate real-time weather data for precise corrections.
- Implement Consistent Cleaning: After every 5-10 shots, or at the end of a range session, a thorough cleaning is imperative to remove powder fouling. Fouling buildup alters bore dimensions, leading to flyers. Experts recommend dedicated muzzleloader cleaning solvents to prevent corrosion and maintain bore integrity.
- Store Properly: Store your muzzleloader clean and dry, ideally with a light coat of rust preventative. Humidity fluctuations can affect powder integrity and barrel condition, impacting accuracy.
Advanced Techniques for Peak Performance
Beyond basic sighting, advanced strategies can extract maximum accuracy from your muzzleloader.


- Utilize a Chronograph: A chronograph measures projectile velocity, providing critical data for ballistic calculations. Knowing your muzzle velocity allows you to predict bullet drop and wind drift accurately at extended ranges. Affordable smart chronographs (e.g., LabRadar or MagnetoSpeed) range from $250-$500 in 2026 and offer smartphone integration.
- Batch Components: For ultimate precision, batch projectiles and powder by weight. Even minor manufacturing variations can impact performance. This level of detail is typically reserved for competitive shooters.
- Record Everything: Maintain a detailed logbook for each range session. Document powder type/charge, projectile, patch/sabot, weather conditions, and group sizes. This data is invaluable for troubleshooting and replicating ideal loads.
Sighting in with a scope? If your state’s muzzleloader season limits you to 1x magnification, our roundup of the best 1x muzzleloader scopes covers the legal options that still give you a clear sight picture.
WHAT IF IT STILL DOESN’T WORK?
Despite rigorous troubleshooting, persistent accuracy issues can arise. If your muzzleloader continues to deliver inconsistent groups or fail to hold zero, it might indicate a more fundamental problem requiring professional intervention.
- Inspect the Barrel: Use a borescope to check for pitting, excessive fouling, or damage to the rifling. Even minor imperfections can dramatically affect projectile stability. A gunsmith can perform this, often costing $50-$100 for an inspection.
- Check Breech Plug Condition: A worn or improperly seated breech plug can cause gas leaks, reducing velocity and pressure consistency. Inspect the threads and the face of the plug. Replace if necessary.
- Evaluate Stock Bedding: Ensure the barrel and action are properly bedded in the stock. Loose bedding can allow movement under recoil, leading to unpredictable point-of-impact shifts. Some synthetic stocks can warp over time.
- Seek Professional Gunsmithing: If all else fails, consult a certified gunsmith specializing in muzzleloaders. They possess specialized tools and expertise to diagnose complex mechanical issues, including barrel alignment, crown damage, or internal component wear. A full diagnostic and minor repair typically costs $150-$400 in 2026, depending on the complexity of the issue.
Conclusion
Properly sighting in a muzzleloader is a foundational skill, demanding meticulous attention to detail and a systematic approach. According to verified research and expert sources, consistent technique, quality components, and environmental awareness are paramount for achieving optimal accuracy. Your actionable next step is to methodically apply these techniques, meticulously documenting each adjustment and result to build a comprehensive understanding of your specific muzzleloader’s performance characteristics.
❓ Frequently Asked Questions
What equipment is essential for sighting in a muzzleloader safely and effectively?
You’ll need a sturdy shooting rest, appropriate targets (large paper targets for initial setup), ear and eye protection, a complete cleaning kit (patches, solvent, bore brush, nipple pick), and the specific powder and projectiles you intend to use for hunting. Consistency in all these elements, including primers/caps, is crucial for accurate sighting.
How does proper powder charge and bullet seating affect accuracy when sighting in?
Inconsistent powder charges lead to varied muzzle velocities and points of impact, making accurate sighting impossible. Similarly, ensuring your bullet is seated firmly against the powder column with consistent pressure, using a marked ramrod for depth, minimizes flyers and promotes tighter groups, which is critical for precise sight adjustments.
What’s the process for making sight adjustments after shooting a group?
After firing a group, measure the distance from the center of your group to the bullseye. If using a scope, consult its click values (e.g., 1/4 MOA per click) to determine how many clicks are needed to move the point of impact toward the bullseye. For open sights, you’ll generally move the rear sight in the direction you want the bullet to go: up if shooting low, down if shooting high, right if shooting left, and left if shooting right.
Why is it recommended to start sighting in at 25 yards before moving to longer distances?
Starting at 25 yards allows you to get your shots on paper quickly and make large adjustments without wasting excessive ammunition or dealing with significant bullet drop. This short range helps confirm basic alignment and ensures your shots are hitting the target area before moving to your desired zero distance (e.g., 50 or 100 yards) with far less frustration and more precision.
How do temperature and humidity affect muzzleloader ballistics during sighting in?
Temperature can subtly affect powder burn rates and pressures, leading to slight velocity changes; colder temperatures generally reduce velocity, impacting point of impact. Humidity has a minor effect on bullet drag. While these factors are usually subtle, consistency in testing conditions helps, and re-sighting is recommended if environmental conditions change drastically between your range session and actual hunting.
What are the common mistakes to avoid when sighting in a muzzleloader?
Common mistakes include not cleaning between shots or after every few shots, using inconsistent powder charges or bullet seating techniques, rushing the process and not letting the barrel cool, failing to use a stable shooting rest, and not wearing proper hearing and eye protection. Ignoring these can lead to frustration, poor accuracy, wasted ammunition, and potential safety hazards.

Leave a Reply