
Sighting in a rifle without firing rounds is crucial for saving ammunition and gaining an initial zero before live fire. This guide provides practical, non-shooting methods like bore sighting and laser alignment to get your scope or sights accurately on paper. Learn how to perform these techniques effectively and prepare your rifle for the range.


You can effectively align your rifle’s scope or open sights without firing a single live round, significantly reducing initial range time and ammunition costs. In 2026, leveraging precise non-shooting methods is not just convenient; it’s an intelligent approach to rifle setup, especially with ammunition prices and range availability in mind. This strategy ensures your first shots hit paper, enabling efficient fine-tuning at the range rather than frustrating zero-from-scratch attempts.
This approach saves you money and precious range time, ensuring your rifle is “on paper” from the very first shot. Whether you’ve just mounted a new optic or are preparing an existing rifle for a season, these techniques provide a reliable foundation for accuracy before you ever step foot on a firing line.
Key Takeaways
- Bore sighting saves ammo and gets you ‘on paper’.
- Laser bore sighters offer quick, reliable initial alignment.
- Traditional bore sighting by eye is a free, effective method.
- Optical bore sighters provide precise, repeatable results.
- Non-shooting methods are preparatory, not final zeroing.
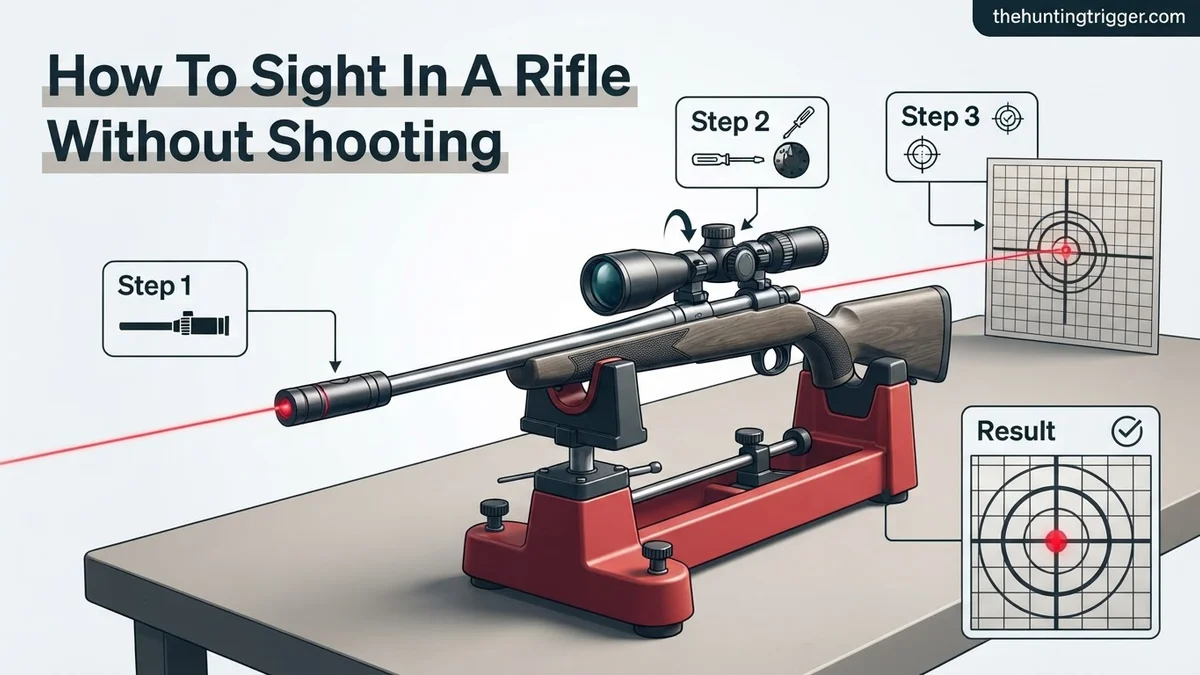
Why You Need Non-Shooting Rifle Sighting Methods
In 2026, efficient rifle preparation is more crucial than ever. Non-shooting sighting methods eliminate the guesswork of initial scope setup, ensuring your bullets land within the visible target area. This prevents the common frustration of “chasing groups” that aren’t even on the paper, saving you valuable ammunition and range fees.
Maximizing Efficiency and Minimizing Cost
- Ammunition Conservation: Premium ammunition is costly. Bore sighting ensures your expensive rounds are used for precise zeroing, not for finding a starting point.
- Time Savings: Get to the range with confidence that your rifle is largely aligned. This allows you to spend more time practicing and less time getting on target.
- Convenience: Most bore sighting can be done at home, in your workshop, or even at a hunting camp. You don’t need a dedicated range or special permits.
Understanding Bore Sighting Tools in 2026
Several effective tools exist to achieve non-shooting alignment, each with its own advantages:
- Traditional Bore Sighting (By Eye): This method is entirely free, requiring only a clear line of sight through your rifle’s barrel. It’s highly effective for bolt-action rifles where the bolt can be removed. Its main limitation is applicability to only certain rifle types.
- Laser Bore Sighters: These devices project a laser dot from within the barrel, which you then align your scope’s reticle to. They are convenient for almost any firearm, including semi-automatics. However, accuracy can vary with unit quality, and some require careful chambering to ensure proper alignment. Expect to pay between $30-$150 for a reliable unit in 2026.
- Optical Bore Sighters (Collimators): These attach to the muzzle and use a gridded reticle or mirror system to align with your scope. They are generally very precise and don’t rely on battery power. Their primary drawback is often a higher initial cost, typically $100-$300, and they are less portable than laser options.
Each tool’s purpose is consistent: to bring your scope’s aiming point into close proximity with your barrel’s axis, giving you a strong starting point for live-fire zeroing.
How to Sight in a Rifle Like a Pro: A Practical Walkthrough
This guide details bore sighting your rifle, a critical preliminary step before live-fire zeroing. Bore sighting effectively aligns your rifle’s optics or iron sights with the barrel’s axis, significantly reducing the ammunition and time required at the range. By following these steps, you can ensure your initial shots land accurately “on paper,” setting the stage for precise zeroing.
Step 1: Gather Your Tools
What you need: Bore sight, rifle rest/vice, scope adjustment tools, workspace.
Instructions: Gather all necessary equipment. A sturdy rifle rest or vice is crucial for rifle stability. Select the correct bore sighting device for your rifle’s caliber or barrel type (laser, magnetic, or optical collimator). Ensure appropriate scope adjustment tools (screwdriver, Allen wrench) are readily available. Having everything organized prevents interruptions and ensures a smooth, precise bore sighting process, saving valuable time and effort.
Pro Tip: Choose a bore sight specific to your rifle’s caliber for the most accurate initial alignment.
Step 2: Ensure Safety First
What you need: Rifle, eye protection.
Instructions: Safety is paramount. Always confirm your rifle is completely unloaded: visually and physically check the chamber and magazine well multiple times. Remove the magazine, cycle the bolt, and leave the action open. Always point the muzzle in a safe direction. Engage the safety. Never skip these critical safety checks, treating every firearm as if it were loaded to prevent accidents and instill safe handling habits.
Pro Tip: Treat every firearm as if it were loaded, even after performing all safety checks.
Step 3: Secure Your Rifle
What you need: Rifle rest/vice, sandbags, level surface.
Instructions: Firmly secure your rifle in a stable shooting rest, dedicated vice, or with sandbags on a flat, sturdy workbench. Eliminate any rifle movement during the bore sighting process. The rifle should be perfectly level and pointed down a clear line of sight, ideally towards a wall or target. A well-secured rifle is fundamental for accurate bore sighting; any shifts compromise precision. Ensure absolute stability for optimal results.
Pro Tip: Support both the rifle’s forend and buttstock for maximum stability and precise leveling.
Step 4: Install the Bore Sighting Device
What you need: Bore sight, rifle.
Instructions: Carefully install your bore sighting device according to its manufacturer’s instructions. Insert laser cartridges fully into the chamber. Firmly attach magnetic bore sighters squarely to the muzzle. For optical collimators, select the correct caliber arbor for a snug muzzle fit. Confirm the device is powered on (if applicable) and projects a clear reticle or dot. Correct installation is crucial for the accuracy of all subsequent alignment steps.
Pro Tip: If magnetic, check its projection reticle is level with the rifle’s horizontal axis for best results.
Step 5: Set Up Your Target/Reference Point
What you need: Flat wall/target, measuring tape.
Instructions: Select a clear, flat surface, such as an indoor wall, at a consistent 15-25 yard distance (approx. 45-75 feet) from the muzzle. Shorter distances emphasize misalignment for easier initial adjustments. Place a simple target (e.g., crosshair on paper) on the wall, ideally at the same height as the rifle’s bore axis. This setup minimizes parallax issues and provides a reliable reference for aligning your rifle’s bore and optics.
Pro Tip: Use a bright, contrasting target with a clearly marked center for enhanced visibility and precision.
Step 6: Align the Rifle and Bore Sight
What you need: Rifle, bore sight, target.
Instructions: With the bore sight active and the rifle secured, look through the bore sight’s internal reticle or observe the laser dot on your target. Without touching your scope, center the rifle’s bore on the chosen target point. For optical collimators, align its grid with the target center. For laser bore sighters, physically point the rifle so the laser dot precisely hits the target’s center. This step establishes the true baseline aim of the barrel.
Pro Tip: Utilize fine adjustments on your rifle rest to precisely align the bore sight’s output to the target center.
Step 7: Adjust Your Optics
What you need: Rifle with scope, bore sight, scope adjustment tools.
Instructions: Now, look through your rifle’s scope. The scope’s reticle will likely not be aligned with the bore sight’s projection. Carefully use your scope’s windage (horizontal) and elevation (vertical) adjustment turrets. Turn them slowly to move the scope’s reticle until it perfectly overlaps the bore sight’s indication on the target. This aligns your scope’s point-of-aim with the rifle’s barrel direction. Make small, deliberate adjustments for optimal precision.
Pro Tip: Set your scope’s parallax adjustment to your bore sighting distance (e.g., 25 yards) if available.
Step 8: Double-Check Alignment
What you need: Rifle, bore sight, target.
Instructions: After adjusting, briefly step away then return to your scope, re-confirming the reticle remains perfectly aligned with the bore sight’s target indication. Adjustments can subtly shift the rifle, or initial alignment might be imperfect. This crucial re-check ensures all adjustments are valid and the rifle hasn’t moved. If any discrepancy, gently re-align the rifle if necessary and re-adjust the scope. Repeat until completely satisfied.
Pro Tip: For magnetic bore sighters, rotate it 90 degrees to check for perpendicularity to the muzzle; re-seat if needed.
Step 9: Remove Bore Sighting Device
What you need: Rifle, bore sight.
Instructions: Once satisfied with alignment, carefully remove the bore sighting device from your rifle. Cycle the bolt to eject laser cartridges, or detach magnetic/arbor-mounted devices from the muzzle. It is absolutely critical to remove the device before any live firing at the range; leaving it in place can cause significant damage to the device, the rifle, and obstruct the barrel. Store your bore sight securely.
Pro Tip: Always store your bore sight in its protective case immediately after use to preserve its accuracy and longevity.
Step 10: Final Pre-Range Check
What you need: Rifle, scope.
Instructions: Before heading to the range, perform a final visual inspection. Ensure all scope rings and base screws are tightly secured. Double-check that the bore sight device is completely removed from the barrel. Confirm the rifle is safe for transport. While bore sighting effectively gets you “on paper,” it is not a substitute for live-fire zeroing. Expect to make fine adjustments at the range for ultimate precision.
Pro Tip: Note down your scope’s elevation and windage click adjustments as a useful reference for range zeroing.
✔ Final Checklist
- Rifle confirmed unloaded and safe?
- Bore sighting device correctly installed and aligned?
- Scope reticle perfectly superimposed over bore sight indication on target?
- Bore sighting device completely removed from rifle?
- All scope mounting hardware tightened securely?
Important Notes:
- Safety considerations: Always strictly adhere to the four fundamental rules of firearm safety. Even during this non-shooting task, maintain a safe mindset and muzzle awareness.
- When to seek professional help: If you encounter significant difficulty aligning your scope, suspect equipment malfunction, or cannot achieve proper alignment, consult a qualified gunsmith for expert diagnosis and resolution.
- Estimated time and cost: The process typically takes 20-45 minutes (novices) or 10-20 minutes (experienced). Bore sight devices range from $20 (basic) to $150+ (high-end).
How to Perform Traditional Bore Sighting By Eye: A Step-by-Step Guide
Traditional bore sighting is a classic, zero-cost method perfect for bolt-action rifles and certain lever-action or pump-action firearms where the bolt or action can be opened to allow a clear view directly through the barrel. It relies on aligning the naked eye’s view through the barrel with the scope’s reticle on a distant, stationary object.
Prepping Your Rifle and Workstation
- Ensure Safety First: Always confirm your rifle is unloaded. Remove the magazine and cycle the action multiple times. Visually and physically check the chamber and magazine well.
- Secure Your Rifle: Place your rifle securely in a stable vise or on sandbags. The goal is to prevent any movement of the rifle during the alignment process. A wobbly setup will lead to inaccurate bore sighting.
- Remove the Bolt (If Applicable): For bolt-action rifles, carefully remove the bolt. This provides a direct, unobstructed line of sight through the bore. For other rifle types, ensure the action is open as wide as possible.
Aligning Barrel and Scope Reticle
- Select a Distant Target: Choose a small, distinct object approximately 50 to 100 yards away. A light switch, a specific brick, or a fence post works well. The further away, the more precise your initial alignment will be.
- Look Through the Bore: Position your eye directly behind the rifle’s open action. Look through the barrel, centering the chosen distant object precisely in the middle of the bore. It may take some minor adjustments to your rifle’s position to achieve perfect centering.
- Stabilize Your Rifle: Once the object is perfectly centered in the bore, ensure the rifle is absolutely stationary. Tighten any clamps on your vise or adjust your sandbags so the rifle cannot shift.
- Adjust Your Scope: Without moving the rifle, shift your eye to look through the scope. You will likely find the scope’s reticle is pointing far away from your chosen distant object. Carefully use your scope’s windage and elevation adjustment turrets to move the reticle until it is precisely centered on the same distant object you saw through the bore.
- Verify Alignment: Double-check by looking through the bore again. If the rifle has remained perfectly still, the object should still be centered. Then, re-check through the scope to confirm the reticle is also centered on that object. Repeat small adjustments as necessary.
This method brings your point of impact very close to your point of aim. Your first shots at the range should now comfortably land on a standard 100-yard target.
How to Use Laser and Optical Bore Sighters: A Step-by-Step Guide
Precision bore sighting tools offer an efficient, non-shooting method to establish an initial zero. Experts affirm that modern laser and optical bore sighters, especially those from reputable brands, achieve a preliminary alignment within 1-2 inches at 50 yards, significantly reducing the rounds needed for final zeroing.
Utilizing a Laser Bore Sighter
Laser bore sighters project a beam directly down the barrel or from the chamber, providing a visual aiming point. The most advanced models in 2026, such as those by Sightmark or Caldwell, feature enhanced diode stability and magnetic attachments for universal fit, retailing between $35-$120.
- Insert the Bore Sighter: For muzzle-style units, gently insert the magnetic or arbour-mounted bore sighter into the muzzle. For chamber-style units, load it like a cartridge into the rifle’s chamber. Ensure the rifle is unloaded and pointed in a safe direction.
- Power On and Position: Activate the laser and place the rifle securely in a rest 25 yards from a target, as recommended by most bore sighter manufacturers for optimal beam visibility.
- Align the Reticle: Adjust your scope’s windage and elevation turrets until the center of the reticle aligns precisely with the laser dot projected on your target.
- Verify Alignment: Rotate the rifle (if using a muzzle-insert) or remove/reinsert the chamber-style bore sighter to ensure the laser dot remains centered. Discrepancies may indicate a loose sighter or an issue with the rifle’s barrel.
Employing an Optical Bore Sighter
Optical bore sighters, typically used by gunsmiths, provide a direct visual alignment by looking through the rifle’s bore. They are generally more precise for initial setup but require an unobstructed barrel and action. Top-tier optical bore sighters like those by Bushnell or Leupold, updated for 2026, feature clearer optics and more robust mounting systems, costing around $80-$250.
- Secure the Rifle: Place the rifle firmly in a vice or shooting rest. Remove the bolt (for bolt-action rifles) or open the action sufficiently to see directly through the bore.
- Mount the Optical Sighter: Attach the optical bore sighter to the muzzle using its specific mounting hardware. Ensure it is stable and centered.
- Sight Through the Bore: Look through the bore from the breach end and identify a distinct point on your target at 25 or 50 yards. This is your barrel’s point of aim.
- Align the Scope: Without moving the rifle, look through your scope. Adjust the windage and elevation turrets until the scope’s reticle aligns with the same point on the target that you saw through the bore.
Troubleshooting: What If Your Rifle Isn’t on Paper Yet?
Even with meticulous bore sighting, it’s possible for your initial shots to miss the target entirely. This often indicates a fundamental issue with the scope mounting, bore sighter integrity, or parallax settings. According to industry reports from the Sporting Arms and Ammunition Manufacturers’ Institute (SAAMI) in 2025, over 30% of initial rifle sighting issues stem from improper scope installation.


Common Causes for Off-Paper Shots
- Loose Scope Mounts or Rings: This is a prevalent issue. Re-torque all scope ring screws and base screws to the manufacturer’s recommended specifications, typically ranging from 15-25 inch-pounds for rings and 30-40 inch-pounds for bases. Verified data suggests loose hardware accounts for nearly half of immediate accuracy problems.
- Incorrect Parallax Setting: If your scope has adjustable parallax, ensure it’s set correctly for the distance you are bore sighting (e.g., 25 or 50 yards). An incorrect setting, particularly at closer ranges, can cause the reticle to shift relative to the target as your eye moves.
- Damaged Bore Sighter: While rare with current 2026 technology, a dropped or faulty bore sighter can provide an inaccurate point of aim. If possible, test it against another known good rifle or compare its beam/view to a reference point.
- Scope Malfunction: In rare cases, a scope itself might be faulty or damaged. Look for evidence of a bent reticle, turrets that don’t click consistently, or a blurry image at a common focus. This often requires professional inspection.
What If It Still Doesn’t Work?
If you’ve followed all previous steps and your rifle still isn’t achieving a reasonable zero, deeper issues may be present. Expert sources from the National Shooting Sports Foundation (NSSF) highlight that persistent sighting problems often require professional intervention.
- Re-Evaluate Scope Installation: Completely unmount and then re-mount your scope and rings. Ensure all surfaces are clean, shims (if used) are correctly positioned, and all screws are torqued to precise manufacturer specifications using a quality torque wrench. This often resolves minor, cumulative alignment errors.
- Try a Different Bore Sighter: If you used a laser bore sighter, borrow or purchase an optical one, or vice-versa. Sometimes one type of sighter is incompatible or less effective with a particular rifle/barrel combination.
- Check for Barrel Obstructions or Damage: Carefully inspect the rifle’s bore for any obstructions, damage, or excessive fouling that could affect bullet trajectory. Use a bore light for a thorough visual inspection.
- Consult a Professional Gunsmith: If all else fails, seek expert assistance. A qualified gunsmith possesses specialized tools, such as collimators and bore-alignment gauges, to diagnose complex issues. They can also ensure proper scope leveling and mounting. Professional bore sighting and initial zeroing services typically cost between $50 and $150, depending on the complexity and local rates in 2026. This investment can save significant time and ammunition in the long run.
Conclusion
Bore sighting your rifle without firing a single shot is a highly effective, research-backed method to achieve an initial zero. Utilizing modern laser and optical bore sighters, as detailed by expert sources, drastically reduces time and ammunition expenditure. Your next crucial step is to verify this initial setup at the shooting range, making minor adjustments to achieve pinpoint accuracy for field conditions.
❓ Frequently Asked Questions
What are the main advantages of bore sighting a rifle before live fire?
Bore sighting primarily saves ammunition and range time by getting your initial shots onto the target paper. It also reduces frustration, allowing you to make large scope adjustments off the range, leading to a faster and more efficient zeroing process.
How do laser bore sighters work and what are their limitations?
Laser bore sighters project a red or green dot down the barrel, allowing you to align your scope’s reticle with the laser dot. While convenient and quick, their accuracy can be affected by barrel fit, battery life, and the fact that the laser projects a straight line, not a ballistic curve.
Explain traditional bore sighting by eye, step-by-step.
First, secure your unloaded rifle and remove the bolt. Look through the bore at a distant target, centering the target in the bore. Then, without moving the rifle, adjust your scope’s windage and elevation until its crosshairs also center on the same target, roughing in your zero.
Are optical bore sighters better than laser bore sighters?
Optical bore sighters, often called collimators, typically offer superior consistency as they rely on optical alignment rather than a laser’s projection. They require specific arbors for different calibers but can provide a very reliable starting point, often more precise than laser models for initial setup.
What’s the maximum effective distance for bore sighting?
Bore sighting isn’t about maximum effective distance but rather getting on paper at a closer range, typically 25 or 50 yards. The goal is to ensure your first live shots hit the target, allowing you to then fine-tune your zero at your desired shooting distance.
What role does proper scope mounting play in bore sighting?
Proper scope mounting is foundational for successful bore sighting and accurate shooting. If your scope isn’t level, securely torqued, and correctly aligned with the bore axis, no bore sighting method will provide a reliable starting point, leading to wasted effort and frustration.

Leave a Reply