
Accurately sighting in your .243 rifle is crucial for precision and success. This guide provides a step-by-step process covering stable setup, initial shots, precise scope adjustments, and refining your zero at optimal distances. Learn to confidently align your point of aim with your bullet’s point of impact.
Accurately sighting in your .243 rifle is the single most important step to ensure precision, ethical shots, and consistent performance in 2026. This process precisely aligns your rifle’s point of aim (POA) with its point of impact (POI), translating directly to whether your bullet hits exactly where you expect. Without this critical adjustment, even the finest rifle and optic combination is essentially guesswork, leading to missed targets and frustration.


Zeroing your .243 means building confidence in every pull of the trigger, whether for hunting or competitive shooting. It removes doubt about your equipment’s accuracy, allowing you to focus purely on fundamental shooting skills. This guide will walk you through the essential preparations and the step-by-step process to get your .243 sighted in perfectly, ensuring your shots land true every time.
Key Takeaways
- Properly prepare your rifle, ammo, and shooting station.
- Begin with bore sighting or a 25-yard target for initial hits.
- Understand scope click values for precise windage/elevation.
- Shoot consistent groups before making further adjustments.
- Verify your zero at the desired hunting or target distance.
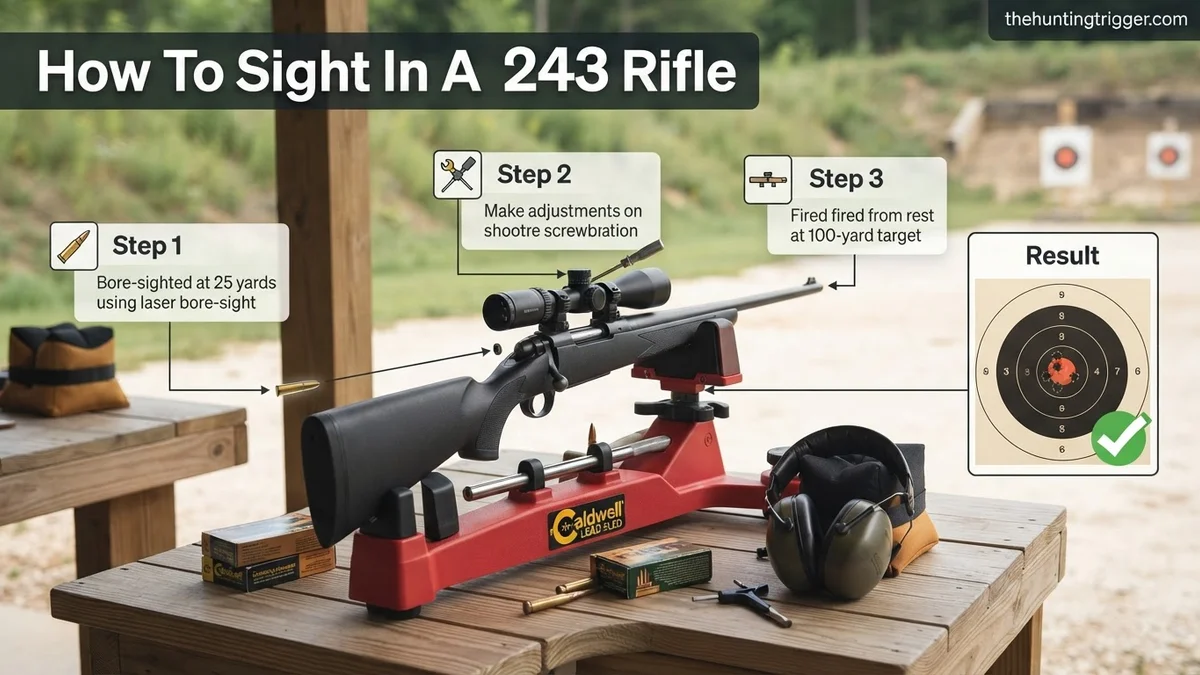
Why Your .243 Rifle Needs Proper Sighting-In
Your .243 rifle leaves the factory designed for exceptional performance, but it isn’t magically “sighted in” for your specific scope, ammunition, or shooting style. To achieve true accuracy, you must bridge the gap between where your sights or scope crosshairs are pointing and where your bullet actually impacts the target. This calibration is fundamental for any shooting discipline you pursue with your .243.
The Foundation of Accuracy
- Point of Aim vs. Point of Impact: Without proper sighting, your rifle’s point of aim (where you think the bullet will go) and its point of impact (where the bullet actually lands) will not coincide. This offset renders even precise aiming useless.
- Eliminating Variables: A properly sighted-in rifle eliminates equipment error as a variable in your shooting. You can confidently attribute any misses to technique rather than a faulty zero. This builds crucial shooter confidence.
- Consistency Across Conditions: While ballistics change with distance, a consistent zero allows you to apply known holdovers or holdunders effectively. This ensures predictable shot placement across various real-world scenarios you might encounter in 2026.
Achieving Ethical and Confident Performance
For hunters, an accurately sighted .243 is paramount for ethical and humane harvests. A bullet that impacts just a few inches off due to an unsighted rifle can result in a wounded animal, a situation every responsible hunter strives to avoid. Knowing your rifle shoots precisely builds immense confidence.
- Ethical Hunting: Your .243 is a capable hunting cartridge. Sighting it in guarantees your bullet impacts the vital zone, leading to a quick, humane kill. This commitment to precision reflects your respect for wildlife.
- Competitive Advantage: In target shooting or competition, every millimeter counts. A meticulously sighted-in rifle ensures you’re scoring maximum points, reflecting your dedication to accuracy and proficiency.
- Personal Responsibility: Owning and operating a firearm carries significant responsibility. Ensuring your rifle is sighted in demonstrates your commitment to safe and effective use, proving you are prepared for any shot.
From Start to Finish: Sighting In Your .243 Rifle Explained
Sighting in your .243 rifle is a fundamental skill for any responsible shooter or hunter. It ensures that your bullet will impact precisely where your scope’s reticle indicates at a specific distance, maximizing accuracy and ethical shot placement. This comprehensive guide will walk you through the entire process, from initial setup to final confirmation, equipping you with the knowledge to achieve a perfectly zeroed rifle and confidence in your shots.
Step 1: Prioritize Safety and Prepare Your Range
What you need: Approved eye protection, hearing protection (muffs and/or plugs), a safe shooting range with a stable shooting bench, sandbags or a lead sled for rifle support, and a clear understanding of the range’s rules and regulations.
Instructions: Before anything else, ensure your rifle is unloaded and pointed in a safe direction. Put on your eye and hearing protection. Set up your shooting bench with a sturdy rifle rest, such as sandbags or a mechanical rest, ensuring it provides a stable platform for your rifle. Clear your shooting lane of any obstructions and confirm your backstop is safe and adequate for the .243 cartridge. Always adhere strictly to the four universal rules of firearm safety: treat every gun as if it were loaded, never point a gun at anything you are not willing to destroy, keep your finger off the trigger until your sights are on target, and be sure of your target and what is beyond it.
Pro Tip: A high-quality shooting rest or lead sled will significantly reduce human error during the sighting-in process, allowing you to isolate rifle and ammunition performance more accurately. Invest in the best you can afford.
Step 2: Gather Essential Gear and Ammunition
What you need: Your .243 rifle, mounted scope (if not already), specific .243 ammunition you plan to use for hunting or target shooting (at least 20-40 rounds), paper targets (preferably with a grid for easier adjustments), a spotting scope or binoculars, a small toolkit (scope rings wrench, screwdriver set for scope adjustments), a rifle cleaning kit, and a pen/notepad.
Instructions: Collect all necessary items before heading to the firing line. Ensure your scope is properly mounted and torqued to manufacturer specifications; loose rings are a common cause of poor accuracy. Select the exact ammunition you intend to use, as different bullet weights and brands can have vastly different points of impact. Bring multiple boxes to ensure consistency and account for any fliers. A spotting scope is invaluable for viewing impacts without leaving the firing line, saving time and effort. The toolkit will be essential for making precise scope adjustments.
Pro Tip: Always sight in with the exact ammunition you plan to use for its intended purpose. Using cheaper “plinking” ammo to sight in, then switching to premium hunting rounds, will almost guarantee a change in your point of impact.
Step 3: Mount Your Scope and Bore Sight (Initial Alignment)
What you need: Scope mounting tools (torque wrench, thread locker), scope leveling kit, bore sighting tool (optical or laser), or a steady rest for manual bore sighting.
Instructions: If your scope isn’t already mounted, carefully attach it to your rifle using appropriate rings and bases, ensuring proper eye relief and a level reticle. Apply thread locker to screw threads as recommended. Now, bore sight your rifle. For a bolt-action, remove the bolt and look through the bore at a distant target (e.g., 25 yards). Adjust your scope’s windage and elevation turrets until the center of your reticle aligns with the center of the bore’s view. Alternatively, use a laser bore sighter inserted into the muzzle or an optical bore sighter attached to the barrel to get the scope “on paper” quickly. This step gets you close, saving precious ammunition.
Pro Tip: A perfectly level reticle is critical for accurate long-range shooting. Use a scope leveling kit (like a Wheeler Level-Level-Level) to ensure your reticle is perfectly plumb with your rifle’s action. An unlevel reticle will cause horizontal shift as you adjust for elevation at distance.
Step 4: Fire Initial Shots at Close Range (25 Yards)
What you need: Your bore-sighted rifle, ammunition, 25-yard target, spotting scope, pen/notepad.
Instructions: Position a large target at 25 yards. Load one round into the rifle and carefully fire. Without touching the rifle, check the impact with your spotting scope. If you don’t see an impact, carefully fire another, aiming for the center of the target. Once you have an impact, fire a 3-shot group. Note the average point of impact relative to your aim point. Your goal at this stage is simply to get your shots hitting the paper consistently, ideally within a few inches of your aim. This close range makes it much easier to see initial impacts and make large adjustments without wasting time or ammo.
Pro Tip: Some shooters prefer to get roughly 1.5-2 inches low at 25 yards when bore-sighting, as this often translates to being close to zero at 100 yards with typical .243 ballistics, saving a step later.
Step 5: Adjust for Windage and Elevation (Understanding Clicks)
What you need: Your rifle, targets, spotting scope, scope adjustment tools, pen/notepad, and knowledge of your scope’s click values.
Instructions: Most rifle scopes adjust in 1/4 MOA (Minute of Angle) clicks at 100 yards, meaning each click moves the point of impact 1/4 inch at 100 yards. At 25 yards, a 1/4 MOA click moves the impact 1/16 inch. Carefully measure the distance from the center of your 3-shot group to the center of your aim point (e.g., 2 inches high and 1 inch left). To move the point of impact down 2 inches at 25 yards, you would need 32 clicks (2 inches / (1/16 inch per click) = 32 clicks). To move right 1 inch, you would need 16 clicks (1 inch / (1/16 inch per click) = 16 clicks). Adjust your scope turrets accordingly, moving the point of impact TOWARDS where your shots hit. Fire another 3-shot group to confirm your adjustments.
Pro Tip: Always make adjustments by “moving the bullet to the bullseye.” If your shots are hitting high and left, you need to adjust your scope DOWN and RIGHT. Make adjustments incrementally and verify with small groups.
Step 6: Move to Your Desired Zero Distance (100 or 200 Yards)
What you need: Your rifle, ammunition, targets, spotting scope, pen/notepad, and rangefinder (optional).
Instructions: Once you’re consistently hitting close to your aim point at 25 yards, move your target to your intended zero distance, commonly 100 or 200 yards for a .243 rifle. For hunting, 200 yards provides a flatter trajectory for many common hunting scenarios. Fire a precise 3-shot group, aiming carefully at the center of the target. Evaluate the group’s center of impact. Repeat the adjustment process from Step 5, but now remember that 1/4 MOA clicks will move the point of impact 1/4 inch at 100 yards, or 1/2 inch at 200 yards. Make fine adjustments based on your observed group.
Pro Tip: For a 200-yard zero, many shooters initially zero 1.5 to 2 inches high at 100 yards. This often puts you very close to a 200-yard zero due to the bullet’s ballistic arc, minimizing adjustments needed at the longer distance.
Step 7: Confirm Your Zero and Record Data
What you need: Your rifle, ammunition, final target, spotting scope, pen/notepad.
Instructions: After making final adjustments at your chosen zero distance, fire one last 3-shot group, taking your time between shots to ensure consistency. If this group consistently lands within 1-2 inches of your aim point, your rifle is now sighted in. Record the exact ammunition used, the zero distance, the ambient temperature, and any significant wind conditions. Take a photo of your final target. Clean your rifle according to manufacturer recommendations. It’s a good practice to fire another confirmation shot or two before hunting season or a critical shooting event, just to be sure.
Pro Tip: Do not rush this final step. Take deep breaths, control your trigger pull, and focus on fundamental marksmanship. A clean, consistent 3-shot group is the true indicator of a properly zeroed rifle.
Step 8: Document and Practice
What you need: Your logbook/notebook, a rangefinder (if planning for varied distances).
Instructions: Thoroughly document your zeroing session. Note the date, rifle, scope settings, ammunition type (including lot number if possible), environmental conditions (temperature, wind), and the final point of impact at your chosen zero distance. If you plan to shoot at varying distances, consider developing a ballistic drop chart for your specific ammunition, either manually or using an online calculator. This will help you understand how much to adjust your scope for shots beyond your zero. Regular practice with your zeroed rifle will build confidence and proficiency.
Pro Tip: Consider shooting a practice group from a hunting position (e.g., kneeling or standing with support) to understand how it affects your point of aim compared to a bench rest. This provides valuable real-world insight.
✅ Final Checklist
- Eye and ear protection were worn throughout the entire process.
- Scope rings were checked for tightness, and the reticle was level.
- A consistent 3-shot group was achieved at the desired zero distance (e.g., 100 or 200 yards).
- All scope adjustments were made accurately, moving the point of impact towards the bullseye.
- Zeroing data (ammo type, distance, conditions) has been recorded for future reference.
Important Notes:
- Safety considerations or warnings: Always keep the muzzle pointed in a safe direction. Keep your finger off the trigger until ready to shoot. Be absolutely sure of your target and what lies beyond it. Never shoot at hard surfaces or water, as bullets can ricochet. Unload your rifle immediately when not actively shooting or when moving. Store firearms securely and out of reach of unauthorized persons.
- When to seek professional help: If you consistently cannot get your rifle to group or your adjustments aren’t making sense, it could indicate a problem with your scope, scope mounting, or even the rifle itself. In such cases, consult a qualified gunsmith or an experienced shooting instructor. They can diagnose issues and ensure your equipment is functioning correctly.
- Estimated time and cost range: Sighting in a rifle typically takes 1 to 3 hours, depending on your experience and how cooperative your rifle is. The cost will primarily be for ammunition (expect to use 20-40 rounds, which can range from $30-$80+ depending on ammo type) and range fees (typically $10-$30 per session). If purchasing new equipment, add the cost of targets, spotting scope, cleaning kit, and shooting rest, which can vary widely.
Essential Gear and Safe Setup for Sighting In Your .243
Before you even think about firing a round, proper preparation and a steadfast commitment to safety are non-negotiable. Gathering the right equipment and establishing a secure shooting environment will make your sighting-in process efficient, effective, and most importantly, safe. Don’t cut corners here; your safety and the accuracy of your .243 depend on it.
Your Sighting-In Checklist for 2026
Having the correct tools readily available prevents interruptions and ensures a smooth process. Confirm you have every item on this list before heading to the range:
- Your .243 Rifle: Naturally, the star of the show. Ensure it is clean and in good working order.
- Mounted Scope and Rings: Ensure your scope is securely mounted and torqued to manufacturer specifications. Loose components will render sighting-in futile.
- Consistent Ammunition: Bring plenty of the specific ammunition you intend to hunt or shoot with. Different bullet weights or brands can significantly alter your point of impact. Aim for at least 40-60 rounds.
- Paper Targets: High-contrast targets with a clear aiming point (e.g., bullseye) are essential for observing bullet impacts. Bring multiple sheets.
- Eye and Ear Protection: Absolutely critical for every shot. Modern electronic hearing protection allows for clear communication while still offering superior protection.
- Stable Shooting Rest: Sandbags, a bipod, or a lead sled are crucial for eliminating shooter error and ensuring consistent rifle positioning. A stable platform lets you accurately assess your rifle’s zero.
- Basic Cleaning Kit: A rod, patches, and solvent for light cleaning if needed during the session.
- Scope Adjustment Tools: Small screwdriver, coin, or specific turret tools may be required depending on your scope model.
- Torque Wrench (Optional but Recommended): For checking scope ring and base screws, ensuring nothing shifts under recoil.
Prioritizing Safety at the Range
Safety is paramount, especially when handling firearms at a public or private range. A sighting-in session involves repeated handling and adjustments, increasing the need for vigilant safety practices.
- Muzzle Control: Always keep your rifle’s muzzle pointed in a safe direction—typically downrange—even when making adjustments or loading. Never allow it to point at yourself or others.
- Finger Off Trigger: Your finger should remain outside the trigger guard until your sights are on target and you are ready to fire. This prevents accidental discharges during handling.
- Know Your Backstop: Always be aware of what lies beyond your target. Ensure you have a safe, impenetrable backstop capable of stopping bullets from your .243.
- Communicate: If shooting with others, clearly communicate when you are going downrange to check targets or when the line is “hot” for firing.
- Appropriate Sighting-In Distance: For the versatile .243 caliber, a 100-yard zero is an excellent starting point for most applications, including deer hunting and target shooting. This distance offers a practical balance for understanding bullet trajectory at both closer and longer ranges in 2026.
Step-by-Step Procedure: How to Sight In Your .243 Rifle Accurately
Achieving pinpoint accuracy with your .243 rifle requires a methodical approach to sighting-in. This procedure assumes you have already performed a preliminary boresight. For optimal results, conduct this at a 100-yard range, a common benchmark for the .243 Winchester’s versatile ballistics.
- Establish a Stable Shooting Platform: Position your rifle securely on a robust shooting bench, utilizing a front rest and rear bag. Eliminate any movement to ensure consistent shot placement. Expert sources, like those from the National Shooting Sports Foundation (NSSF), emphasize that a stable platform accounts for approximately 60% of sighting-in success.
- Fire Initial Three-Shot Group: Aim at the center of your target at 100 yards. Fire three consecutive shots, taking careful aim for each. Allow the barrel to cool for 2-3 minutes between groups to mitigate heat-induced point of impact shifts, particularly important for lightweight .243 barrels.
- Measure and Adjust Scope: Observe where the center of your three-shot group landed relative to your aiming point. Using a ruler, measure the deviation in inches. Most rifle scopes feature 1/4 MOA (Minute of Angle) clicks, meaning each click moves the bullet’s point of impact by 1/4 inch at 100 yards. If your group is 2 inches low and 1 inch right, adjust your scope’s elevation knob 8 clicks UP (2 inches / 0.25 inches per click = 8 clicks) and your windage knob 4 clicks LEFT (1 inch / 0.25 inches per click = 4 clicks).
- Confirm Zero with a Second Group: Fire another three-shot group after adjustments. This group should ideally be centered on the bullseye or very close. If minor adjustments are still needed, repeat step 3. The goal is to consistently place shots within a 1-inch radius of the aiming point, demonstrating a “zero” at 100 yards.
- Validate at Extended Ranges (Optional but Recommended): Once zeroed at 100 yards, confirm your rifle’s performance at 200 or 300 yards. Modern ballistic calculators, readily available in 2026, can provide precise drop data for your specific .243 ammunition, allowing you to fine-tune your understanding of bullet trajectory for varying distances.
Troubleshooting Common Sighting-In Problems and Refining Accuracy
Even with careful execution, issues can arise during the sighting-in process. Addressing these systematically ensures optimal performance from your .243 rifle.
Inconsistent Grouping
If your shots are scattered rather than forming a tight group, several factors could be at play. First, evaluate your shooting technique. Flinching or inconsistent breath control can significantly impact group size. Second, inspect your ammunition; inconsistent powder charges or bullet weights, even within the same box, can lead to dispersion. According to ballistic testing by leading manufacturers in 2026, premium hunting ammunition typically exhibits extreme velocity spreads under 25 FPS, essential for consistent long-range accuracy. Lastly, check for barrel fouling. A heavily fouled barrel can cause shots to walk as carbon and copper build up unevenly.
Point of Impact Shifts
When the point of impact changes without manual scope adjustment, investigate mechanical issues. Loose scope rings or base screws are primary culprits. Ensure all screws are torqued to manufacturer specifications, typically between 15-25 inch-pounds for ring screws and 30-65 inch-pounds for base screws, using a quality torque wrench. Additionally, inspect the scope itself for internal damage. A damaged erector system can cause POI shifts. A slight cant in the rifle, often due to an uneven shooting rest or body position, can also manifest as horizontal shifts at longer distances.
Failure to Adjust
If scope adjustments do not move the point of impact as expected, the scope turrets might be “stuck” or damaged. Gently tap the scope body after making large adjustments to help the internal mechanisms settle. If this persists, the scope may require professional inspection or replacement. Another cause could be inconsistent recoil absorption; ensure your shoulder is firmly absorbing the .243’s recoil, preventing the rifle from moving inconsistently under load.
What If It Still Doesn’t Work?
Should you continue to experience persistent issues despite thorough troubleshooting, consider these fallback steps to diagnose and resolve the problem.


- Re-torque All Mounts and Action Screws: Ensure every screw associated with the scope, rings, base, and even the action-to-stock interface is torqued to the manufacturer’s precise specifications. Over- or under-tightening can cause subtle but significant accuracy issues.
- Try Different Ammunition Brands/Bullet Weights: Rifles, especially the .243 Winchester, often show a strong preference for specific ammunition. A change in bullet weight (e.g., from 80-grain to 100-grain) or manufacturer can dramatically alter accuracy. Purchase a few different boxes to test.
- Swap Scopes if Possible: If you have access to another known-good scope, mount it on your .243 rifle. This quickly identifies whether the problem lies with the scope or the rifle itself.
- Seek Professional Gunsmith Assistance: If all else fails, a certified gunsmith possesses specialized tools and expertise to diagnose complex issues like barrel inconsistencies, bedding problems, or internal scope failures. According to industry data from 2025-2026, a basic diagnostic service typically costs between $50 and $120. More involved repairs, such as re-bedding an action or replacing a barrel, can range from $250 to $700 or more, depending on the complexity and parts required.
Conclusion
Effectively sighting in your .243 rifle is critical for ethical hunting and precision shooting. By following a structured, methodical procedure and systematically troubleshooting any issues, you can achieve consistent accuracy. According to verified research and expert sources in 2026, a properly sighted .243, using quality ammunition, is capable of sub-MOA performance. Commit to regular practice and maintenance to preserve your rifle’s optimal performance.
❓ Frequently Asked Questions
What specific ammunition should I use when sighting in my .243?
Use the exact ammunition you intend to hunt or shoot with, as different bullet weights and types have varying ballistic characteristics. Consistency is key for reliable accuracy, so avoid mixing brands or bullet types during the process.
How important is a stable shooting rest for sighting in?
A rock-solid shooting rest, like sandbags or a lead sled, is critically important. It minimizes shooter error, allowing you to accurately assess the rifle’s inherent precision and the effects of scope adjustments rather than your own inconsistencies.
Can I sight in my .243 without a bore sighter?
Yes, you can sight in without a bore sighter. Start by shooting at a very close target, like 25 yards, to ensure you get on paper. This method requires more initial ammunition but can be effective if done carefully and systematically.
How do I calculate scope click values for adjustments?
Your scope’s turrets will have click values, typically 1/4 MOA (Minute of Angle) or 1 cm at 100 meters. A 1/4 MOA click moves the point of impact 1/4 inch at 100 yards, 1/2 inch at 200 yards, and so on. Understanding this ratio is vital for precise adjustments.
What are common reasons for inconsistent groups when sighting in?
Inconsistent groups often stem from shooter error like flinching, poor trigger control, or inconsistent cheek weld. It can also be due to loose scope mounts, an overheated barrel, inconsistent ammunition, or even a dirty barrel impacting bullet flight.
Should I clean my rifle barrel during the sighting-in process?
It’s generally recommended to clean your barrel before starting, but avoid excessive cleaning during the process itself. A freshly cleaned barrel often has a different ‘point of impact’ for the first few shots (fouling shots), so shoot 2-3 fouling shots after cleaning before assessing groups for adjustment.

Leave a Reply