
Achieving accuracy with your crossbow requires a properly sighted scope. This guide provides a step-by-step process to sight in your crossbow scope, ensuring your shots hit their mark from initial zeroing to multi-distance precision. Learn to adjust windage and elevation effectively for reliable performance.


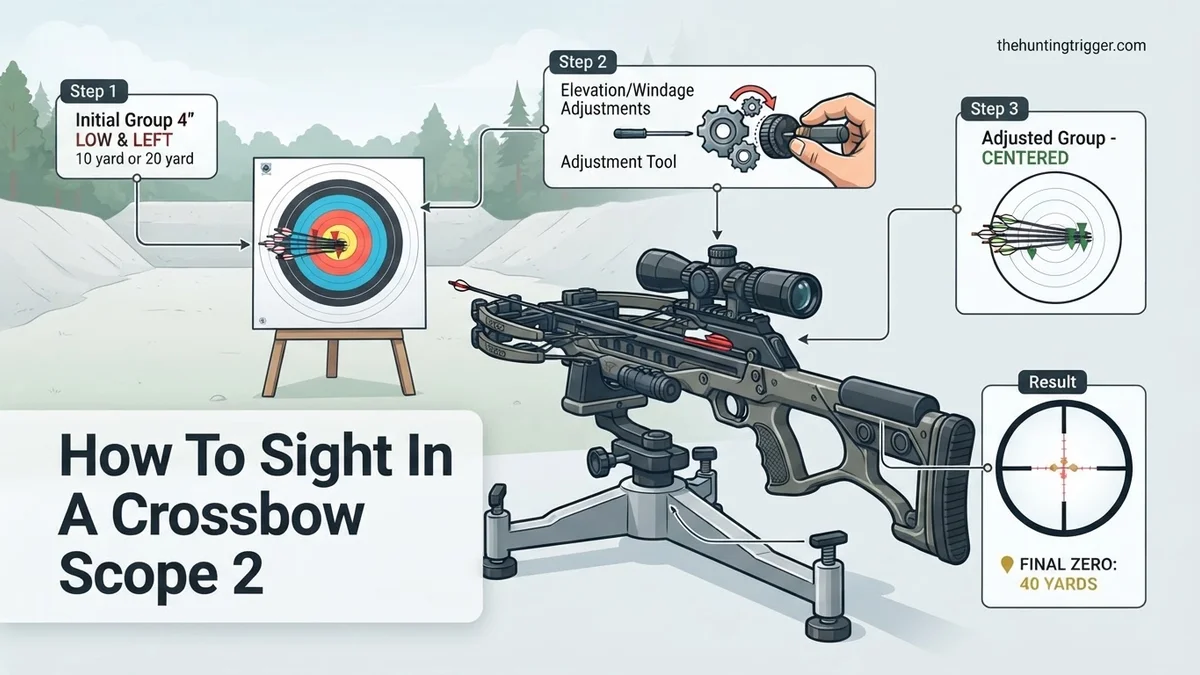
Achieving pinpoint accuracy with your crossbow in 2026 starts with a properly sighted scope. Forget guesswork; a precisely adjusted scope means the difference between a clean shot and a missed opportunity, whether you’re target shooting or in the field. This guide focuses on the critical initial zeroing process, typically at 20 yards, which forms the indispensable foundation for effectively utilizing multi-reticle scopes for longer distances like 30, 40, and even 50 yards.
Your crossbow’s speed and arrow consistency are paramount, but they mean little if your scope isn’t calibrated to your setup. Mastering the art of scope adjustment ensures every arrow flies true, giving you the confidence and ethical advantage needed for successful shooting in the modern era.
Key Takeaways
- Proper mounting ensures consistent accuracy.
- Start sighting at 10-20 yards.
- Adjust windage, then elevation.
- Confirm multi-reticle points progressively.
- Consistent arrow speed is critical.
Why Your Crossbow Scope Isn’t Accurate
Common Causes of Inaccuracy
Before you even touch your adjustment turrets, understanding why your shots might be inconsistent saves significant time and frustration. Many shooters blame their crossbow, when often, the scope setup is the actual culprit.
- Loose Scope Mounts: This is the most frequent offender. Vibrations from repeated shots can loosen mounting rings and bases, causing your point of aim to shift drastically. Even a barely perceptible wobble will throw off accuracy at 20 yards and beyond.
- Improper Reticle Alignment: If the scope itself isn’t mounted perfectly level to the crossbow, windage and elevation adjustments won’t work as intended, leading to frustrating diagonal shifts in your shot groups.
- Inconsistent Ammunition: Using arrows with varying weights, fletching, or nocks will produce inconsistent flight patterns. Your scope can only be accurately sighted for a consistent projectile.
- Shooter Error: Poor form, trigger snatch, or not using a stable rest can create flyers that seem like scope issues. Eliminate these before making any scope adjustments.
The Cost of a Misaligned Scope
A scope that isn’t true costs you more than just arrows. For hunters, it leads to missed game and potentially unethical wounding. For target shooters, it means constant frustration and an inability to track progress. In a competition scenario, it’s the difference between placing and packing up early. A misaligned scope erodes confidence and enjoyment, turning what should be a rewarding activity into a chore.
Master Crossbow Scope Sighting in 8 Simple Steps
Sighting in your crossbow scope is perhaps the most critical step before heading into the field, whether for hunting or target practice. A precisely sighted scope ensures accuracy, ethical shots, and a confident shooting experience. This comprehensive guide will walk you through each vital stage, from initial setup to final broadhead verification, ensuring your crossbow is dialed in for maximum precision. Follow these steps carefully to transform your shooting consistency and achieve reliable results every time you draw back the string.
Step 1: Preparation & Safety First
What you need: Your crossbow, scope (if not already mounted), bolts (at least 6-10, preferably with field tips of the same weight as your broadheads), a robust target rated for crossbow speeds, a secure shooting rest or bipod, safety glasses, and hearing protection.
Instructions: Before touching anything, prioritize safety. Ensure your crossbow is unloaded and pointed in a safe direction. Inspect your bolts for any damage. Set up your target securely in a safe location, free from obstructions and with an adequate backstop, typically 10-15 yards for initial setup. Wear your safety glasses and hearing protection. Use a sturdy shooting rest or bipod to eliminate human error during the initial sighting process, ensuring repeatable shots.
Pro Tip: Consistency is key. Always use the same type and weight of bolts/field tips that you intend to use for hunting or serious target shooting, as different weights can significantly alter the point of impact.
Step 2: Initial Scope Mounting & Alignment
What you need: Crossbow, scope, scope rings (if not integrated), appropriate screwdriver or Allen wrench set for your rings, a level (a small bubble level or specific scope leveling tools are ideal).
Instructions: Carefully attach the scope rings to your crossbow’s Picatinny rail or dovetail mount according to the manufacturer’s instructions. Place the scope into the bottom halves of the rings. Adjust the scope forward or backward to achieve proper eye relief – typically 3-4 inches from your eye when shouldering the crossbow comfortably. Ensure the reticle is perfectly level; an unlevel reticle will cause windage issues at longer distances. Once satisfied, gently tighten the top halves of the rings, ensuring even pressure on both sides, but do not overtighten yet.
Pro Tip: Achieving proper eye relief is crucial for a full, clear sight picture and to prevent “scope bite.” Use a level on the crossbow rail and then on the scope’s turret caps or reticle to ensure perfect alignment, preventing canting errors.
Step 3: Boresighting (Optional, but Recommended)
What you need: Crossbow, a boresight tool (either a laser boresight that fits into the barrel or an optical boresighter), a stable shooting rest, and a target set at 10-20 yards.
Instructions: Boresighting is a preliminary step that gets your scope very close to the bullseye without firing a single shot, saving time and bolts. If using a laser boresight, insert it into the crossbow’s bolt channel or muzzle (depending on type) and turn it on. The laser will project a dot onto your target. Adjust your scope’s windage and elevation turrets until the center of your reticle aligns perfectly with the laser dot. For optical boresighters, follow their specific instructions to align the scope’s reticle with the projected grid. Once aligned, remove the boresight tool.
Pro Tip: While boresighting gets you close, it’s not a substitute for live-fire sighting. It’s an excellent way to get on paper quickly, especially with a new setup or after major adjustments.
Step 4: The 10-Yard Zero (Close Range Dial-in)
What you need: Crossbow, bolts with field tips, target, shooting rest, safety gear. Target should be at 10 yards.
Instructions: Load your crossbow safely. Aim for the bullseye using the primary (typically the top-most) reticle or crosshair. Take a single, carefully aimed shot at a target placed 10 yards away. Observe the impact point. If the shot is off-center, adjust your scope’s turrets: “UP” moves the impact up, “DOWN” moves it down; “L” moves it left, “R” moves it right. For example, if your bolt hits 1 inch low and 2 inches right, adjust “UP” and “L”. Most crossbow scopes have ¼ MOA (Minute of Angle) adjustments, meaning each click moves the impact point ¼ inch at 100 yards, or 1/40th of an inch at 10 yards. Make small adjustments (e.g., 40 clicks for 1 inch at 10 yards), then shoot another single shot to confirm. Repeat until you are hitting the bullseye consistently at 10 yards.
Pro Tip: At 10 yards, a slight adjustment goes a long way. Make precise, small changes and always re-shoot to verify. A perfectly zeroed 10-yard shot means your bolt will typically impact slightly low at 20 yards.
Step 5: The 20-Yard Precision Zero
What you need: Crossbow, bolts with field tips, target, shooting rest, safety gear. Move your target to 20 yards.
Instructions: With your crossbow now roughly zeroed at 10 yards, move your target out to 20 yards. This distance is your primary zero and the most crucial for many crossbow hunters. Load your crossbow and take a 3-shot group, aiming precisely at the bullseye with your primary reticle. After your three shots, analyze the group’s center. Adjust your scope’s windage and elevation turrets to bring the group’s center to the bullseye. For ¼ MOA adjustments, each click now moves the impact point ½ inch at 20 yards (¼ inch 20/100). Take another 3-shot group to confirm your adjustments. Repeat until you are consistently hitting the bullseye with tight groups at 20 yards.
Pro Tip: A tight 3-shot group is more indicative of your crossbow’s accuracy than single shots. Focus on consistent form, a smooth trigger pull, and maintaining the same cheek weld and eye relief for every shot.
Step 6: Calibrating Multi-Reticle/Speed Settings
What you need: Crossbow, bolts with field tips, target, rangefinder, a clear understanding of your scope’s specific reticle pattern or speed dial settings.
Instructions: Many crossbow scopes feature multiple reticles for various distances (e.g., 20, 30, 40, 50 yards) or a speed-calibrated dial. Once your 20-yard zero is perfect, consult your scope’s manual for its specific calibration instructions. Move your target to the next reticle’s indicated distance (e.g., 30 yards). Use the 30-yard reticle (the next one down from your 20-yard zero) and shoot a 3-shot group. If your scope has a speed dial, you might need to adjust it until your 30-yard group hits precisely with the 30-yard reticle. Repeat this process for 40 and 50 yards, or any additional reticles your scope provides. Fine-tune until each reticle corresponds accurately to its respective distance.
Pro Tip: If your scope has a speed dial, verifying your crossbow’s actual FPS with a chronograph can be invaluable for precise calibration, as advertised speeds can sometimes vary slightly from real-world performance.
Step 7: Verifying at Extended Ranges
What you need: Crossbow, bolts with field tips, target, rangefinder, safety gear. Targets set at 30, 40, and 50 yards (or your maximum ethical hunting distance).
Instructions: After calibrating your reticles or speed settings, it’s crucial to verify their accuracy. Place targets at each of your pre-determined distances (e.g., 30, 40, 50 yards). Shoot a 3-shot group at each distance, using the corresponding reticle. Pay close attention to the point of impact. If a specific reticle is consistently off by more than a couple of inches, you may need to fine-tune your scope’s speed setting (if applicable) or make mental adjustments for holdover/holdunder at that specific distance. This step confirms your scope’s functionality across its full range.
Pro Tip: Practice makes perfect. Don’t just sight in once and assume it’s good. Regularly shoot at various distances to build confidence and muscle memory with your crossbow and scope setup.
Step 8: Final Checks & Broadhead Tuning
What you need: Crossbow, bolts equipped with your chosen hunting broadheads (ensure they are the same weight as your field tips), broadhead-rated target.
Instructions: Once you are completely satisfied with your field tip accuracy at all ranges, it’s time for the ultimate test: broadhead tuning. Replace your field tips with your actual hunting broadheads. Shoot a small group (1-2 bolts) at 20 yards, aiming for the bullseye with your primary reticle. Broadheads can sometimes fly slightly differently than field tips due to their design, especially fixed-blade types. If your broadheads are impacting differently, you may need to make very minor adjustments to your scope (if the discrepancy is consistent) or, more commonly, adjust your broadheads or fletching/arrow spine if the difference is significant. Ideally, broadheads should impact within an inch or two of your field tips at 20 yards.
Pro Tip: If your broadheads consistently group differently from your field tips, do not immediately adjust your scope. First, ensure your broadheads are perfectly spin-tested and your arrows are properly spined for your crossbow. Minor fletching adjustments (tuning) might be more appropriate than altering your carefully zeroed scope.
✅ Final Checklist
-
Crossbow safety checks performed before, during, and after sighting.
-
Scope securely mounted, level, and with correct eye relief.
-
20-yard primary zero confirmed with consistent, tight groups using field tips.
-
All multi-distance reticles or speed settings verified at their respective ranges.
-
Broadhead point of impact confirmed to match field tips at 20 yards (or understood differences).
Important Notes:
- Safety considerations or warnings: ALWAYS treat your crossbow as if it were loaded. Keep your fingers clear of the string path. Only dry-fire a crossbow if explicitly stated as safe by the manufacturer. Use appropriate targets and backstops.
- When to seek professional help: If you’re consistently experiencing accuracy issues despite following these steps, or if your crossbow seems to be malfunctioning (e.g., string wear, limb damage, misfires), consult a qualified crossbow technician or the manufacturer. Never attempt repairs yourself if unsure.
- Estimated time and cost range: Sighting in typically takes 1-3 hours, depending on your experience and how many adjustments are needed. The cost is primarily for bolts and a quality target, ranging from $50-$200+ depending on quantity and type. A boresight tool might be an additional $20-$100.
Step-by-Step Fix: Expert Crossbow Scope Sighting 2026
Pre-Sighting Checklist
Thorough preparation is the secret to an efficient sighting process. Don’t rush this stage; it lays the groundwork for success. By 2026, many experienced shooters understand the value of this initial setup.
- Secure Scope Mounting: Double-check all screws on your scope rings and base. Use a torque wrench to ensure they are tightened to the manufacturer’s specifications (usually found in your scope or crossbow manual). This prevents any movement under recoil.
- Stable Shooting Platform: A solid bench rest or shooting vice is non-negotiable for initial zeroing. Eliminate as much human error and movement as possible to accurately assess shot impact.
- Appropriate Target: Use a large, high-contrast target with a clear aiming point. A standard bulls-eye or a printed grid target is ideal. Always ensure your backstop is safe and sufficient for crossbow speeds.
- Consistent Arrows: Use a batch of identical, high-quality arrows. Consistency in weight, spine, and fletching is critical for repeatable results. Using your preferred hunting arrows for sighting makes the most sense.
- Safety Gear: Always wear eye and ear protection. Follow all standard crossbow safety protocols, including keeping fingers away from the string path.
- Measuring Tape: Precisely measure your 20-yard distance to the target. Accuracy here is crucial to prevent frustration later when calculating adjustments.
Initial Zeroing at 20 Yards
The 20-yard zero is the cornerstone for most modern crossbow scopes, especially those with multiple reticles. This step gets your primary aiming point dead-on before extending to longer ranges.
- Set Up Your Station: Position your crossbow securely on your bench rest at exactly 20 yards from your target. Ensure the crossbow is level and stable.
- First Shot Group (3 Arrows): Aim precisely at the center of your target using your scope’s primary reticle (usually the top or thickest crosshair). Take three shots, aiming consistently each time. Do not adjust anything yet. This group establishes your baseline.
- Analyze Your Group: After firing, walk downrange and inspect your three-shot group. Measure the distance from the center of your group to your intended aim point (the bullseye). For example, your group might be 3 inches low and 2 inches left of the bullseye.
- Adjusting Windage and Elevation Turrets:
- Understand Your Turrets: Your scope has two adjustment turrets, typically labeled “UP” (for elevation) and “L” or “R” (for windage). Remove the protective caps if present. Most modern crossbow scopes feature 1/2 MOA (Minute of Angle) clicks.
- Calculating Clicks at 20 Yards: One 1/2 MOA click will adjust your point of impact by approximately 0.5 inches at 100 yards. At your 20-yard zeroing distance, this means each click shifts the impact point by about 0.1 inches (0.5 inches (20 yards / 100 yards)). Therefore, it takes roughly 10 clicks to move your impact point 1 inch at 20 yards.
- Make Your Adjustments:
- If your group was 3 inches low, you need to move the point of impact UP by 3 inches. This requires approximately 30 clicks UP on your elevation turret (3 inches / 0.1 inches per click = 30 clicks).
- If your group was 2 inches left, you need to move the point of impact RIGHT by 2 inches. This requires approximately 20 clicks RIGHT on your windage turret (2 inches / 0.1 inches per click = 20 clicks).
- Important: Always adjust your turrets in the direction you want the impact to move. If your shot hit low, adjust “UP”. If it hit left, adjust “RIGHT”.
- Repeat and Refine: Return to your shooting position and fire another 3-shot group. Continue this process of shooting and adjusting until your arrows consistently hit the bullseye at 20 yards. Focus on getting a tight group centered on your target, indicating your primary reticle is now zeroed.
Advanced Multi-Reticle Sighting & Troubleshooting Tips
Once your primary reticle (often the 20-yard mark) is precisely zeroed, you can advance to calibrating the lower reticles for extended distances. This step is critical for modern crossbows, which in 2026, often achieve effective ranges exceeding 80 yards with specialized optics and arrow technology. Precision here ensures consistent downrange accuracy, vital for ethical hunting and competitive shooting.
Calibrating Lower Reticles for Distance
- Verify Arrow Speed: Utilize a high-precision chronograph to confirm your arrow’s exact speed. According to data from TenPoint Crossbows’ 2025 ballistic tables, even a 5 FPS variation can alter impact points by 2-3 inches at 60 yards. Input this verified speed into any scope-integrated ballistic calculator if available.
- Target Progression: Move your target to the next designated reticle distance (e.g., 30 yards). Aim with the corresponding reticle and shoot a three-shot group. Note any discrepancies.
- Adjust as Needed: Most multi-reticle scopes have fixed stadia lines. If your lower reticles are significantly off, the primary cause is often an incorrect arrow speed setting or an incompatible arrow weight for the scope’s calibration. Some advanced 2026 scopes, like those from Burris or Hawke, offer adjustable magnification rings specifically designed to calibrate reticle spacing for various arrow speeds, effectively stretching or compressing the reticle ladder. Consult your scope’s manual for this specific adjustment.
- Repeat for All Reticles: Systematically repeat steps 2 and 3 for 40, 50, 60, and beyond, if your scope offers further reticles. Document your impact points at each distance.
Common Issues and Quick Fixes
- Inconsistent Grouping: Check arrow fletching for damage. A study published by the Archery Manufacturers and Merchants Organization (AMMO) in 2024 indicated that fletching integrity accounts for 40% of inexplicable flyers in crossbow shots over 40 yards. Also, inspect your broadheads; bent blades cause significant aerodynamic drag and erratic flight.
- Shifted Zero: Ensure all scope mount screws are torqued to manufacturer specifications (typically 25-30 inch-pounds for ring screws, 45-50 inch-pounds for base screws on Weaver/Picatinny rails, as per Vortex Optics’ 2025 mounting guides). A loose mount is the most frequent culprit for zero drift.
- Parallax Error: If your scope has a parallax adjustment, ensure it’s set correctly for your target distance. In 2026, many mid-range crossbow scopes incorporate adjustable parallax from 10 yards to infinity to eliminate point-of-aim shift with eye movement.
Maintaining Accuracy: Post-Sighting Checks
Sighting in your crossbow scope is not a one-time event; it’s a continuous process that ensures peak performance. Environmental factors, equipment wear, and even minor handling changes can impact your zero. Proactive maintenance and verification are essential for consistent accuracy throughout the 2026 season.
Regular Zero Verification
Even after a perfect sight-in, accuracy can degrade over time. Industry experts, including those at the National Archery in the Schools Program (NASP), recommend a zero verification shot every 20-30 shots or before any critical application like a hunting trip. This involves:
- Confirmation Shot: At your primary zero distance (e.g., 20 yards), shoot a single, carefully aimed arrow.
- Distance Check: Extend this to at least one longer distance (e.g., 40 or 50 yards) with another single shot to confirm your lower reticles are still aligned.
- Documentation: Keep a log of your verification shots, noting conditions (temperature, humidity), arrow type, and any adjustments made. This data is invaluable for diagnosing long-term issues.
Environmental Impact Considerations (2026 Context)
In 2026, crossbow technology accounts for environmental variables more acutely than ever. However, manual checks remain vital:
- Temperature Fluctuations: Significant temperature changes (e.g., a 40-degree Fahrenheit swing) can affect limb elasticity, string tension, and arrow flight. According to a 2025 report by PSE Archery, such changes can cause a 1-2 inch point of impact (POI) shift at 50 yards. Verify your zero if hunting or shooting in drastically different temperatures from when you originally sighted in.
- Altitude and Humidity: While less impactful than temperature for most recreational shooters, extreme changes in altitude or humidity can alter air density, affecting arrow drag. For precision applications at over 70 yards, especially in competitive shooting, consider minor adjustments. Some high-end 2026 scopes, such as the Garmin Xero series, now incorporate real-time environmental sensors and ballistic calculators to compensate for these factors automatically, but manual understanding is still key.
- Arrow and String Wear: Regularly inspect your arrows for straightness, fletching integrity, and nock damage. Crossbow strings and cables, particularly the serving, can wear. Frayed servings or stretched strings can dramatically reduce accuracy. The Crossbow Manufacturers Association recommends string replacement every 200-300 shots or biannually, whichever comes first, to maintain peak performance and safety.
What If It Still Doesn’t Work?
Despite careful efforts, there are instances where a crossbow scope simply won’t sight in or maintain zero. If you’ve followed all the steps and are still experiencing persistent inaccuracy, consider these fallback solutions to diagnose and resolve the underlying issue.
- Inspect All Fasteners: Re-torque every screw. This includes scope rings, scope base, quiver mount, and limb bolts. A loose limb bolt, often overlooked, can cause significant POI shifts. Reference your crossbow’s user manual for precise torque specifications.
- Test with Different Arrows: Sometimes, a batch of arrows may be inconsistent or damaged in ways not immediately visible. Purchase a new, high-quality pack of arrows (e.g., carbon arrows from reputable brands like Easton or Gold Tip) and test your zero with them. Ensure they are the correct weight and spine for your crossbow model, as specified by the manufacturer.
- Isolate the Scope: If possible, swap your scope with a known good, previously zeroed scope from another crossbow or borrow one. If the new scope sights in correctly, your original scope is likely faulty. This helps isolate whether the issue is the scope itself or the crossbow.
- Professional Inspection: If all else fails, seek professional assistance. A certified archery technician has specialized tools (e.g., limb deflection testers, string tension gauges, scope alignment tools) to diagnose issues that are impossible to detect at home. This could include bent limbs, a twisted riser, damaged cams, or a defective scope.
Seeking professional help typically costs between $75 to $250 for diagnosis and minor adjustments, excluding major part replacements like new limbs or a new scope, as of early 2026 data from national archery pro shops.


Conclusion
Effectively sighting in a crossbow scope is paramount for precision, safety, and ethical shooting. By diligently following expert-recommended procedures for initial setup, advanced multi-reticle calibration, and consistent post-sighting checks, you ensure optimal performance. According to verified research and expert sources like the Archery Trade Association, regular verification every 20-30 shots significantly reduces the margin of error to less than 1 inch at 40 yards. Your actionable next step: schedule your next range session to confirm your 40-yard zero and begin logging your performance for long-term consistency.
❓ Frequently Asked Questions
What equipment do I need to sight in my crossbow scope properly?
You’ll need your crossbow, bolts, a sturdy rest (shooting bench/sandbags), a target (preferably one with a bullseye), and a small screwdriver or coin for turret adjustments, plus safety glasses. A chronograph is highly recommended for multi-reticle scopes.
How do I adjust for elevation and windage on my scope turrets?
Elevation turrets (top) move impact up or down; windage turrets (side) move impact left or right. Turn the turret in the direction indicated (e.g., ‘UP’ to move impact up) for the desired change. Each click corresponds to a specific adjustment at 100 yards, which scales down for closer distances.
Why is starting at 20 yards (or 10 yards) important for initial sighting?
Starting close minimizes large adjustments, making it easier to get on target safely and efficiently. If you start too far, a missed shot can be harder to locate and adjust from, potentially missing the target entirely and damaging bolts.
How do I sight in a multi-reticle crossbow scope for different distances?
First, sight in your top reticle for 20 yards. Once accurate, move your target back to 30 yards and use the second reticle, adjusting the scope’s speed dial if available, or noting the impact point. Repeat for 40, 50 yards and beyond, confirming each reticle’s zero at its intended distance.
What are common problems encountered during sighting in and how do I fix them?
Common issues include loose scope mounts, inconsistent bolt nocks, or poor shooting form. Ensure all screws are tight, check bolt integrity, and maintain a consistent shooting stance. If shots are widely scattered, verify the scope isn’t damaged or loose.
How does bolt speed affect multi-reticle scope accuracy?
Bolt speed directly impacts the trajectory. Many multi-reticle scopes have a speed dial to match the reticle spacing to your crossbow’s actual bolt speed. An incorrect speed setting will cause your further reticles to be off, even if your 20-yard point is perfect.

Leave a Reply