
The Halo 4×32 crossbow scope’s yardage lines typically consist of horizontal stadia lines calibrated for specific distances, usually starting at 20 yards and progressing in 10-yard increments (e.g., 20, 30, 40, 50, 60). These lines provide quick aiming points for various target ranges based on the crossbow’s velocity.

📌 Key Takeaways
- Yardage lines are typically calibrated for 20-60 yards, with 10-yard increments, for crossbow velocities between 300-400 FPS.
- Accurately identify your crossbow’s velocity to match the scope’s ballistic reticle for precise aiming.
- Always ensure the scope is securely mounted and eye relief is correct to prevent injury during recoil.
- Improper zeroing or parallax adjustment is the most common cause of yardage line inaccuracy.
- If repeatable accuracy cannot be achieved after careful zeroing and troubleshooting, professional gunsmith calibration or scope inspection is advised.
The Halo 4×32 crossbow scope is engineered to provide precise aiming solutions for crossbow enthusiasts, hunters, and competitive shooters. At the heart of its utility are the meticulously designed yardage lines, which translate ballistic drop into intuitive aiming points. For equipment operators and technical personnel accustomed to precision systems, understanding the intricate configuration and practical application of these lines is paramount for achieving consistent accuracy. This comprehensive guide delves into the structural components, operational principles, and critical calibration processes surrounding the Halo 4×32 crossbow scope yardage lines. We will examine the ballistic drop compensating (BDC) reticle system, essential optical and mechanical components, and advanced troubleshooting techniques to ensure your equipment performs optimally in diverse conditions.
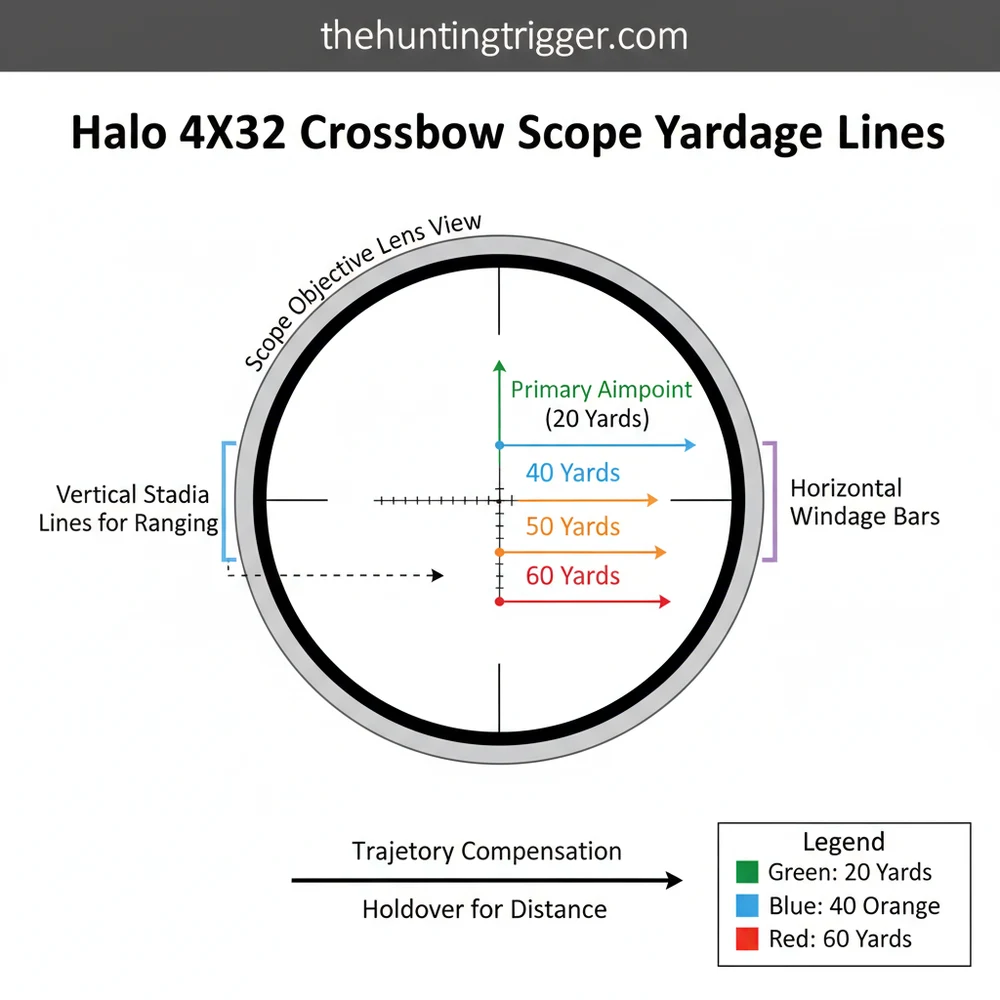
Deciphering the Halo 4×32 Crossbow Scope Yardage Lines: Ballistic Reticle Configuration

The core functionality of the Halo 4×32 crossbow scope yardage lines lies within its Ballistic Drop Compensating (BDC) reticle. Unlike a standard duplex reticle, which offers only a single aiming point, a BDC reticle incorporates multiple horizontal lines or dots below the primary crosshair. This sophisticated configuration is specifically calibrated to account for the parabolic trajectory of a crossbow bolt over varying distances, providing distinct aiming points for different ranges without requiring manual turret adjustments for each shot. For a technical audience, understanding this system’s inherent design for specific ballistic profiles is key to leveraging its full potential.
The BDC System Explained for Crossbow Applications
A BDC system on a Halo 4×32 crossbow scope is not a universal solution but a carefully engineered approximation. Crossbow bolts, due to their comparatively lower velocities and higher drag coefficients than rifle cartridges, exhibit significant ballistic drop. The BDC reticle anticipates this drop. After the initial zero (typically at 20 or 30 yards), subsequent lines represent progressively longer distances, such as 30, 40, 50, and 60 yards. Each line is positioned to align with the estimated point of impact for a bolt at that specific range, assuming a standard bolt velocity and weight for which the scope is pre-calibrated. Manufacturers like Halo typically design their BDC reticles for average crossbow speeds (e.g., 300-350 FPS), but precise matching to your specific crossbow system is critical for accuracy.
Understanding the Reticle Structure and Line Placement
The Halo 4×32 crossbow scope’s reticle often features a central aiming point (crosshair or dot) for the primary zero distance, followed by several stadia lines below it. These lines are typically spaced to represent 10-yard increments. The exact spacing and number of lines can vary slightly between models or production runs, emphasizing the importance of consulting your specific scope’s user manual. The reticle may also incorporate windage hashes or a vertical picket post to assist in lateral drift compensation, though the primary focus remains on vertical drop. The visual layout provides a quick reference, allowing the user to select the appropriate aiming line based on the estimated target distance, streamlining the shot process under field conditions.
How Crossbow Bolt Dynamics Influence Yardage Line Design
The effectiveness of the Halo 4×32 crossbow scope yardage lines is inextricably linked to the dynamics of the crossbow bolt. Factors such as bolt weight, diameter, fletching configuration, and the crossbow’s launch velocity (Feet Per Second, FPS) all significantly impact the bolt’s trajectory. A heavier bolt with lower velocity will exhibit more drop than a lighter, faster bolt. The BDC reticle’s design is a compromise, offering reliable compensation for a range of typical crossbow setups. Therefore, calibrating the scope to your specific bolt and crossbow combination is not merely a recommendation but a mandatory procedure. Deviations from the assumed ballistic profile can lead to significant point-of-impact errors, negating the advantage of the BDC system. For further reading on crossbow bolt dynamics, consult resources on external ballistics for archery equipment.
The BDC reticle in the Halo 4×32 is often engineered as a Second Focal Plane (SFP) reticle. This means the reticle’s apparent size remains constant regardless of magnification changes. Since the Halo 4×32 is a fixed 4x magnification, this distinction is less critical but still implies the yardage lines are accurate at that fixed magnification, not adjustable for other power settings common in variable scopes.
Halo 4×32 Crossbow Scope: Key Components and Internal Layout Overview
A comprehensive understanding of the Halo 4×32 crossbow scope’s physical structure and internal layout is crucial for its proper maintenance, mounting, and effective use of its yardage lines. Each component plays a vital role in optical performance, structural integrity, and the precise mechanical adjustments necessary for accurate targeting. This overview breaks down the essential parts, highlighting their function and contribution to the overall system.
Optical Component Identification: Objective and Ocular Lenses
At either end of the scope are the primary optical components: the objective lens and the ocular lens (eyepiece). The objective lens, located at the front of the scope, gathers ambient light and forms an inverted, real image within the scope body. Its 32mm diameter in the Halo 4×32 model indicates its light-gathering capability, influencing image brightness, especially in low-light conditions. Manufacturer specifications often highlight multi-coating applications on these lenses, which reduce glare and maximize light transmission. The ocular lens, or eyepiece, is what the user looks through. It magnifies the internal image formed by the objective lens, presenting an erect, virtual image to the eye. Proper eye relief—the optimal distance between the eye and the ocular lens—is critical for a full, clear field of view and safe operation, especially with the recoil of a crossbow.
The Main Tube and Its Structural Integrity
The main tube, typically constructed from aircraft-grade aluminum alloy, houses all internal optical and mechanical components. For the Halo 4×32, this tube is usually a 1-inch (25.4mm) or 30mm diameter, dictating the compatibility with mounting rings. Its robust construction ensures shock resistance from recoil and environmental durability. The tube is purged with inert gases like nitrogen or argon and O-ring sealed to prevent internal fogging and moisture ingress, a critical feature for reliability in varied outdoor conditions. The internal baffles within the tube help to reduce stray light and improve image contrast.
Turret Mechanisms and Their Role in Zeroing
The adjustment turrets, typically located on top (elevation) and the right side (windage) of the main tube, are essential for calibrating the Halo 4×32 crossbow scope yardage lines. These turrets allow precise, repeatable clicks to shift the reticle’s point of impact. Each click typically represents 1/4 MOA (Minute of Angle) at 100 yards, which translates to a specific adjustment value at shorter crossbow ranges (e.g., 1/4 MOA at 20 yards is 0.05 inches). The internal mechanical system of springs and detents ensures that once adjusted, the reticle maintains its position even under significant shock. Many Halo scopes feature tool-less, finger-adjustable turrets with audible and tactile clicks, enhancing user convenience during the zeroing process. OEM specifications often detail the total adjustment range, usually between 50-70 MOA for both windage and elevation.
Mounting System Considerations for Stable Performance
The interface between the scope and the crossbow, the mounting system, is as critical as the scope itself for maintaining yardage line accuracy. This typically involves scope rings and a mounting base (Picatinny or Weaver style). Proper torque specifications for ring screws are paramount to prevent scope movement under recoil while avoiding over-tightening, which can deform the main tube and affect optical performance. Manufacturer guidelines usually specify torque values, often between 15-20 inch-pounds for ring cap screws. A loose mount can introduce inconsistent point-of-impact shifts, rendering the yardage lines unreliable. Quality rings and a sturdy base, precisely installed, form a stable platform for consistent shot placement.
| Component | Primary Function | Typical Material/Spec |
|---|---|---|
| Objective Lens | Gathers light, forms initial image | Glass, multi-coated (e.g., FMC) |
| Ocular Lens | Magnifies image for viewer | Glass, multi-coated |
| Main Tube | Houses optics, structural integrity | Aircraft-grade aluminum (e.g., 6061-T6) |
| Adjustment Turrets | Windage/elevation control (e.g., 1/4 MOA) | Machined aluminum/brass internals |
| Reticle | Aiming points (BDC yardage lines) | Etched glass (preferred) or wire |
Calibrating Halo 4×32 Crossbow Scope Yardage Lines: Precision Zeroing Procedures
Achieving optimal accuracy with your Halo 4×32 crossbow scope yardage lines depends entirely on a meticulous zeroing and calibration process. This procedure ensures that the scope’s reticle aligns precisely with your crossbow’s ballistic output, compensating for bullet drop at various ranges. Deviating from these steps can lead to significant inconsistencies, especially when relying on the BDC lines for extended shots. This guide provides a step-by-step methodology for technical users to establish a precise zero.
Always wear appropriate eye protection when shooting. Ensure your crossbow is decocked or stored safely when not actively shooting. Follow all range safety protocols. Never dry-fire a crossbow without manufacturer-approved protection for the string and limbs.
Step 1: Initial Mount and Bore Sighting for Your Crossbow System
- Mount the Scope: Secure the Halo 4×32 scope onto your crossbow’s Picatinny or Weaver rail using high-quality rings. Ensure consistent eye relief by adjusting the scope’s position fore and aft. The reticle must appear level with the crossbow’s bore. Utilize a scope leveling tool for precise alignment.
- Torque Specifications: Adhere strictly to the scope ring manufacturer’s torque specifications, typically ranging from 15 to 20 inch-pounds for cap screws. Use a calibrated torque wrench to prevent over-tightening, which can damage the scope tube, or under-tightening, which can lead to scope shift.
- Bore Sighting (Initial Alignment): For initial rough alignment, either use a laser bore sighter inserted into the crossbow’s barrel or visually align the scope. For visual bore sighting, remove the quiver, place the crossbow securely on a rest, and aim at a target 20-30 yards away. Look through the bore to center the target, then adjust the scope’s windage and elevation turrets until the reticle’s main crosshair aligns with the same point on the target. This significantly reduces the number of shots required for fine-tuning.
Step 2: Establishing the Primary Zero Range
- Target Setup: Position a large target at your chosen primary zero distance, typically 20 or 30 yards. This is the range at which your main crosshair (the top line of your BDC reticle) will be dead-on.
- Controlled Shooting Environment: Shoot from a stable bench rest using a consistent shooting technique. Consistency is paramount to isolate scope adjustment errors from shooter errors.
- First Group Analysis: Fire a 3-shot group. Analyze the group’s center of impact relative to your aiming point.
- Adjusting for Zero: Adjust the scope’s windage and elevation turrets. If your bolts are impacting low, turn the elevation turret “UP” (counter-clockwise on most scopes). If bolts are impacting left, turn the windage turret “RIGHT” (clockwise). Remember, 1/4 MOA clicks mean approximately 0.25 inches of movement at 25 yards. Consult your scope’s manual for specific click values.
- Repeat and Refine: Continue firing 3-shot groups and making adjustments until your primary crosshair consistently places bolts within a tight group at your desired zero point.
Step 3: Fine-Tuning Windage and Elevation Adjustments
Once the primary zero is established, verify that your turret adjustments are precise and repeatable. Shoot additional groups, deliberately moving the point of impact with turret clicks, then returning to your zero. This “tracking test” confirms the mechanical integrity of the turret system.
Step 4: Verifying Yardage Line Accuracy at Extended Ranges
- Range Verification: Move your target to the distances corresponding to your BDC yardage lines (e.g., 30, 40, 50, 60 yards).
- Test Each Line: Using the appropriate yardage line as your aiming point, fire a 3-shot group at each distance.
- Assess and Adapt: Note any deviations. Small variances are common due to bolt speed differences. If a specific line is consistently off (e.g., the 50-yard line consistently hits high), you may need to adjust your primary zero slightly (e.g., zero at 25 yards instead of 20 to bring subsequent lines down) or understand the exact ballistic profile of your crossbow.
Step 5: Documenting Your Crossbow’s Ballistic Profile
Maintain a detailed logbook for your crossbow system. Record the specific crossbow model, bolt type (weight, fletching, broadhead/field point), actual velocity, zeroing distance, and the observed point of impact for each yardage line. This data is invaluable for troubleshooting and for rapidly re-zeroing after component changes. Regular maintenance of your crossbow system also plays a crucial role in maintaining zero.
For optimum accuracy, ensure the crossbow limbs are free from twist, the string is in good condition, and the arrow rest provides consistent fletching clearance. A chronograph reading of your specific bolt velocity is highly recommended to better predict ballistic performance and align with BDC expectations.
Factors Influencing Halo 4×32 Crossbow Scope Yardage Line Accuracy: An In-depth System Analysis
While the Halo 4×32 crossbow scope yardage lines provide a robust aiming system, their accuracy is contingent upon a multitude of interacting factors beyond the initial zero. For the technical user, understanding these variables is crucial for predictive performance and diagnosing inconsistencies. This section provides an in-depth system analysis of the elements that can influence the precise alignment of your yardage lines with your bolt’s trajectory.
Impact of Crossbow Bolt Velocity (FPS) on Trajectory
The speed at which your crossbow launches a bolt is the single most significant factor influencing its trajectory and, consequently, the effectiveness of the BDC yardage lines. The Halo 4×32’s reticle is designed around an assumed velocity range. If your crossbow-bolt combination generates significantly higher or lower FPS than this nominal range, the factory-set spacing of the yardage lines will be inaccurate. A faster bolt will exhibit less drop, causing subsequent BDC lines to hit low, while a slower bolt will show more drop, causing them to hit high. A chronograph is an indispensable tool for measuring your actual bolt velocity. If your velocity deviates considerably, a slight adjustment to your primary zero distance (e.g., zeroing at 25 yards instead of 20 for a faster crossbow) can often compensate, or you may need to learn the specific offsets for your system. For managing your equipment’s power system, refer to guides on crossbow draw weight adjustment.
Broadhead vs. Field Point Dynamics: Calibrating for Projectile Type
The aerodynamic properties of your bolt’s tip, specifically broadheads versus field points, can introduce subtle yet significant shifts in point of impact, especially at longer ranges. Field points are aerodynamically consistent and typically stabilize well. Broadheads, particularly fixed-blade designs, can create more drag and sometimes exhibit slight steering effects from their blades, especially if not perfectly aligned with the fletching. Even mechanical broadheads, when deployed, introduce changes in frontal area and drag. It is imperative to perform your final yardage line calibration with the exact broadhead you intend to use for hunting. Many experienced shooters will find that a broadhead will typically hit slightly lower than a field point at extended ranges due to increased drag, necessitating distinct verification of yardage lines with the hunting projectile.
Environmental Variables: Temperature, Humidity, and Barometric Pressure
Environmental conditions, though often overlooked, can measurably influence a bolt’s flight path.
| Environmental Factor | Impact on Bolt Trajectory | Mitigation/Consideration |
|---|---|---|
| Temperature | Minor velocity changes (cold decreases FPS slightly), affects air density. | Be aware of significant temperature swings (>30°F). |
| Humidity | Lower air density in high humidity (less drag), but impact is negligible for crossbows. | Generally not a critical factor for crossbow ranges. |
| Barometric Pressure | High pressure increases air density (more drag); low pressure decreases it (less drag). | Significant changes in elevation/weather fronts can alter point of impact subtly at long range. |
| Wind | Most significant environmental factor for lateral drift. | Practice shooting in varying wind conditions, utilize windage holds. |
Of these, wind is by far the most dominant factor. Even a moderate crosswind can push a crossbow bolt several inches off target at 40-50 yards. While the Halo 4×32 scope’s reticle primarily addresses vertical drop, some designs include rudimentary windage references. Practical application requires learning to estimate wind speed and direction and holding off the target accordingly, a skill developed through extensive practice.
Shooting Angle Compensation for Uphill and Downhill Shots
When shooting at inclined angles (uphill or downhill), gravity acts on the bolt for a shorter effective horizontal distance than the actual line-of-sight distance. This phenomenon means that for any given line-of-sight range, the bolt will impact higher than if shot on level ground. Most shooters compensate for this by aiming for a shorter distance than the actual range. For instance, a 40-yard shot downhill may require using the 30-yard yardage line. Advanced rangefinders with angle compensation capabilities can provide the “shoot-to” distance, simplifying this complex ballistic calculation and significantly improving accuracy with your Halo 4×32 crossbow scope yardage lines. Neglecting angle compensation is a common source of missed shots in uneven terrain.
Maintaining Optimal Equipment Condition for Consistent Performance
The overall condition of your crossbow system directly influences consistent bolt trajectory. Frayed strings, worn serving, damaged fletching, bent bolts, or a compromised arrow rest can all introduce inconsistencies that make the Halo 4×32 scope’s yardage lines unreliable. Regularly inspect your crossbow string and cables for wear, check nocks for damage, and ensure bolts are straight and fletching intact. A consistent release from the string, proper nock fit, and a clean barrel or rail are fundamental to ensuring each shot launches with the predicted velocity and spin, allowing the BDC reticle to perform as intended. Refer to your crossbow manufacturer’s maintenance schedule for critical inspection points.
Diagnosing and Resolving Halo 4×32 Crossbow Scope Yardage Line Issues: A Troubleshooting Blueprint
Even with meticulous zeroing and an understanding of external factors, inconsistencies with your Halo 4×32 crossbow scope yardage lines can arise. Effectively diagnosing and resolving these issues requires a systematic troubleshooting approach. This section provides a blueprint for identifying common problems that lead to inaccurate yardage line performance and offers practical solutions for rectification, ensuring your scope and crossbow system operate at peak precision.
Identifying Inconsistent Zeroing Patterns
One of the most frustrating issues is an inconsistent zero – where shots group well but their center of impact shifts unpredictably, or groups spread excessively.
- Symptoms: Wide shot groups at your zero range, or groups consistently shifting point of impact over time or between shooting sessions, despite consistent aiming.
- Potential Causes:
- Loose scope mounts or rings.
- Damaged scope internals (e.g., reticle shift).
- Inconsistent shooting form.
- Compromised bolt components.
- Worn crossbow string or components.
- Diagnostic Steps & Solutions:
- Isolate the Scope: First, confirm the issue isn’t user error. Have another experienced shooter test the crossbow.
- Inspect Mounting Hardware: Check all scope ring screws and base screws for proper torque (refer to OEM specs, typically 15-20 in-lbs for rings). A common issue is a loose mount allowing subtle scope shift under recoil.
- Scope Tracking Test: Perform a “box test” at your zero range. Shoot a group, then adjust turrets a significant number of clicks (e.g., 20 clicks right, shoot a group; 20 clicks up, shoot a group; 20 clicks left, shoot a group; 20 clicks down, shoot a group). The final group should return to the original zero point. If it doesn’t, the scope’s internal tracking mechanism may be faulty.
- Crossbow Inspection: Perform a thorough inspection of the crossbow’s string, cables, cams, limb pocket bolts, and arrow rest for any signs of wear, damage, or looseness.
Addressing Scope Mounting and Ring Torque Specifications
A significant portion of accuracy issues stems from improper scope mounting. Even the slightest movement of the scope can render the yardage lines useless.
- Symptoms: Vertical or horizontal stringing of shots, sudden and inexplicable shifts in point of impact, especially after a few shots or transport.
- Potential Causes:
- Under-torqued ring screws, allowing the scope to slide.
- Over-torqued ring screws, which can pinch the scope tube and affect optical alignment or internal mechanics.
- Loose mounting base screws.
- Incompatible or low-quality scope rings/base.
- Diagnostic Steps & Solutions:
- Disassemble and Reassemble: Carefully remove the scope and rings. Clean all contact surfaces (rings, scope tube, base).
- Re-mount with Precision: Remount the scope, ensuring proper eye relief and reticle levelness. Apply thread locker (e.g., blue Loctite, if specified by manufacturer) to base screws if they showed signs of loosening.
- Calibrated Torque: Use a calibrated torque wrench for all screws. Adhere strictly to manufacturer-recommended torque values.
- Check Ring-to-Scope Fit: Ensure the scope rings are correctly sized for the 1-inch main tube of the Halo 4×32. Poorly machined or misaligned rings can stress the scope tube.
Understanding and Correcting Parallax Errors in Your Reticle
Parallax is the apparent shift of the reticle relative to the target when the eye moves off the optical axis. While fixed-power scopes like the Halo 4×32 typically have parallax set at a specific distance (often 50 or 100 yards), it can still introduce errors at closer crossbow ranges if significant.
- Symptoms: The point of impact shifts when your eye position behind the scope changes slightly, even if the scope is perfectly still.
- Potential Causes:
- Eye is not consistently centered behind the scope.
- Parallax setting of the scope does not perfectly match the shooting distance.
- Diagnostic Steps & Solutions:
- Head Position Consistency: Practice consistent head and eye positioning behind the scope. Good cheek weld and eye relief are crucial.
- Parallax Test: Set up a target at 20-30 yards. With the crossbow securely mounted (e.g., in a vise), center the reticle on the target. Then, without moving the crossbow, subtly shift your head left, right, up, and down, observing if the reticle appears to move off the target. If it does, parallax is present.
- Mitigation: While the Halo 4×32 often lacks adjustable parallax, minimizing head movement is the primary solution. Consistent form is key. For longer-range shooting, be acutely aware of potential parallax-induced errors.
Assessing Bolt Component Integrity and Consistency
The bolt itself is a critical component in the ballistic chain. Any inconsistency here will directly affect accuracy regardless of the scope’s quality.
- Symptoms: Unexplained flyers, erratic groups, or inconsistent performance across the yardage lines even after verifying scope setup.
- Potential Causes:
- Bent bolts.
- Damaged or missing fletching.
- Loose inserts or points/broadheads.
- Inconsistent bolt weight or spine stiffness.
- Damaged nocks.
- Diagnostic Steps & Solutions:
- Bolt Spin Test: Roll each bolt on a flat, true surface (e.g., glass table) to check for bends.
- Fletching Integrity: Inspect fletching for damage, peeling, or misalignment. Replace damaged fletching.
- Component Security: Ensure inserts and points/broadheads are securely glued or threaded in place.
- Weight and Spine Consistency: If possible, weigh bolts for consistency and consider checking their spine stiffness if major issues persist. Ideally, use bolts from the same manufacturing batch.
Environmental Interference and Shooting Technique Flaws
External elements and the shooter’s interaction with the equipment can significantly impact perceived accuracy.
- Symptoms: Difficulty maintaining a consistent zero in different conditions, poor groups in specific weather, or unexplained misses despite using the correct yardage line.
- Potential Causes:
- Unaccounted for wind drift.
- Improper shooting stance or grip.
- “Torquing” the crossbow (applying lateral pressure).
- Inconsistent trigger pull.
- Ignoring angle compensation on sloped terrain.
- Diagnostic Steps & Solutions:
- Wind Management: Learn to read wind flags and estimate wind speed. Practice holding off for wind.
- Form Review: Record yourself shooting to identify any inconsistencies in your stance, grip, or trigger pull. Ensure a firm, consistent hold without “muscling” the crossbow.
- Trigger Practice: Practice a smooth, deliberate trigger press without disturbing the aiming point.
- Angle Compensation: Utilize a rangefinder with angle compensation or learn to apply manual angle-shooting rules.
Effective troubleshooting involves a methodical approach, eliminating variables one by one. Often, issues with the Halo 4×32 crossbow scope yardage lines stem not from the scope itself, but from its interaction with other components or environmental factors. For specific component troubleshooting, consult detailed guides on crossbow component troubleshooting.
Common Questions on Halo 4×32 Crossbow Scope Yardage Lines
What is the optimal zeroing range for the Halo 4×32 scope?
The optimal primary zeroing range for the Halo 4×32 crossbow scope is typically 20 or 30 yards. This range provides a good balance for establishing a point-blank range for the main crosshair, while allowing the subsequent BDC yardage lines (e.g., 40, 50, 60 yards) to fall into their intended calibration zones with minimal deviation. Some shooters with very fast crossbows (380+ FPS) might opt for a 30-yard zero, as it can often bring the longer-range BDC lines closer to their actual point of impact due to less overall bolt drop.
How do different bolt weights affect the yardage lines?
Bolt weight significantly impacts the trajectory and, consequently, the accuracy of the Halo 4×32’s yardage lines. A heavier bolt, all else being equal, will travel slower and exhibit more ballistic drop than a lighter bolt. If the scope’s BDC reticle was calibrated for a medium-weight bolt (e.g., 400 grains), using a much heavier bolt (e.g., 450 grains) will cause shots to impact lower than the designated yardage lines. Conversely, a much lighter bolt (e.g., 350 grains) will hit higher. It is essential to zero and verify your yardage lines with the specific bolt weight you intend to use.
Can I use this scope with any crossbow velocity?
While you can physically mount the Halo 4×32 scope on any crossbow, its BDC yardage lines are optimized for a specific range of crossbow velocities, typically in the 300-350 FPS range. Crossbows significantly outside this range (e.g., very slow older models or extremely fast modern models) may find the BDC lines less accurate. For faster crossbows, shots may hit high on the lower BDC lines; for slower crossbows, shots may hit low. In such cases, you might need to adjust your primary zero range or learn the specific offsets for your system, effectively creating your own custom ballistic chart based on observed impacts.
What role does eye relief play in using the yardage lines?
Eye relief, the distance between your eye and the ocular lens, is crucial for a full, clear field of view and for minimizing parallax errors when using the yardage lines. Insufficient eye relief can lead to “scope bite” (the scope hitting your eyebrow during recoil), while excessive eye relief can result in a restricted “tunnel vision” view and difficulty seeing the entire reticle, including the lower yardage lines. Maintaining consistent eye relief also helps prevent parallax errors, ensuring the yardage lines appear fixed relative to the target, rather than shifting with slight head movements.
How often should I re-zero my Halo 4×32 crossbow scope?
It’s best practice to re-zero or at least verify your Halo 4×32 crossbow scope yardage lines at the beginning of each shooting season, before any critical hunting trip, and anytime you make significant changes to your crossbow system (e.g., new string, different bolt weight, new broadheads). Additionally, if the crossbow has been dropped, subjected to severe impacts, or if you notice any unexplained shifts in accuracy, a re-zero is highly recommended to ensure the reliability of your yardage lines.
Step-by-Step Guide to Understanding the Halo 4X32 Crossbow Scope Yardage Lines
Identify – Identify your crossbow’s exact bolt velocity (FPS) as a critical component for accurate yardage line calibration.
Locate – Locate the main crosshair (usually 20-yard zero) and subsequent stadia lines within the scope’s reticle layout.
Reference – Reference the scope’s instruction manual to understand the specific yardage assigned to each line in its unique configuration.
Connect/Route – Connect your shooting experience to the diagram by aiming with the appropriate line for your target distance, ensuring proper system alignment.
Verify – Verify accuracy by shooting at known distances (e.g., 30, 40, 50 yards) and confirming impacts align with the corresponding yardage lines.
Troubleshoot – Troubleshoot any inconsistencies by re-zeroing, checking for parallax errors, or consulting the scope’s documentation regarding its internal structure.
Halo 4×32 Crossbow Scope Yardage Lines: Frequently Asked Questions
What does the halo 4×32 crossbow scope yardage lines show?
The Halo 4×32 crossbow scope yardage lines display a series of horizontal aiming points, or stadia lines, calibrated to correspond with specific distances, usually from 20 to 60 yards. This optical system assists in quick target acquisition and accurate shot placement without manual adjustments for varying ranges, enhancing the overall shooting system and configuration.
How do I read the halo 4×32 crossbow scope yardage lines?
To read the lines, first zero your crossbow at 20 yards using the top reticle. Then, shoot at longer distances (e.g., 30, 40, 50 yards) and note which line aligns with the point of impact. Each subsequent line below the main crosshair corresponds to a specific yardage, creating a functional aiming component for different ranges.
What are the main components in halo 4×32 crossbow scope yardage lines?
The main components are the etched glass reticle with multiple horizontal stadia lines, designed to compensate for bolt drop at various distances. These lines form part of the internal optical system. The specific layout of these lines is crucial for ranging, forming a core component of the scope’s ballistic capability.
What are common problems with halo 4×32 crossbow scope yardage lines?
Common problems include incorrect zeroing, parallax error, or mismatch between crossbow velocity and the scope’s ballistic calibration. These issues lead to inaccurate shot placement. Troubleshooting involves re-zeroing, checking parallax settings, and verifying bolt speed to ensure the lines function as intended within the system.
Can I use halo 4×32 crossbow scope yardage lines for DIY repair?
Internal reticle issues or recalibration for different velocities are generally not DIY repair tasks. While mounting and basic zeroing are manageable, internal scope component repair requires specialized tools and expertise. Attempting DIY internal repairs can damage the precision optical system and void warranties, impacting the entire configuration.
What tools do I need for halo 4×32 crossbow scope yardage lines?
For initial setup and calibration, you’ll need an Allen wrench set for mounting rings, a screwdriver for scope adjustments, a target, and a rangefinder. A chronograph to measure bolt velocity is also highly recommended to accurately match your crossbow’s performance to the scope’s ballistic layout and ensure proper system function.


Leave a Reply