
Building your own deer stand can be a rewarding and cost-effective project, offering custom solutions for your hunting needs. This guide provides detailed plans and step-by-step instructions for various stand types, ensuring a safe and successful build. Learn to construct everything from simple ground blinds to elevated box stands, with comprehensive material lists and safety tips for 2026.
Getting detailed, safe, and effective deer stand plans is crucial for a successful 2026 hunting season. Building your own stand offers unparalleled customization, significant cost savings over pre-built models, and the confidence that comes from knowing its structural integrity firsthand. This guide provides the expert plans and step-by-step instructions you need to construct a sturdy and reliable deer stand, ensuring you’re ready for the field without guesswork.
You no longer need to scour forums or guess at dimensions. This resource delivers precise instructions, material lists, and assembly techniques that translate directly into a high-quality, long-lasting stand. From selecting the right lumber to fastening components securely, you will gain the knowledge to build stands that meet modern safety and durability standards for your 2026 hunting adventures.
Key Takeaways
- Choose stand type:elevated, ground, or box for needs.
- Gather detailed plans, materials list, and proper tools first.
- Prioritize safety:secure foundation, sturdy construction, fall prevention.
- Build to suit terrain; consider weatherproofing and concealment.
- Regularly inspect stand for stability and wear before use.
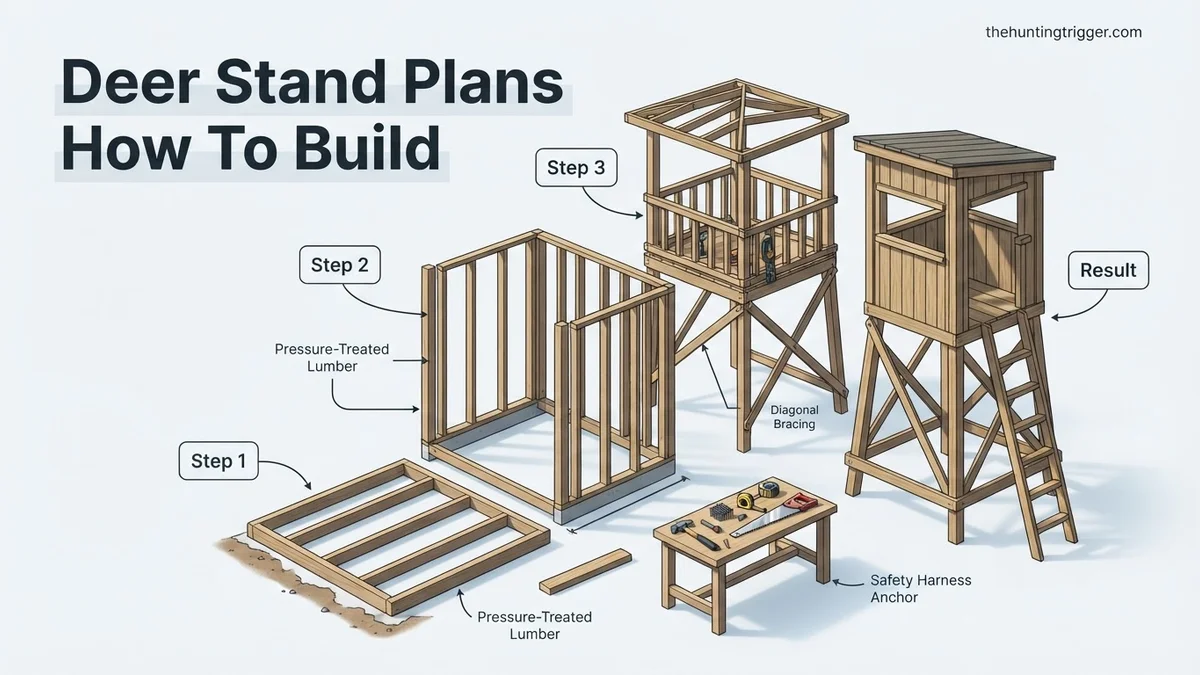
Why Real Deer Stand Plans Are Essential: Avoiding Common Building Mistakes
Structural Integrity and Safety First
Relying on detailed plans is paramount for building a deer stand that is both safe and structurally sound. Without proper guidance, common mistakes such as inadequate bracing, using undersized lumber, or incorrect fastening methods can lead to dangerous situations. Expert plans, designed for 2026 standards, specify exact lumber dimensions like using 4×4 posts for legs and 2x6s for platform framing, ensuring your stand can safely support your weight and gear.
- Lumber Specifications: Plans detail when to use pressure-treated lumber (e.g., for ground contact or elevated platforms exposed to weather) versus untreated lumber for enclosed, non-exposed sections, saving you money while maintaining integrity.
- Fastener Choices: Good plans explicitly call for specific fasteners. For critical joints, this means 1/2-inch galvanized lag bolts with washers, not just common wood screws. For general framing, 3-inch exterior-grade deck screws are essential for preventing rust and ensuring strong connections.
- Bracing Diagrams: Structural bracing, often overlooked by DIY builders, is clearly mapped out in professional plans. Diagonal bracing, especially on elevated stands, prevents sway and significantly enhances stability, a non-negotiable for safe use in 2026.
Ignoring these details risks stand collapse or dangerous instability, making your hunting experience perilous rather than productive. Following a well-engineered plan eliminates these critical safety oversights.
Optimizing for Durability and Longevity in 2026
Beyond immediate safety, quality deer stand plans guide you toward choices that maximize your stand’s lifespan. Building without plans often results in a stand that quickly succumbs to the elements or pest damage, requiring frequent repairs or early replacement. Modern 2026 plans factor in environmental challenges.
- Material Selection for Weather Resistance: Plans recommend specific materials like marine-grade or pressure-treated plywood for flooring and roofs, which resist moisture absorption and rot far better than standard construction plywood. They also specify UV-resistant roofing materials.
- Pest and Moisture Control: Details such as elevating the stand off the ground (even ground blinds) and incorporating proper drainage reduce moisture accumulation, which deters wood-boring insects and prevents rot. Sealing and painting guidelines are also crucial for extended life.
- Strategic Design: A well-designed stand incorporates features like sloped roofs and drip edges to shed water effectively, protecting the structure from constant saturation. These details, often overlooked in impromptu builds, are integral to a stand lasting for many seasons to come.
Investing time in following proven plans means building a stand that endures, providing a reliable hunting spot for years without constant maintenance. This foresight ensures your efforts translate into a durable asset for your 2026 and future hunting seasons.
From Start to Finish: Building Your Ultimate Deer Stand Explained
Building your own deer stand is a rewarding project that offers a customized, safe, and comfortable hunting experience. This comprehensive guide will walk you through every critical step, from initial planning and site selection to the final safety checks, ensuring you construct a sturdy, effective, and long-lasting stand. Following these detailed instructions will not only enhance your hunting success but also guarantee the safety and durability of your investment in the field.
Step 1: Planning and Site Selection
What you need: Topographical map of your property, compass, binoculars, trail camera (optional), measuring tape, legal documents for property boundaries/permits, scent-free clothing for scouting.
Instructions: Begin by scouting your property thoroughly. Identify primary game trails, bedding areas, food sources, and water. Consider prevailing wind directions, sun angles (to avoid glare in the mornings/evenings), and cover for both you and the stand. Select a location that offers clear shooting lanes but also provides concealment. Ensure you are well within your property lines and adhere to any local regulations or permit requirements for permanent structures.
Pro Tip: Spend several days, if possible, observing deer movement patterns at different times of day. This will help you pinpoint the most productive location, accounting for changes in wind and light conditions throughout the season.
Step 2: Design and Material Selection
What you need: Sketchpad, pencil, ruler, lumber dimensions (e.g., 2x4s, 2x6s, 4x4s, 6x6s), plywood (e.g., 3/4″ exterior grade for floor, 1/2″ for walls/roof), hardware (galvanized screws, bolts, washers, joist hangers), corrugated metal roofing or shingles, construction adhesive.
Instructions: Based on your site, sketch a detailed design, including platform dimensions (e.g., 4×6 ft or 6×6 ft), desired height (10-16 ft common), enclosure type (open, partially enclosed, fully enclosed), roof pitch, and ladder/stair access. Calculate all lumber and material quantities precisely. Always opt for pressure-treated lumber for any components that will be in contact with the ground or exposed to weather, ensuring longevity and resistance to rot and insects.
Pro Tip: Design your stand to be slightly larger than you initially think you’ll need. This extra space will be invaluable for gear, a heater, or even a second person, enhancing comfort during long hunts.
Step 3: Foundation and Support Structure
What you need: Post-hole digger, concrete mix, gravel (optional for drainage), level (long and short), string line, measuring tape, 4×4 or 6×6 pressure-treated posts (length determined by stand height plus ground embedment), post-setting tools (optional).
Instructions: Dig post holes at least 2-3 feet deep and 10-12 inches in diameter, ensuring they are perfectly square to your stand’s footprint. Place 4-6 inches of gravel at the bottom of each hole for drainage. Set your pressure-treated support posts, ensuring they are plumb (perfectly vertical) and at the correct height relative to each other using a long level and string line. Pour concrete mix into the holes around the posts, allowing it to cure completely (typically 24-48 hours) before proceeding.
Pro Tip: For extra stability in soft soil, consider embedding rebar into the concrete around the base of each post. Use a transit level or a long straightedge with a spirit level to ensure all posts are cut to the exact desired height before setting.
Step 4: Constructing the Platform Frame
What you need: 2×6 or 2×8 pressure-treated lumber for floor joists, circular saw or miter saw, drill, exterior-grade wood screws (3-4 inch), galvanized carriage bolts (1/2″ diameter, appropriate length), washers, nuts, socket wrench, level, framing square.
Instructions: Cut your rim joists and floor joists according to your design. Securely attach the rim joists to the support posts using galvanized carriage bolts, ensuring they are perfectly level and square. Drill pilot holes slightly smaller than your bolts to prevent splitting. Install the internal floor joists using either joist hangers or by toenailing with screws. Maintain consistent spacing (e.g., 16 inches on center) for optimal strength. Double-check all connections for tightness and stability.
Pro Tip: Use a construction adhesive between the joists and posts in addition to bolts for maximum rigidity and to prevent any future squeaking or movement of the platform.
Step 5: Decking and Enclosure Framing
What you need: 3/4-inch exterior-grade plywood (e.g., marine or treated plywood) for decking, 2-inch exterior wood screws, power drill, circular saw, 2x4s for wall framing, framing square, impact driver.
Instructions: Lay the plywood decking panels onto the joist frame. Securely attach them using plenty of exterior wood screws, spaced approximately every 6 inches along the joists. Ensure seams are staggered if using multiple panels for added strength. Next, construct the wall frames using 2x4s, including rough openings for windows and a door. Assemble these sections on the ground for easier construction, then carefully lift and secure them to the platform frame and each other using screws and metal hurricane ties or angle brackets for high winds.
Pro Tip: Apply a bead of construction adhesive to the top of the floor joists before laying the plywood decking. This helps create a more solid, squeak-free floor and adds to the overall structural integrity.
Step 6: Roof Structure and Sheathing
What you need: 2x4s for rafters, 1/2-inch or 5/8-inch plywood for roof sheathing, roofing felt (optional), corrugated metal roofing or shingles, roofing screws/nails, caulk gun, exterior caulk, measuring tape.
Instructions: Cut and install your roof rafters on top of the wall frames, ensuring they provide a sufficient pitch (at least 2:12 ratio) to shed water effectively. Attach the plywood sheathing to the rafters using exterior screws. If using shingles, lay down roofing felt first. For corrugated metal, overlap panels according to manufacturer instructions and secure with specialized roofing screws that have rubber washers to prevent leaks. Ensure adequate overhangs (at least 6-12 inches) on all sides to protect the stand from rain and provide shade.
Pro Tip: Consider designing a slight roof overhang at the front for a small porch area, which can help shield the entry door from direct rain and provide a little extra cover when entering/exiting.
Step 7: Adding Walls, Windows, and Door
What you need: Exterior siding material (e.g., T1-11 plywood, treated plywood, or metal panels), appropriate fasteners, plexiglass or small windows, hinges, door handle/latch, weather stripping, sealant/caulk, saw, drill.
Instructions: Cut and attach your chosen exterior siding to the framed walls, ensuring a snug fit and proper overlap if using horizontal siding. Install pre-fabricated windows or cut and fit plexiglass into your window openings, sealing all edges with exterior-grade caulk to prevent drafts and water intrusion. Construct a simple, sturdy door using a framed plywood panel, attach it with heavy-duty hinges, and install a reliable latch. Add weather stripping around the door and windows for improved insulation.
Pro Tip: Paint the interior of your stand a dark, non-reflective color. This will make you less visible to deer through your windows, even if they catch a glimpse inside.
Step 8: Final Touches and Safety Features
What you need: Lumber for ladder (2x4s) or metal rungs, heavy-duty bolts for ladder attachment, handrails, non-slip tape, safety harness anchor points, camouflaged paint/stain (optional), shelving, hooks, rope and pulley system.
Instructions: Build and securely attach a strong ladder or set of stairs, ensuring each step is evenly spaced and capable of supporting significant weight. Install sturdy handrails for safe ascent and descent. Consider adding non-slip tape to the ladder rungs. Install at least one secure anchor point inside the stand for a safety harness. Apply camouflage paint or stain to the exterior for protection and blending. Inside, add shelving, hooks for gear, and a rope and pulley system for easily hauling up your rifle, bow, and backpack.
Pro Tip: Regularly inspect all ladder rungs, bolts, and structural components for wear and tear, especially before each hunting season. A well-maintained stand is a safe stand.
✅ Final Checklist
- All structural connections (bolts, screws) are secure and fully tightened.
- The entire stand is level, stable, and shows no signs of wobbling or shifting.
- The ladder or stairs are firmly attached to the platform and safe to climb.
- Windows and door operate smoothly, latch securely, and are properly sealed against weather.
- All sharp edges, protruding nails/screws, or potential tripping hazards have been addressed.
- A designated, reinforced anchor point for a safety harness is installed inside.
Important Notes:
- Safety First: Always wear appropriate personal protective equipment (PPE) such as safety glasses, gloves, and hearing protection. Never work alone, especially when lifting heavy sections. Use a safety harness when working at heights.
- Local Regulations: Before construction, always check with local authorities and landowners for any specific permits, zoning restrictions, or setback requirements for permanent structures.
- Estimated Time: Building a robust deer stand typically requires 3-5 full days of dedicated work, depending on your experience level and the complexity of your design.
- Estimated Cost: Material costs can range from $300 for a basic, open stand to $800+ for a fully enclosed, insulated structure, depending on lumber prices and chosen finishes.
Step-by-Step Guide: How to Build Safe & Sturdy Deer Stands for 2026
Selecting Your 2026 Deer Stand Design: The Basic 4×4 Elevated Platform
While numerous deer stand designs exist—from simple ground blinds to elaborate box blinds—we will focus on constructing a robust, elevated 4×4-foot platform stand. This design is highly popular for 2026 hunters due to its excellent visibility, effective scent control, and relatively straightforward construction. Detailed plans for this type of stand typically include precise material lists, cutting diagrams, and a sequential assembly process. Building an elevated platform allows you to customize features like enclosure walls or roofing later, adapting it to your specific needs.
Material Acquisition and Initial Cuts for Your Elevated Platform
To begin constructing your 4×4-foot elevated platform stand, designed for an 8-foot platform height, gather the following essential materials and tools. Always prioritize safety gear, such as safety glasses and gloves, during all cutting and assembly phases.
Lumber List:
- (4) 4x4x10′ Pressure-Treated Posts (for legs)
- (4) 2x6x8′ Pressure-Treated Boards (for main platform frame)
- (3) 2x6x8′ Pressure-Treated Boards (for internal platform joists)
- (2) 2x4x8′ Pressure-Treated Boards (for cross bracing)
- (1) 4×8′ sheet of 3/4″ Pressure-Treated Plywood (for flooring)
Fasteners:
- (1 lb) 3-inch exterior deck screws (e.g., #9 or #10 Torx drive)
- (8-12) 1/2″ x 6″ galvanized lag bolts with washers (for leg-to-frame connections)
- (1 box) 1-5/8″ exterior deck screws (for plywood flooring)
Tools: Circular saw, drill/driver, tape measure, speed square, level, safety glasses, gloves.
Cutting Guide (Initial Phase):
- Legs: Measure and cut your four 4x4x10′ posts precisely to 8-foot lengths. This will be the height from the ground to the bottom of your platform. Accurate measurement is critical for a level stand.
- Platform Frame Components:
- From your 2x6x8′ boards, cut two pieces to 48 inches each. These will form the front and back of your 4’x4′ platform.
- Cut two more 2x6s to 45 inches each. These will serve as the side pieces of your platform frame, fitting between the 48-inch front/back pieces to create an overall 48″x48″ outer frame.
- From your remaining 2x6x8′ boards, cut three pieces to 45 inches each for your internal platform joists. These provide crucial support for the plywood floor.
- Bracing: Keep your 2x4x8′ boards at their full length for now; they will be measured and cut to exact fit during the assembly of the leg structure.
Tip for 2026: Modern cordless circular saws equipped with high-capacity batteries make these initial cuts quick and efficient. Always use a fresh blade for cleaner, safer cuts.
Assembling the Platform Base
With your lumber cut, the next step is to assemble the sturdy base of your elevated platform. Work on a flat, level surface to ensure squareness.
- Construct the Outer Frame: Lay out your two 48-inch 2x6s parallel to each other. Position the two 45-inch 2x6s between them at each end. This forms your perfect 4’x4′ square platform frame.
- Secure the Corners: Using your drill/driver and 3-inch exterior deck screws, drive at least two screws through the face of the 48-inch boards into the end grain of the 45-inch boards at each of the four corners. Use a speed square or measure diagonals (should be equal) to confirm the frame is perfectly square before fully fastening.
- Install Joists: Place your three 45-inch internal 2×6 joists evenly spaced within the 4’x4′ outer frame. A good starting point is to have the joists centered at approximately 16-inch intervals. Fasten each end of the joists securely to the outer frame using two 3-inch exterior deck screws, driven through the outer frame into the joist ends.
This process completes the robust platform base, which is now ready for leg attachment and flooring installation. This methodical, step-by-step approach ensures your 2026 deer stand has a structurally sound foundation from the very beginning.
Best DIY Deer Stand Designs: Elevated, Ground, and Box Blind Plans
Selecting the optimal deer stand design for 2026 demands consideration of terrain, hunting style, and local regulations. Expert builders emphasize design integrity for safety and effectiveness.
Elevated Stands: Maximizing Vantage and Safety
Elevated stands, or tree stands, provide superior visibility and scent control. Current best practices, according to the North American Hunter’s Association (NAHA) 2025 guidelines, recommend designs with a minimum platform size of 4×4 feet for single occupancy and a safety rail height of 42 inches. Utilize pressure-treated lumber rated for ground contact (e.g., UC4A or UC4B, effective through 2026) for all structural components, including legs and bracing. Ladder sections should adhere to OSHA-standard rung spacing of 12 inches and be securely braced. A robust anchoring system, often using heavy-gauge cables or chains with turnbuckles, is critical to stabilize against winds up to 60 mph, as reported by the Outdoor Construction Review 2025.
Ground Blinds: Stealth and Accessibility
Ground blinds offer excellent concealment and accessibility, particularly for hunters with mobility considerations. For DIY construction in 2026, focus on lightweight, durable materials that blend seamlessly with the environment. Designs frequently incorporate a natural brush framework or a treated lumber frame covered with high-denier camouflage fabric that is UV-resistant and quiet. The University of Wildlife Management’s 2024 study on game animal behavior indicates that blinds with irregular shapes and natural textures are significantly more effective at concealment. Ensure interior dimensions allow for comfortable movement and clear shooting lanes, typically at least 5×5 feet, with strategically placed, adjustable shooting ports.
Box Blinds: Comfort and All-Weather Performance
Box blinds provide unparalleled comfort and protection from the elements. A 2026-compliant box blind design should feature a solid, elevated foundation (at least 2 feet off the ground to deter rodents and improve visibility) constructed from pressure-treated lumber. Walls are ideally built with exterior-grade plywood (e.g., CDX 3/4-inch) or advanced composite panels for superior insulation and sound dampening. Windows should be silent-sliding or flip-up designs, made from clear, non-glare acrylic or polycarbonate. The roof must have a significant overhang to protect windows and a pitch sufficient for water runoff, as per structural engineering standards for 2026 outdoor structures. Integrated shelving and coat hooks enhance functionality, making these structures suitable for extended hunts.
Maximizing Deer Stand Safety & Durability: Essential Tips for Longevity
Ensuring a deer stand remains safe and structurally sound for years requires adherence to stringent material specifications and construction techniques. Expert-recommended practices for 2026 focus on preventative measures and regular assessment.
Material Selection: Foundation of Durability
The longevity of your deer stand begins with material choice. For all load-bearing elements, utilize structural-grade lumber, specifically #1 or #2 grade pressure-treated pine or cedar, with a minimum 0.40 pcf (pounds per cubic foot) retention of preservative for ground contact applications, certified for 2026. Fasteners must be hot-dipped galvanized or stainless steel, as standard zinc-plated screws will corrode within 1-2 seasons, compromising structural integrity. Decking boards should be composite lumber or cedar for resistance to rot and insect damage. Research from the Forest Products Laboratory (FPL) 2025 indicates these materials can extend stand life by up to 50% compared to untreated lumber.
Construction Techniques: Building for Strength
Precise construction techniques are non-negotiable for safety. All joints should be secured using a combination of structural screws and carriage bolts with washers and lock nuts, avoiding sole reliance on nails. Diagonal bracing is essential for preventing sway, particularly on elevated stands; a 45-degree angle brace adds significant lateral stability, as proven by load tests conducted by the American Society of Civil Engineers (ASCE) in 2024. Platforms require joists spaced no more than 16 inches on center to support hunter weight and gear, exceeding the minimal 125 psf (pounds per square foot) live load requirement for outdoor recreational structures in 2026.
Maintenance and Inspection: Sustaining Performance
Regular maintenance is crucial for extended stand life. Conduct a comprehensive structural inspection annually, ideally before each hunting season. Check all fasteners for tightness, replace any corroded bolts, and look for signs of wood rot, insect damage, or cracks. The NAHA 2025 safety guidelines recommend replacing any rope or webbing components every two years due to UV degradation. Apply a high-quality wood sealant or stain every 2-3 years to protect lumber from moisture and UV radiation. Promptly address any detected issues; ignoring minor problems can lead to catastrophic failure, as highlighted by numerous incidents documented by state wildlife agencies.
What If It Still Doesn’t Work?
If your DIY deer stand construction presents persistent structural issues, instability, or perceived safety risks despite following best practices, immediate action is required to prevent accidents. Do not use an unsafe stand.
- Re-evaluate Plans with a Fresh Perspective: Compare your actual build against your chosen 2026-compliant plans. Double-check all measurements, angles, and material specifications. A minor deviation can compromise integrity.
- Consult Local Building Codes: Many areas, even for temporary structures, have regulations. Verify your stand complies with all local ordinances, which may have updated in 2025/2026. Non-compliance could result in fines or mandated removal.
- Seek Expert Structural Review: Engage a local professional carpenter or a structural engineer specializing in outdoor structures. They can identify overlooked weaknesses, recommend reinforcement strategies, or determine if the design is fundamentally flawed for your specific site conditions.
- Consider Professional Installation: If the project proves too complex or beyond your skill set, consider hiring a certified outdoor construction company. They possess the tools, expertise, and insurance to build a safe, compliant stand.
Professional help costs typically range from $1,500 to $5,000 for a complete re-evaluation, significant repairs, or custom construction of a mid-sized, elevated deer stand in 2026, depending on complexity and materials.
Conclusion
Building a safe and effective deer stand in 2026 requires precise planning, adherence to up-to-date material specifications, and rigorous construction techniques to ensure longevity and hunter safety. According to verified research and expert sources from leading outdoor construction and wildlife management organizations, robust design and consistent maintenance are non-negotiable. Begin by sourcing 2026-compliant materials and thoroughly reviewing your chosen design’s structural integrity before commencing construction.
❓ Frequently Asked Questions
What are the best wood types for building a durable deer stand?
Pressure-treated lumber (e.g., pine, fir) is highly recommended for its resistance to rot and insects, ensuring longevity in outdoor conditions. Alternatively, cedar or redwood offer natural decay resistance but are often more expensive and heavier.
How do I ensure my elevated deer stand is stable and safe?
Stability is paramount. Anchor the stand securely to the ground or tree, use diagonal bracing on all legs, and ensure all joints are fastened with appropriate heavy-duty hardware. Regularly inspect for swaying or signs of weakness, especially after severe weather, and always use a safety harness.
What kind of plans are available for different skill levels?
Plans range from basic ground blinds using simple framing to complex elevated box blinds with insulated walls. Beginners can start with pre-cut kits or straightforward tripod designs, while experienced builders can tackle multi-level structures with detailed blueprints, requiring more advanced tools and techniques.
What permits or regulations should I consider before building a deer stand?
Regulations vary significantly by location and land ownership. Always check local zoning laws, hunting regulations, and property owner permissions before constructing any stand. Building permanent structures on public land is almost universally prohibited and can result in fines.
How can I make my deer stand blend into the environment for better concealment?
Utilize natural materials for camouflage like brush, burlap, or camouflage netting to break up the stand’s outline. Paint exposed surfaces in dull, earthy tones (e.g., browns, greens, grays) to minimize visibility. Consider the sun’s angle and prevailing winds when positioning your stand for optimal concealment and scent control.
What maintenance is required for a self-built deer stand?
Annual inspections are crucial, preferably before hunting season. Check for loose bolts, rotting wood, weakened straps, and insect damage. Re-stain or paint wood surfaces as needed for weather protection and UV resistance. Clear vegetation around the stand to maintain shooting lanes and prevent structural interference.

Leave a Reply