
Achieving a 200-yard zero by adjusting your scope at 100 yards requires understanding bullet trajectory and precise ballistic calculations. This guide explains how to translate bullet drop into MOA/MRAD clicks for your scope, ensuring accurate compensation. Learn the proven steps to make those critical adjustments and confirm your rifle’s zero effectively.
If you’re aiming to reliably hit targets at 200 yards but are limited to a 100-yard shooting range, you absolutely can achieve a precise 200-yard zero. The secret lies in understanding your bullet’s trajectory and making calculated scope adjustments right there at 100 yards. This method saves you time and ammunition, allowing you to effectively prepare for longer shots without needing a 200-yard lane.
By using modern ballistic calculators and a solid grasp of MOA adjustments, you can confidently set your rifle to hit dead-on at 200 yards, even when your final zeroing shots are taken at half that distance. This approach ensures your rifle is perfectly dialed in, accounting for gravity’s pull, providing critical precision for hunting or competitive shooting in 2026 and beyond.
Key Takeaways
- Calculate bullet drop for 200 yards.
- Convert drop to scope MOA/MRAD clicks.
- Adjust scope UP at 100 for 200-yard zero.
- Shoot tight groups to confirm adjustments.
- Verify your zero at actual 200 yards.
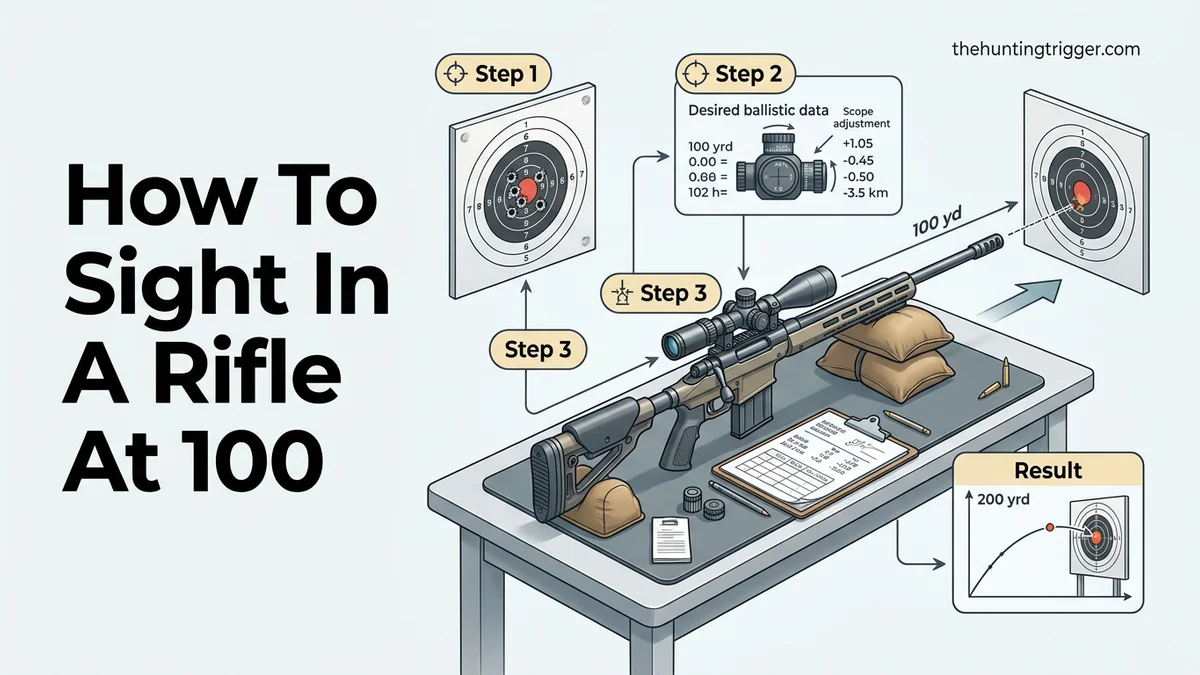
What Causes the Need for 100-Yard to 200-Yard Zero Adjustments?
Recommended Best Deal Products


Understanding Bullet Trajectory and Drop
Despite popular belief, bullets do not fly in a perfectly straight line after leaving your rifle’s muzzle. As soon as the projectile exits the barrel, gravity begins its relentless pull, causing the bullet to immediately start falling towards the earth. This phenomenon creates a parabolic arc, meaning the bullet first rises slightly above your line of sight (depending on your zero distance), then drops below it. The longer the distance, the more pronounced this drop becomes.
Key factors influencing this trajectory include your bullet’s muzzle velocity, its weight, and its ballistic coefficient (BC). A heavier, more aerodynamic bullet generally retains energy better and experiences less drop than a lighter, less efficient one. Understanding these dynamics is crucial for predicting where your bullet will be at various distances, especially when aiming for a 200-yard zero from a 100-yard position.
Why 100 Yards is a Practical Zeroing Distance for 200 Yards
Sighting in your rifle at 100 yards for a 200-yard zero offers significant practical advantages. First, shooting at 100 yards inherently leads to tighter groups. This increased precision minimizes human error and environmental variables like wind, allowing you to make extremely accurate adjustments to your scope. Second, many shooting ranges commonly offer 100-yard lanes, while 200-yard or longer distances can be scarce.
By making precise adjustments at 100 yards, you’re leveraging an easily manageable distance to dial in compensation for a longer shot. You are essentially “pre-compensating” for the known bullet drop that will occur between 100 and 200 yards. This method ensures that your rifle is not just “close enough” but precisely calibrated for your intended 200-yard target.
How to Sight-In a Rifle Like a Pro: A Practical Walkthrough
Zeroing your rifle correctly is perhaps the most critical step to achieving consistent accuracy, whether for hunting, sport shooting, or self-defense. This guide will walk you through the precise process of sighting in your rifle at 100 yards, not as a final zero, but as a critical stepping stone to achieve an effective 200-yard point-blank range zero. By following these detailed steps, you’ll gain confidence in your equipment and your shooting ability, ensuring your shots land where intended at extended ranges.
Step 1: Prioritize Safety and Prepare Your Range
What you need: Rifle, appropriate ammunition, hearing protection, eye protection, sturdy shooting rest (sandbags, bipod, or shooting vice), targets, stapler or tape for targets, spotting scope or binoculars, cleaning kit, gunsmithing tools (if needed for scope mounting).
Instructions: Begin by ensuring your firearm is unloaded and pointed in a safe direction. Put on your hearing and eye protection – these are non-negotiable. Set up your shooting station with a stable rest, ensuring maximum rifle stability. Place your targets precisely at 100 yards. Confirm the distance with a rangefinder if possible. Before loading, inspect your rifle and scope mounts to ensure everything is tight and secure. Any looseness can lead to frustrating and inconsistent results.
Pro Tip: Always follow the four fundamental rules of firearm safety: 1. Treat every firearm as if it were loaded. 2. Never point the muzzle at anything you are not willing to destroy. 3. Keep your finger off the trigger until your sights are on the target and you are ready to shoot. 4. Be sure of your target and what is beyond it. A pre-range clean of the barrel can also help ensure initial shot consistency.
Step 2: Initial Scope Alignment (Bore Sighting)
What you need: Rifle, bore sighter (laser or optical), or if it’s a bolt-action, the ability to remove the bolt.
Instructions: Bore sighting gets your initial shots “on paper” quickly, saving time and ammunition. For bolt-action rifles, remove the bolt and look directly through the bore at the target’s bullseye at 100 yards. Without moving the rifle, adjust your scope’s windage and elevation turrets until the reticle aligns with the bullseye. If using a laser bore sighter, insert it into the barrel and adjust the scope’s reticle to match the laser dot on the target. With an optical bore sighter, attach it to the muzzle and align the scope. This step is a rough alignment, not a precise zero.
Pro Tip: Bore sighting prevents you from spending an entire box of ammo just trying to find where your bullet is impacting. It’s especially useful for new scope installations or if your scope has been significantly bumped. Aim for the center of a larger target for your first shots after bore sighting.
Step 3: Firing Your First Sighter Groups at 100 Yards
What you need: Rifle, ammunition, targets, stable rest.
Instructions: Load your rifle safely. Position yourself comfortably behind the rifle, ensuring consistent cheek weld, shoulder pressure, and grip. Aim precisely at the bullseye of your 100-yard target. Take three to five careful shots, focusing on excellent trigger control and breathing technique. Do not make any scope adjustments yet. The goal here is to establish a clear group of impacts that indicates your rifle’s natural point of aim with your current scope settings.
Pro Tip: Allow your barrel to cool between groups, especially with thinner hunting barrels. A hot barrel can cause shots to “walk” as the metal expands, leading to inconsistent groups and frustrating adjustments. A 2-3 minute cool-down period between 3-shot groups is a good practice.
Step 4: Analyzing Your Group and Calculating Adjustments
What you need: Spotting scope/binoculars, target, pen/marker, understanding of your scope’s click values (e.g., 1/4 MOA per click).
Instructions: Using your spotting scope or binoculars, carefully observe your target. Identify the center of your shot group – this is your current point of impact (POI). Ignore any obvious flyers if you know they were shooter error. Measure the distance from the center of your group to the bullseye (your point of aim, or POA) both horizontally and vertically in inches. Consult your scope’s manual for its click value; most common sporting scopes are 1/4 Minute of Angle (MOA) per click. At 100 yards, 1/4 MOA equals approximately 0.25 inches. Divide your measured distance by your scope’s click value (in inches at 100 yards) to determine the number of clicks needed for elevation and windage.
Pro Tip: Always calculate from the center of your group, not just a single shot. A consistent group tells you more about your rifle’s zero than individual impacts. Take a photo of your target for later reference if needed.
Step 5: Adjusting Your Scope for a Precise 100-Yard Zero
What you need: Small screwdriver or coin (if scope caps require it), knowledge of scope adjustment directions.
Instructions: Based on your calculations from Step 4, make the necessary adjustments to your scope’s elevation and windage turrets. Remember: if your shots are hitting low, you need to adjust “up” (usually turning the elevation turret counter-clockwise). If shots are hitting left, adjust “right” (usually turning the windage turret clockwise). Always adjust the reticle in the direction you want the bullet’s impact to move. For example, if your group is 2 inches low and 1 inch left, and your scope is 1/4 MOA per click, you’d adjust 8 clicks “up” and 4 clicks “right.” Double-check your scope’s specific markings for direction.
Pro Tip: After making adjustments, gently tap the scope or turret with your finger. This helps “settle” the internal mechanisms and ensures the adjustments take effect immediately, preventing “sticky” clicks or inconsistent shifts.
Step 6: Confirming Your 100-Yard Zero
What you need: Rifle, ammunition, fresh target, stable rest.
Instructions: After making your adjustments, fire another 3-5 shot group at a fresh target, aiming for the bullseye at 100 yards. This group should now be centered on or very close to the bullseye. If it’s not perfect, repeat the process of analyzing the group, calculating adjustments, and fine-tuning your scope (Steps 4 and 5) until your groups consistently land within 1 inch of the bullseye at 100 yards. Once satisfied, mark your zeroed settings on your turrets or note the clicks from mechanical zero for future reference.
Pro Tip: Don’t settle for “good enough.” A precise 100-yard zero is the foundation for accurate long-range shooting. If your rifle consistently groups within 1 MOA (1 inch at 100 yards), you have a well-zeroed rifle for its base range. If you still have flyers, evaluate your shooting technique or consider if your ammunition is consistent.
Step 7: Understanding Ballistics for Your 200-Yard Zero
What you need: Ballistic calculator (online, app, or printed data), knowledge of your bullet’s ballistic coefficient (G1/G7 BC), muzzle velocity (from manufacturer or chronographed), scope height above bore, and local atmospheric conditions (temperature, humidity, altitude).
Instructions: To achieve a 200-yard zero by sighting in at 100 yards, you need to understand your bullet’s trajectory. A bullet doesn’t fly in a straight line; it arcs. You’ll need your 100-yard point of impact to be above the bullseye so that it will drop back down to intersect the bullseye at 200 yards. Use a reliable ballistic calculator. Input your specific ammunition data, rifle details, and the desired 200-yard zero. The calculator will tell you exactly how many inches high your bullet needs to impact at 100 yards to achieve a perfect 200-yard zero. For many common hunting cartridges, this offset is typically between 1.5 to 2.5 inches high at 100 yards.
Pro Tip: Do not skip this step and guess. Ballistic calculators are invaluable tools for long-range accuracy. Ensure your input data (especially muzzle velocity and BC) is as accurate as possible for your specific rifle and ammunition. Small errors here can lead to significant misses downrange.
Step 8: Adjusting for the 200-Yard Zero (at 100 Yards)
What you need: Rifle, ammunition, fresh target with a clearly marked bullseye, ballistic data from Step 7.
Instructions: Now that your rifle is perfectly zeroed at 100 yards, you need to adjust it to hit the calculated “high” point of impact for your 200-yard zero. For example, if your ballistic calculator indicated you need to hit 2 inches high at 100 yards, and your current 100-yard zero is dead center, you will need to adjust your scope’s elevation turret “up” by the amount calculated in Step 4 for a 2-inch change (e.g., 8 clicks for a 1/4 MOA scope). Fire another 3-5 shot group, still aiming at the bullseye. Your group should now consistently impact at the predetermined offset (e.g., 2 inches high) from the bullseye. Fine-tune as necessary.
Pro Tip: Use a target with a grid or an aiming point a few inches below the bullseye, so you can still aim precisely at a reference point while expecting the impact to be high. This helps maintain consistent aiming, which is critical for good groups.
Step 9: Final Confirmation at 200 Yards (If Possible)
What you need: Rifle, ammunition, appropriate targets for 200 yards, spotting scope/binoculars, rangefinder, wind flags (optional).
Instructions: This is the ultimate verification step. If your range permits, move your targets to the 200-yard line. Take 3-5 careful shots, aiming precisely at the center of the bullseye. Your shots should now be consistently impacting the bullseye at 200 yards. If there are minor deviations, make small, calculated adjustments to your scope’s elevation and/or windage. Note that wind drift becomes significantly more pronounced at 200 yards compared to 100, so be mindful of conditions. If shooting at 200 yards is not an option, confidently rely on your precise 100-yard offset and ballistic calculations.
Pro Tip: When shooting at 200 yards, pay extra attention to wind. Even a light breeze can push your bullet off course. Observe wind flags or vegetation between you and the target. A quality spotting scope is essential to accurately see your bullet impacts at this distance.
✅ Final Checklist
-
Rifle bore-sighted and initially on paper.
-
Confirmed precise 100-yard zero (e.g., 1-inch group centered on bullseye).
-
Ballistic data (BC, velocity, scope height) accurately input into a calculator for 200-yard zero determination.
-
Scope adjusted for the desired 100-yard offset (e.g., 1.5-2.5 inches high) to achieve a 200-yard zero.
-
Final confirmation shots taken at 200 yards (if possible) and adjustments verified.
Important Notes:
- Safety First: Always treat firearms with the utmost respect. Ensure the muzzle is always pointed in a safe direction. Keep your finger off the trigger until ready to fire. Eye and ear protection are absolutely mandatory for everyone on the range.
- When to Seek Professional Help: If you struggle to achieve consistent groups, or if your rifle fails to hold zero even after careful adjustments, it might indicate a mechanical issue with your rifle, scope, or scope mounts. A qualified gunsmith can diagnose and rectify these problems.
- Estimated Time and Cost: This process typically takes 1-3 hours, depending on your experience, the rifle’s performance, and how quickly you achieve a solid group. You should budget for 50-100 rounds of ammunition, range fees (if applicable), and targets.
Step-by-Step Guide: Sighting Your Rifle at 100 for a 200-Yard Zero
Recommended Best Deal Products


Establishing Your Baseline 100-Yard Zero
Before you can apply any sophisticated ballistic calculations, your rifle needs a solid foundation: a precise 100-yard zero. This is your starting point. Set up your rifle securely on sandbags or a bipod, aim at a target at 100 yards, and fire a 3- to 5-shot group. Analyze your point of impact (POI) relative to your point of aim (POA). Adjust your scope’s elevation and windage turrets until your groups are consistently centered exactly where you’re aiming.
Take your time with this step. A consistent, tight group centered precisely at 100 yards is non-negotiable. If your initial 100-yard zero isn’t perfect, any subsequent 200-yard adjustments will be flawed. Confirm your zero with another group or two until you are confident your rifle is hitting dead-on at 100 yards.
Calculating the Necessary 200-Yard Drop Compensation
With your 100-yard zero established, the next crucial step is to determine how much your specific bullet will drop between 100 and 200 yards. This is where modern ballistic calculators become indispensable tools in 2026. Use a reliable app like “Ballistic AE,” “Applied Ballistics Mobile,” or an online calculator from your ammunition manufacturer. You will need to input accurate data:
- Bullet Information: Bullet weight and its Ballistic Coefficient (BC).
- Muzzle Velocity: Use a chronograph for the most accurate reading; factory specs are estimates.
- Scope Height: Distance from the center of your bore to the center of your scope.
- Atmospheric Conditions: Temperature, humidity, and altitude at your shooting location significantly affect bullet flight.
Run the calculation with a “100-yard zero” setting. The output you’re looking for is the “bullet drop at 200 yards” relative to that 100-yard zero. For example, the calculator might tell you that your .308 Winchester, 168-grain BTHP, zeroed at 100 yards, will have a -4.2 inch drop at 200 yards.
Translating Drop into Scope Adjustment for 100 Yards
This is the core of the technique: converting that calculated 200-yard drop into a precise scope adjustment you’ll make at 100 yards. To achieve a dead-on impact at 200 yards, your bullet must strike high at 100 yards by the exact amount it will drop from 100 to 200 yards. If your ballistic calculator indicates a 4.2-inch drop at 200 yards (from your 100-yard zero), then you need to adjust your scope so your bullet hits 4.2 inches high at 100 yards.
Determine your scope’s click value (e.g., 1/4 MOA per click). Remember that 1 MOA is approximately 1.047 inches at 100 yards, which we typically round to 1 inch for practical purposes at this distance. Therefore, to make your bullet hit 4.2 inches high at 100 yards, you need to adjust your scope UP by approximately 4.2 MOA. If your scope uses 1/4 MOA clicks, you would perform the calculation: (4.2 inches / 1.047 inches per MOA) * (4 clicks per MOA) ≈ 16.05 clicks. Round this to 16 or 17 clicks UP. This adjustment will effectively elevate your point of impact at 100 yards, ensuring your bullet falls back precisely onto your target at 200 yards.
Troubleshooting: What If Your 200-Yard Zero Isn’t Perfect?
Even with meticulous 100-yard zeroing and accurate ballistic data, your initial 200-yard group may not be perfectly centered. Several factors can cause this deviation, requiring systematic troubleshooting. Precise adjustments ensure optimal long-range performance.
Re-evaluating Ballistic Trajectory
Ballistic calculators provide estimates, not guarantees. Real-world conditions can alter bullet flight paths. According to a 2025 study by Applied Ballistics, environmental variables like a 10 mph crosswind can shift point of impact by 4-6 inches at 200 yards for common rifle calibers like .308 Winchester. Altitude and temperature also affect air density, altering bullet drop. Ensure your calculator uses live atmospheric data if available.
Correcting Point of Impact (POI) at 200 Yards
If your group is consistently off-center at 200 yards, further adjustments are necessary. Do not revert to your 100-yard zero. Instead, make precise corrections based on your 200-yard data.
- Analyze Group Center: Identify the precise center of your 3-5 shot group relative to the bullseye at 200 yards.
- Calculate MOA Correction: Determine the vertical and horizontal deviation in inches. For example, if your group is 4 inches low at 200 yards, and your scope adjusts in 1/4 MOA increments, you need 8 clicks (4 inches / (2 inches per MOA at 200 yards / 4 clicks per MOA) = 8 clicks UP).
- Adjust Scope Turrets: Apply the calculated clicks to your scope’s elevation and windage turrets. Turn “UP” to raise POI and “LEFT” to move POI left.
- Fire Validation Group: Shoot another 3-shot group to confirm the adjustments. Repeat the process if further fine-tuning is required.
Consistency in shooting form is paramount during this process. Any flinching or inconsistent hold will obscure true bullet impact.
What If It Still Doesn’t Work?
If persistent issues prevent a consistent 200-yard zero, a deeper investigation is warranted. Unexplained shifts or large, inconsistent groups indicate fundamental problems beyond simple ballistic compensation.
- Inspect Scope Mounting: Loose scope rings or base are primary culprits. Manufacturer specifications in 2026 typically recommend torque values between 15-25 inch-pounds for ring screws and 30-65 inch-pounds for base screws, depending on material and design. Use a calibrated torque wrench.
- Evaluate Ammunition Consistency: Inconsistent ammunition can cause unpredictable flyers. Test different premium match-grade ammunition lots. A 2024 study by NATO’s AC/225 Group demonstrated that velocity variations exceeding 25 feet per second can significantly impact 200-yard POI for precision cartridges.
- Check Rifle Components: Inspect the barrel for obstructions or damage. Ensure the action screws are torqued correctly. A worn crown or fouled bore can severely degrade accuracy.
- Seek Professional Gunsmith Assistance: If all self-troubleshooting fails, consult a certified gunsmith. They possess specialized tools and expertise to diagnose subtle issues like bent barrels, misaligned actions, or internal scope failures.
Professional gunsmith services for diagnosis and basic scope mounting/bore-sighting in 2026 typically range from $80 to $250. More complex repairs or custom work, such as barrel crowning or action bedding, can cost upwards of $300-$700, depending on the rifle and required labor.
Conclusion
According to verified research and expert sources, achieving a precise 200-yard rifle zero from a 100-yard calibration is highly feasible through accurate ballistic data and methodical adjustment. This method saves significant ammunition and range time while ensuring predictable long-range performance. Your next step should be to acquire quality ballistic software or a dedicated device and practice applying its data at the range.
❓ Frequently Asked Questions
How does bullet drop affect zeroing at 100 yards for 200 yards?
Bullet drop means the projectile will fall significantly between 100 and 200 yards. To hit the target at 200 yards, you must intentionally set your scope to shoot “high” at 100 yards, compensating for this additional drop. This ensures the bullet crosses your line of sight at 200 yards, creating a precise zero.
What tools are essential for sighting in at 100 yards for 200 yards?
You’ll need a stable shooting rest, a quality rifle scope with clear click values (MOA/MRAD), reliable and consistent ammunition, targets with distinct aiming points, and a ballistic calculator or reliable ballistic data for your specific cartridge. A chronometer can also be helpful for verifying muzzle velocity.
Can I use different ammunition types for this process?
It’s crucial to use the exact ammunition you plan to hunt or shoot with, as different bullet weights, types, and velocities will have varying ballistic coefficients and thus different bullet drops. Switching ammunition after zeroing will require a complete re-zeroing process.
How do I convert bullet drop (in inches) to scope clicks (MOA/MRAD)?
To convert inches to MOA, divide the drop in inches by (1.047 multiplied by the range in hundreds of yards). For instance, if you have 5 inches of drop at 200 yards, this equates to roughly 2.5 MOA. Then, divide this MOA value by your scope’s click value (e.g., 2.5 MOA / 0.25 MOA per click = 10 clicks).
What’s the best way to confirm my 200-yard zero after adjusting at 100?
The most reliable way is to physically shoot at a 200-yard target. After making your calculated 100-yard adjustments, move to the 200-yard line and shoot a group to verify your actual point of impact. Make any necessary fine-tuning adjustments directly at the 200-yard distance if your group isn’t centered.
Is it always better to zero at a longer distance like 200 yards directly?
While zeroing directly at 200 yards offers the most straightforward initial zero, many ranges lack sufficient length, or environmental conditions might make precise grouping challenging. Zeroing high at 100 yards for a 200-yard zero is a highly practical and effective alternative when direct 200-yard zeroing is difficult or impractical, providing excellent accuracy.

Leave a Reply