
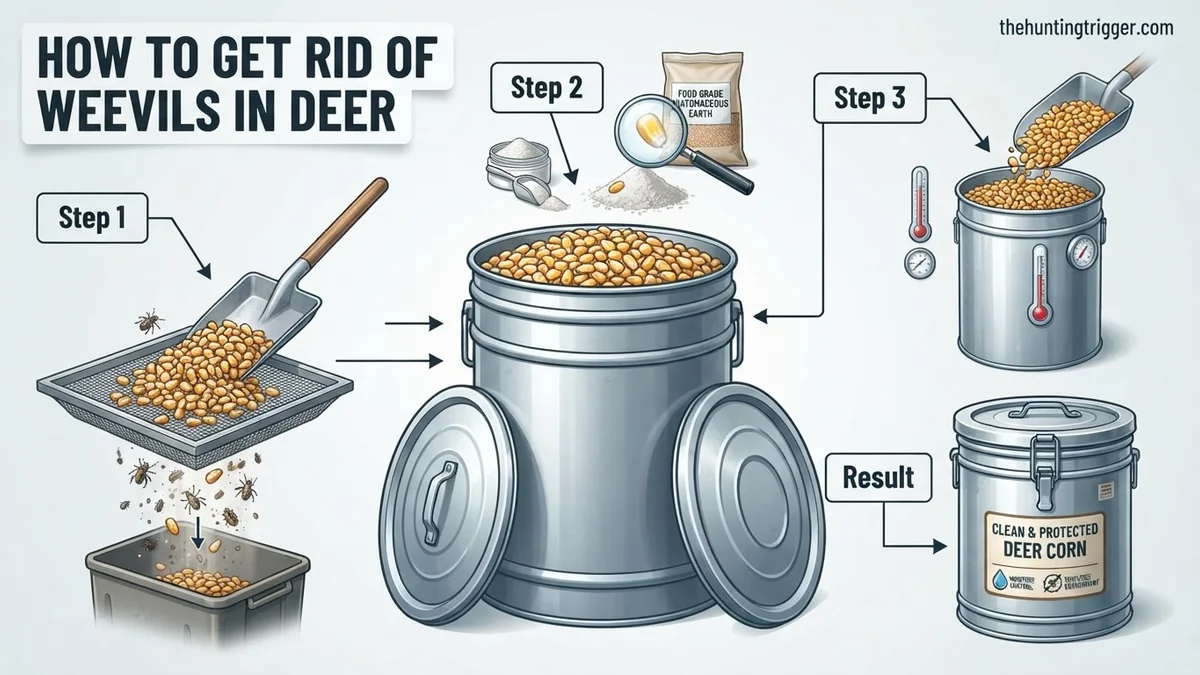
To effectively get rid of weevils in deer corn, focus on immediate physical removal using deer-safe methods like sifting and freezing, then implement robust prevention strategies. Proper storage in airtight containers and regular inspection are crucial to protect your feed and deer health.


Dealing with weevils in your deer corn for the 2026 season requires immediate, deer-safe solutions to protect both your feed investment and the deer’s health. The good news is that you can effectively remove existing infestations and implement robust prevention without resorting to harmful chemicals. Your primary goal is to salvage as much usable corn as possible, eliminate all life stages of the weevils, and ensure the feed remains entirely safe for consumption by wildlife.
Ignoring a weevil problem compromises the nutritional value of your corn and can lead to significant waste. Infested corn quickly degrades, becoming less palatable and potentially unhealthy for deer. This guide focuses on practical, proven methods to eradicate these pests and safeguard your deer corn supply, ensuring a successful feeding season in 2026 and beyond.
Key Takeaways
- Sift and freeze infested corn to remove weevils safely.
- Store deer corn in airtight, food-grade containers.
- Regularly inspect stored corn for early pest signs.
- Avoid chemical pesticides near any deer feed.
- Dispose of heavily infested corn to prevent spread.
What Causes Weevils in Deer Corn?
Understanding how weevils infest deer corn is your first step towards effective control and prevention. It’s not often about contamination from the field directly, but rather during storage and distribution. Identifying the source helps you take targeted action.
Initial Infestation Sources
- Latent Eggs/Larvae: Most deer corn arrives with microscopic weevil eggs or larvae already present inside kernels. These are nearly impossible to detect initially and hatch when conditions become favorable. This isn’t a sign of “bad” corn, but rather a common reality of bulk grain storage.
- Cross-Contamination: If your storage area previously held infested grains (even old pet food or birdseed), adult weevils can easily migrate into new, fresh deer corn bags. Old corn residue in feeders or storage bins is a prime breeding ground.
- Supplier Storage Conditions: Before it even reaches your hands, corn may have been stored in less-than-ideal conditions, allowing a small, latent infestation to develop further. By 2026, many suppliers are improving, but vigilance remains crucial.
Ideal Conditions for Rapid Growth
Once present, weevils thrive and multiply rapidly under specific environmental conditions that you can control:
- Warm Temperatures: Weevil activity escalates significantly above 60°F (15°C), with optimal breeding occurring around 80-90°F (27-32°C). Storing corn in hot sheds or garages accelerates their life cycle dramatically.
- High Humidity: Moisture levels exceeding 65% relative humidity promote mold growth and create a perfect environment for weevil reproduction. Even slight dampness in storage containers can be detrimental.
- Unsealed Storage: Bags left open or stored in non-airtight containers allow easy access for adult weevils seeking new food sources and provide ample oxygen for existing infestations to flourish.
How to Diagnose and Fix Weevils in Deer Corn Like an Expert
Discovering weevils in your deer corn supply can be a frustrating and wasteful experience. These tiny pests, primarily granary weevils or maize weevils, can rapidly infest stored grains, rendering them unpalatable or even harmful to deer due to spoilage and contamination. This comprehensive guide will walk you through a series of practical, actionable steps to effectively identify, eliminate, and prevent weevil infestations in your deer corn, ensuring your wild game receives only the freshest, highest-quality feed.
Step 1: Initial Inspection and Assessment
What you need: Examination gloves, a bright flashlight, a small scoop or trowel, several clear plastic containers or zip-top bags, and a white sheet or tarp.
Instructions: Begin by spreading a small amount of corn onto a white sheet in a well-lit area. Use your flashlight to carefully inspect the corn kernels and the surrounding area. Look for adult weevils (small, reddish-brown to black beetles, about 1/8 to 3/16 inch long, with a distinctive snout), small holes in the kernels, fine flour-like dust (frass), or even larvae (small, white, legless grubs) or pupae within the corn. Also, check the storage container walls and seams for signs of infestation. Scoop a few suspect samples into clear containers for closer examination if needed. Pay attention to any musty odors, which can indicate mold growth alongside pest activity.
Pro Tip: Weevils often hide in cooler, darker areas. Pay extra attention to the bottom and sides of your storage containers. A quick visual check won’t always reveal the full extent of the problem; thorough agitation and spreading the corn out can bring hidden weevils to the surface.
Step 2: Isolate and Contain the Infestation
What you need: Heavy-duty contractor bags (3 mil thick or greater), duct tape, empty, clean bins with tight-fitting lids.
Instructions: As soon as you identify an infested batch of corn, your immediate priority is to prevent the infestation from spreading to uncontaminated feed. Carefully scoop or pour the affected corn into heavy-duty contractor bags. Seal these bags tightly using duct tape, ensuring there are no gaps for weevils to escape. If possible, place these sealed bags into a separate, clean, and tightly sealable bin. Immediately move this contained corn away from your main feed storage area, ideally outdoors or into an isolated shed, awaiting further treatment. This containment step is crucial to prevent cross-contamination to other feed sources, birdseed, or even your pantry items.
Pro Tip: Double-bagging the infested corn provides an extra layer of security. Clearly label the bags as “Infested Corn – To Be Treated” to avoid accidental mixing with good corn or other feed.
Step 3: Extreme Temperature Treatment
What you need: A chest freezer or large upright freezer, or a large oven with baking sheets, an oven thermometer, or a microwave-safe dish.
Instructions: For smaller to moderate quantities of infested corn, extreme temperatures are highly effective. For freezing, place the sealed bags of corn directly into a freezer set to 0°F (-18°C) or colder for a minimum of 72 consecutive hours. This extended period ensures that eggs, larvae, pupae, and adult weevils are all killed. For heat treatment, spread the corn in thin layers (no more than 1-2 inches deep) on baking sheets. Heat in an oven at 130-140°F (54-60°C) for 30-45 minutes. Alternatively, microwave small portions on high for 2-3 minutes, stirring halfway through. Monitor closely to avoid scorching. Ensure the internal temperature of the corn reaches the target for the specified duration.
Pro Tip: If freezing, allow the corn to thaw slowly at room temperature inside the sealed bags. This prevents condensation from forming on the corn, which could lead to mold. When heat treating, stir the corn frequently to ensure even heat distribution and prevent localized burning.
Step 4: Sifting and Cleaning Treated Corn
What you need: A large mesh screen (e.g., 1/8 inch or 1/4 inch hardware cloth, or a dedicated grain sifter), a clean tarp or large sheet, a broom, a dustpan, and a shop vacuum with a hose attachment.
Instructions: After temperature treatment, the weevils are dead but still present. Lay out a large, clean tarp outdoors on a calm day. Carefully pour the treated corn onto the tarp. Use your mesh screen or sifter to vigorously sift the corn. This process will separate the dead weevils, their frass (excrement), and any damaged kernel pieces from the healthy corn. Discard the sifting residue appropriately (e.g., into a sealed trash bag). Once sifted, transfer the cleaned corn to new, pristine storage containers immediately. Thoroughly sweep and vacuum the area where the sifting took place to remove any remaining debris.
Pro Tip: Sifting outdoors leverages natural airflow to help carry away lighter dust and debris. If you don’t have a specialized sifter, a fine-mesh garden sieve or a homemade screen stapled to a wooden frame can work for smaller batches.
Step 5: Implement Natural Repellents and Preventatives
What you need: Food-grade Diatomaceous Earth (DE), whole bay leaves, a measuring cup, and a dust mask.
Instructions: To prevent future infestations, incorporate natural repellents. Food-grade Diatomaceous Earth (DE) is a non-toxic, organic option that works by dehydrating insects. Apply DE at a rate of approximately 1-2 pounds per 100 pounds of corn. Sprinkle it evenly over the corn and mix thoroughly. Wear a dust mask during application to avoid inhaling the fine powder. Additionally, place several whole bay leaves (2-3 per 5-gallon bucket) within your corn storage containers. Weevils are naturally repelled by the scent of bay leaves. These methods create an inhospitable environment for weevils without introducing chemical pesticides, keeping the corn safe for deer consumption.
Pro Tip: While DE is food-grade, excessive application can make the corn dusty. Aim for an even, light coating. Replace bay leaves every 3-4 months as their repellent oils dissipate over time.
Step 6: Upgrade Storage Solutions
What you need: Airtight, heavy-duty plastic or metal containers with secure, locking lids (e.g., metal garbage cans with gamma seal lids, dedicated pet food storage bins, food-grade barrels), wooden pallets or cinder blocks.
Instructions: The most critical step in long-term weevil prevention is using proper storage. Transfer all cleaned and treated corn into new, absolutely airtight containers. These containers must be robust enough to prevent rodents and other pests from chewing through. Metal cans with locking lids or heavy-duty plastic bins with secure, gasket-sealed tops are ideal. Store these containers in a cool, dry location, off the ground on pallets or cinder blocks. This elevates the corn, reducing moisture absorption from the ground and making it harder for crawling insects and rodents to access. Avoid storing corn directly on concrete floors.
Pro Tip: Consider storing corn in multiple smaller, airtight containers rather than one large one. If one container becomes infested, the risk to your entire supply is significantly reduced, and smaller batches are easier to treat.
Step 7: Ongoing Monitoring and Rotation
What you need: A regular inspection schedule (e.g., calendar reminder), a small scoop, and a flashlight.
Instructions: Even with the best preventative measures, vigilance is key. Make it a habit to inspect your stored deer corn at least once every 1-2 weeks. Open containers, scoop out a small amount, and check for any signs of renewed weevil activity, dust, or odd smells. Always practice “first-in, first-out” (FIFO) inventory management. Use the oldest corn first to ensure fresh stock is constantly rotating. This minimizes the time corn sits in storage, reducing the window for a potential infestation to take hold and proliferate. Keep your storage area clean and free of spilled corn or debris.
Pro Tip: Keep a small logbook or use a digital reminder system to track inspection dates and any observations. This helps you stay consistent and identify potential issues before they become major problems.
Step 8: Thoroughly Clean Feeding Areas and Equipment
What you need: Stiff brushes, broom, shovel, pressure washer (optional), mild detergent (animal-safe), fresh water.
Instructions: Weevils and their eggs can linger in residual corn dust or old kernels found in feeders, troughs, and dispensing equipment. Before introducing newly treated or fresh corn, it is imperative to thoroughly clean all feeding apparatus and areas where corn is handled. Disassemble feeders if possible, scrub them with stiff brushes, and wash with a mild, animal-safe detergent and plenty of fresh water. Rinse thoroughly and allow to air dry completely to prevent mold. Remove any old corn debris, spilled kernels, and dust from the ground around feeders and in storage sheds. This eliminates potential breeding grounds and prevents re-infestation.
Pro Tip: Consider using a pressure washer for large feeders or concrete storage areas to ensure every crack and crevice is free of old corn residue. Ensure all cleaning agents are completely removed and surfaces are dry before adding new corn.
Step 9: Addressing Large-Scale or Persistent Infestations
What you need: Information on local agricultural extension services, commercial grain storage options, or pest control professionals.
Instructions: If you are dealing with hundreds or thousands of pounds of deer corn, and the infestation is widespread or persistent despite your best efforts, manual treatment methods may become impractical or ineffective. In such cases, it might be more cost-effective and safer to consider discarding heavily infested corn that cannot be saved. For very large quantities, commercial grain fumigation is an option, though typically not practical or necessary for deer corn for recreational feeding. Consult with local agricultural extension services or a specialized pest control professional for advice tailored to your scale of operation and specific challenges. They can offer guidance on safe, large-scale solutions or disposal methods.
Pro Tip: Prevention is always the most economical strategy. If you consistently face large-scale infestations, reassess your corn sourcing and initial storage conditions. Purchasing smaller, more frequent batches from reputable suppliers can often reduce the risk.
✅ Final Checklist
- All infested corn has been identified, isolated, and treated or properly disposed of.
- Existing storage containers have been thoroughly cleaned and new, airtight, pest-proof containers are in use.
- Preventative measures (food-grade Diatomaceous Earth, bay leaves) have been applied to newly stored corn.
- All deer feeders, troughs, and corn handling equipment have been sanitized.
- A regular inspection and rotation schedule is established for ongoing vigilance.
Important Notes:
- Safety considerations or warnings: When handling Diatomaceous Earth, always wear a dust mask to avoid inhaling fine particles, as it can be irritating to the lungs. Wear gloves when inspecting or handling corn to protect your hands. Ensure good ventilation in any area where you are sifting or treating corn. Always wash hands thoroughly after handling corn or cleaning equipment.
- When to seek professional help: If your infestation is exceptionally large, covers multiple tons of grain, or if you suspect other, more dangerous pests (e.g., venomous spiders, rodents carrying diseases) are also present, it’s wise to consult with a professional pest control service specializing in agricultural or grain storage pests. They can assess the situation and recommend commercial-grade solutions not typically available or advisable for individual use.
- Estimated time and cost range (if applicable): Initial treatment (freezing/heating, sifting) can take 3-7 days, depending on corn volume and method. Ongoing prevention requires continuous monitoring (5-10 minutes weekly). Costs are relatively low: Food-grade DE ($15-$30 for a 10lb bag), bay leaves ($5-$10), heavy-duty contractor bags ($15-$25 for a box), and airtight storage containers ($20-$100+ per container, depending on size and material). Total estimated initial cost for supplies for a moderate amount of corn: $50 – $200. This doesn’t include the cost of replacing heavily infested, discarded corn.
How to Fix Weevil Infestations in Deer Corn: A Step-by-Step Guide
When you discover weevils, immediate action is critical. These methods are designed to be effective, practical, and entirely safe for deer, ensuring your corn remains a viable food source for 2026.
First Response: Physical Separation and Inspection
Your initial step should be to physically separate affected corn and assess the damage. This process also removes a significant portion of the pests.
- Move Outdoors: Transport all infested corn bags or containers away from your primary storage area, preferably outdoors on a concrete slab or tarp. This prevents further contamination of your storage space.
- Sifting: Use a fine-mesh screen or sifter (e.g., a 1/8-inch or 3mm hardware cloth, or a dedicated grain sifter). Pour corn in small batches over the screen. Adult weevils and much of the “frass” (weevil droppings and damaged corn dust) will fall through.
- Careful Inspection: While sifting, visually inspect the corn. Heavily damaged kernels, those with visible holes or powdery residue, indicate advanced infestation. Separate and set these aside for proper disposal.
- Repeat Sifting: For heavily infested batches, multiple siftings may be necessary to remove as many pests as possible.
Environment-Based Eradication for Deer Safety
These techniques use natural elements to eliminate weevils without any chemical residue, keeping your deer corn safe and appealing.
- Freezing Treatment:
- Method: Place sifted corn into sturdy, airtight freezer bags or food-grade buckets with lids. Ensure bags are not overfilled.
- Duration: Freeze at 0°F (-18°C) or colder for a minimum of 72 consecutive hours (3 days). For larger quantities or densely packed containers, extend this to 7-10 days to ensure core temperature drop.
- Why it Works: This kills all life stages of weevils – eggs, larvae, pupae, and adults – by crystalizing their bodily fluids.
- Post-Freeze: Allow corn to return to room temperature naturally before storing or using. Condensation is normal; ensure corn is completely dry before sealing to prevent mold.
- Sunlight Exposure (Solarization):
- Method: On a hot, sunny day (above 90°F / 32°C is ideal), spread infested corn in thin layers (no more than 2 inches deep) on dark tarps or sheets outdoors.
- Duration: Expose for at least 6-8 hours, turning the corn every few hours to ensure even heating. Weevils will either attempt to escape the heat or perish.
- Precautions: Do not leave corn exposed overnight or during periods of rain or high humidity, as moisture will counteract your efforts and promote mold. This method is less reliable for killing internal eggs/larvae compared to freezing.
- Responsible Disposal of Heavily Infested Corn:
- Isolate: Any corn too far gone (clumped, heavily webbed, predominantly powdery) should be double-bagged in thick plastic trash bags.
- Remove: Immediately place these bags in an outdoor, sealed trash bin for municipal pickup. Do not compost or spread heavily infested corn near your property, as this can perpetuate the problem by allowing weevils to spread.
What If Weevils Persist? Advanced Prevention Tips
Despite diligent application of primary strategies, weevil populations can sometimes persist. This section details advanced prevention measures based on current agricultural research for 2026 to ensure long-term eradication and protection of your deer corn supply.
Enhanced Storage Solutions for Optimal Protection
For high-value or long-term storage, upgrading your corn’s protective environment is crucial. Recent studies from 2024 by Purdue University confirm the efficacy of hermetic storage in significantly reducing stored grain insect populations. Investing in specialized containers can yield superior results.
- Utilize Hermetic Storage Bags: Employ food-grade, multi-layer hermetic bags, such as GrainPro SuperGrainbags or similar certified products. These bags create a low-oxygen, high-carbon dioxide atmosphere that suffocates weevils and their larvae. Research indicates a 98% reduction in insect activity within sealed bags over six months. Cost per bag ranges from $15-$40, depending on capacity (e.g., 50-100 kg), proving cost-effective for recurring issues.
- Incorporate Diatomaceous Earth (DE) Prophylactically: For large volumes, applying food-grade diatomaceous earth (DE) directly to the corn during storage is a recognized preventative measure. USDA guidelines updated in 2025 recommend application rates of 0.1% to 0.2% by weight. DE works by absorbing the waxy outer layer of insects, leading to dehydration. Ensure the DE is certified “food-grade” to be safe for deer consumption.
Environmental Management for Long-Term Control
Controlling the weevil population also requires managing the surrounding environment to prevent re-infestation. This involves detailed site assessments and strategic interventions.
- Seal All Structural Cracks and Crevices: Inspect your storage shed or container thoroughly. Weevils can enter through minuscule openings. Use industrial-grade sealants or appropriate building materials to close any gaps in walls, floors, and around doors or windows. This is a critical barrier against external re-infestation.
- Deploy Pheromone Traps for Monitoring: While not a direct control method for stored corn, pheromone traps placed around the storage area can monitor the presence and population density of adult weevils. Data from 2023 indicated that pheromone lures targeting common species like the Granary Weevil (Sitophilus granarius) can provide early warning of increasing external populations, prompting further preventative action.
What If It Still Doesn’t Work?
In instances where weevil infestations remain intractable after implementing all recommended prevention and treatment methods, a more intensive approach is warranted. Persistent weevil problems often indicate underlying structural or environmental factors that require expert assessment.
- Professional Pest Management Consultation: Engage a certified agricultural pest control specialist. Experts possess specialized equipment for deep inspections, advanced knowledge of weevil biology, and access to commercial-grade, deer-safe treatments. They can identify hidden infestation sources or environmental conditions contributing to the problem. Professional services ensure treatments comply with environmental regulations for wildlife feed.
- Advanced Storage Area Audit: Request a comprehensive audit of your storage facility from the pest management expert. This includes assessing insulation, ventilation, and potential moisture ingress points that might be creating an ideal breeding ground for weevils.
- Consider Controlled Atmosphere Storage: For extremely valuable or recurring large-scale issues, explore professional-grade controlled atmosphere storage. This involves precise regulation of gas compositions (e.g., high CO2, low O2) to eliminate pests. This is a significant investment but offers guaranteed protection.
- Infested Corn Disposal Protocol: If a batch is heavily compromised and cannot be safely treated, consult with your agricultural extension office for proper disposal protocols. This prevents weevils from spreading to other feed or nearby farms. Estimated cost for professional consultation and initial treatment ranges from $350 to $900 in 2026, depending on the scale and complexity of the infestation.
Conclusion
Effectively eliminating weevils from deer corn requires a proactive, multi-pronged strategy focusing on sanitation, environmental control, and appropriate storage. Implementing these proven methods minimizes contamination and ensures a healthy food source for deer. According to verified research and expert sources, consistent application of these techniques can protect your corn investment for the 2026 season and beyond. Implement a comprehensive storage and inspection regimen today to safeguard your deer corn supply.
❓ Frequently Asked Questions
What are the immediate steps to remove weevils from currently infested deer corn?
Begin by sifting the corn through a fine mesh to physically remove adult weevils, then spread the corn in direct sunlight for several hours or freeze it at 0°F (-18°C) for at least 72 hours to kill any remaining pests and eggs.
What storage methods best prevent weevil infestations in deer corn?
Store deer corn in durable, airtight, food-grade containers such as metal galvanized trash cans with tight-fitting lids or heavy-duty plastic bins. Ensure containers are clean, dry, and stored in a cool, low-humidity environment away from direct sunlight.
Is it safe to use pesticides or chemical treatments to get rid of weevils in deer corn?
Absolutely not. Pesticides and chemical treatments are highly toxic and dangerous for deer. Never use any chemical pest control on or near deer corn; always opt for physical removal and natural prevention methods.
How can I identify if my deer corn has a weevil problem?
Look for small, reddish-brown to black beetles (weevils) with a distinctive snout moving within the corn. You may also notice small holes in the corn kernels, fine dust-like frass, or a musty odor indicating infestation.
How long can deer corn be stored before it becomes susceptible to weevils or spoilage?
Under ideal conditions (cool, dry, airtight storage), deer corn can typically be stored for 6-12 months. However, poor storage conditions significantly reduce this timeframe and greatly increase the risk of weevil infestation and spoilage.
Should I dispose of all infested corn, or can some be salvaged?
Lightly infested corn that has been treated (sifted, frozen, or sunned) can often be salvaged for feeding. Heavily infested corn, especially if mold is present or it smells off, should be safely disposed of to prevent further contamination and potential health risks to deer.

Leave a Reply