
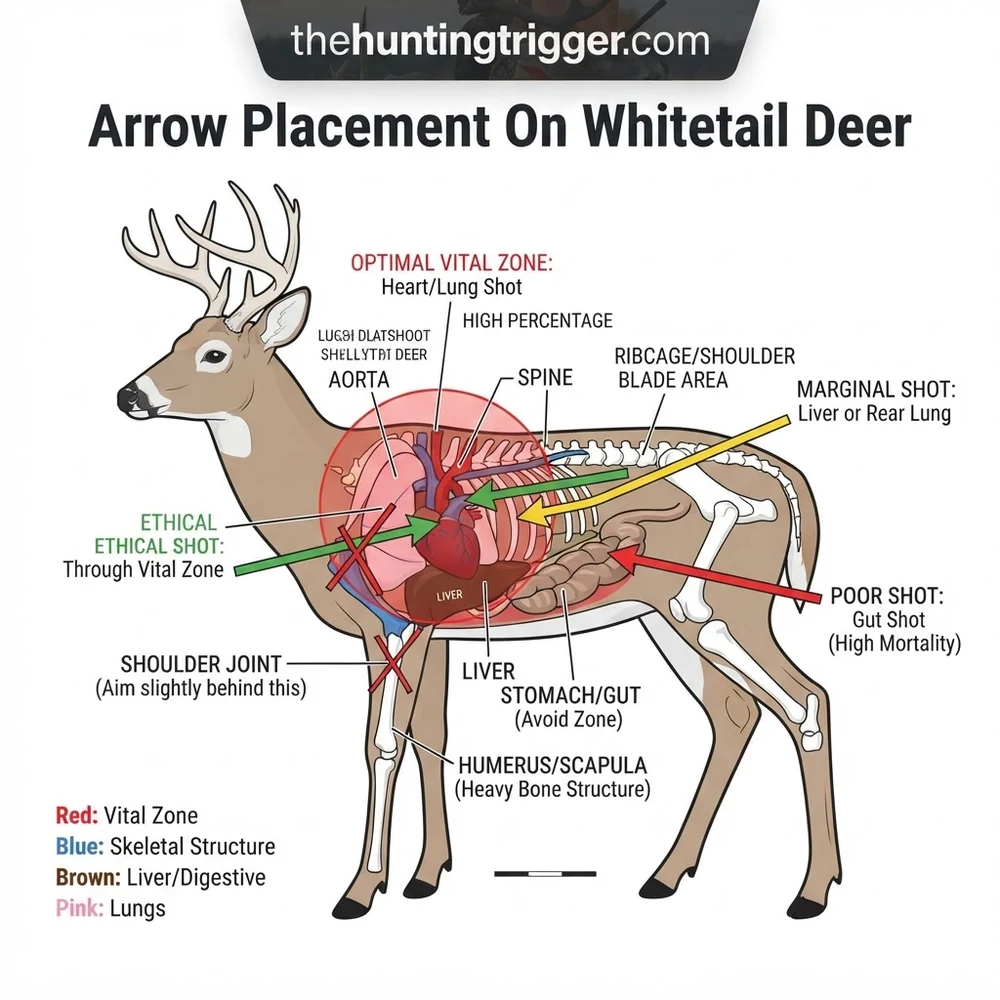
Optimal arrow placement targets the heart and lungs, situated directly behind the shoulder, slightly below the center of the body mass. A shot angled correctly through the rib cage, avoiding the heavy shoulder bone structure, ensures a quick, ethical harvest by disrupting vital system configuration and blood flow, crucial for humane hunting.


📌 Key Takeaways
- The primary vital component targets are the heart and lungs, forming the largest ethical shot zone.
- Accurate identification of the shoulder blade and humerus bone structure is critical to avoid deflected shots.
- Optimal shot angles (broadside, quartering-away) significantly increase the likelihood of hitting vitals and proper arrow pass-through.
- The most common failure point is a ‘shoulder hit’ or ‘gut shot’ resulting from misjudging the deer’s body layout or angle.
- Extensive practice with anatomical diagrams and 3D targets is essential before attempting a live hunt to perfect your arrow placement system.
Achieving an ethical and effective arrow placement on whitetail deer is paramount for any bowhunter. This detailed guide goes beyond basic targeting, offering a comprehensive technical overview of whitetail anatomy, shot dynamics, and equipment considerations. Understanding the intricate biological blueprint of a deer, the physics of arrow trajectory, and the critical role of equipment configuration are essential for consistent, humane harvests. This article provides the foundational knowledge and practical strategies necessary to maximize your success rate and uphold the highest standards of ethical hunting. Whether you’re refining your technique or seeking to diagnose shot performance, mastering these principles will elevate your bowhunting proficiency.
(Please insert a detailed diagram here depicting the internal and external anatomy of a whitetail deer, clearly labeling vital organs (heart, lungs, liver, stomach), major skeletal structures (shoulder blade, spine, leg bones, ribs), and ideal arrow penetration zones for various shot angles. The diagram should be professional, schematic, and suitable for a technical audience.)
Understanding Whitetail Deer Anatomy: The Blueprint for Ethical Arrow Placement
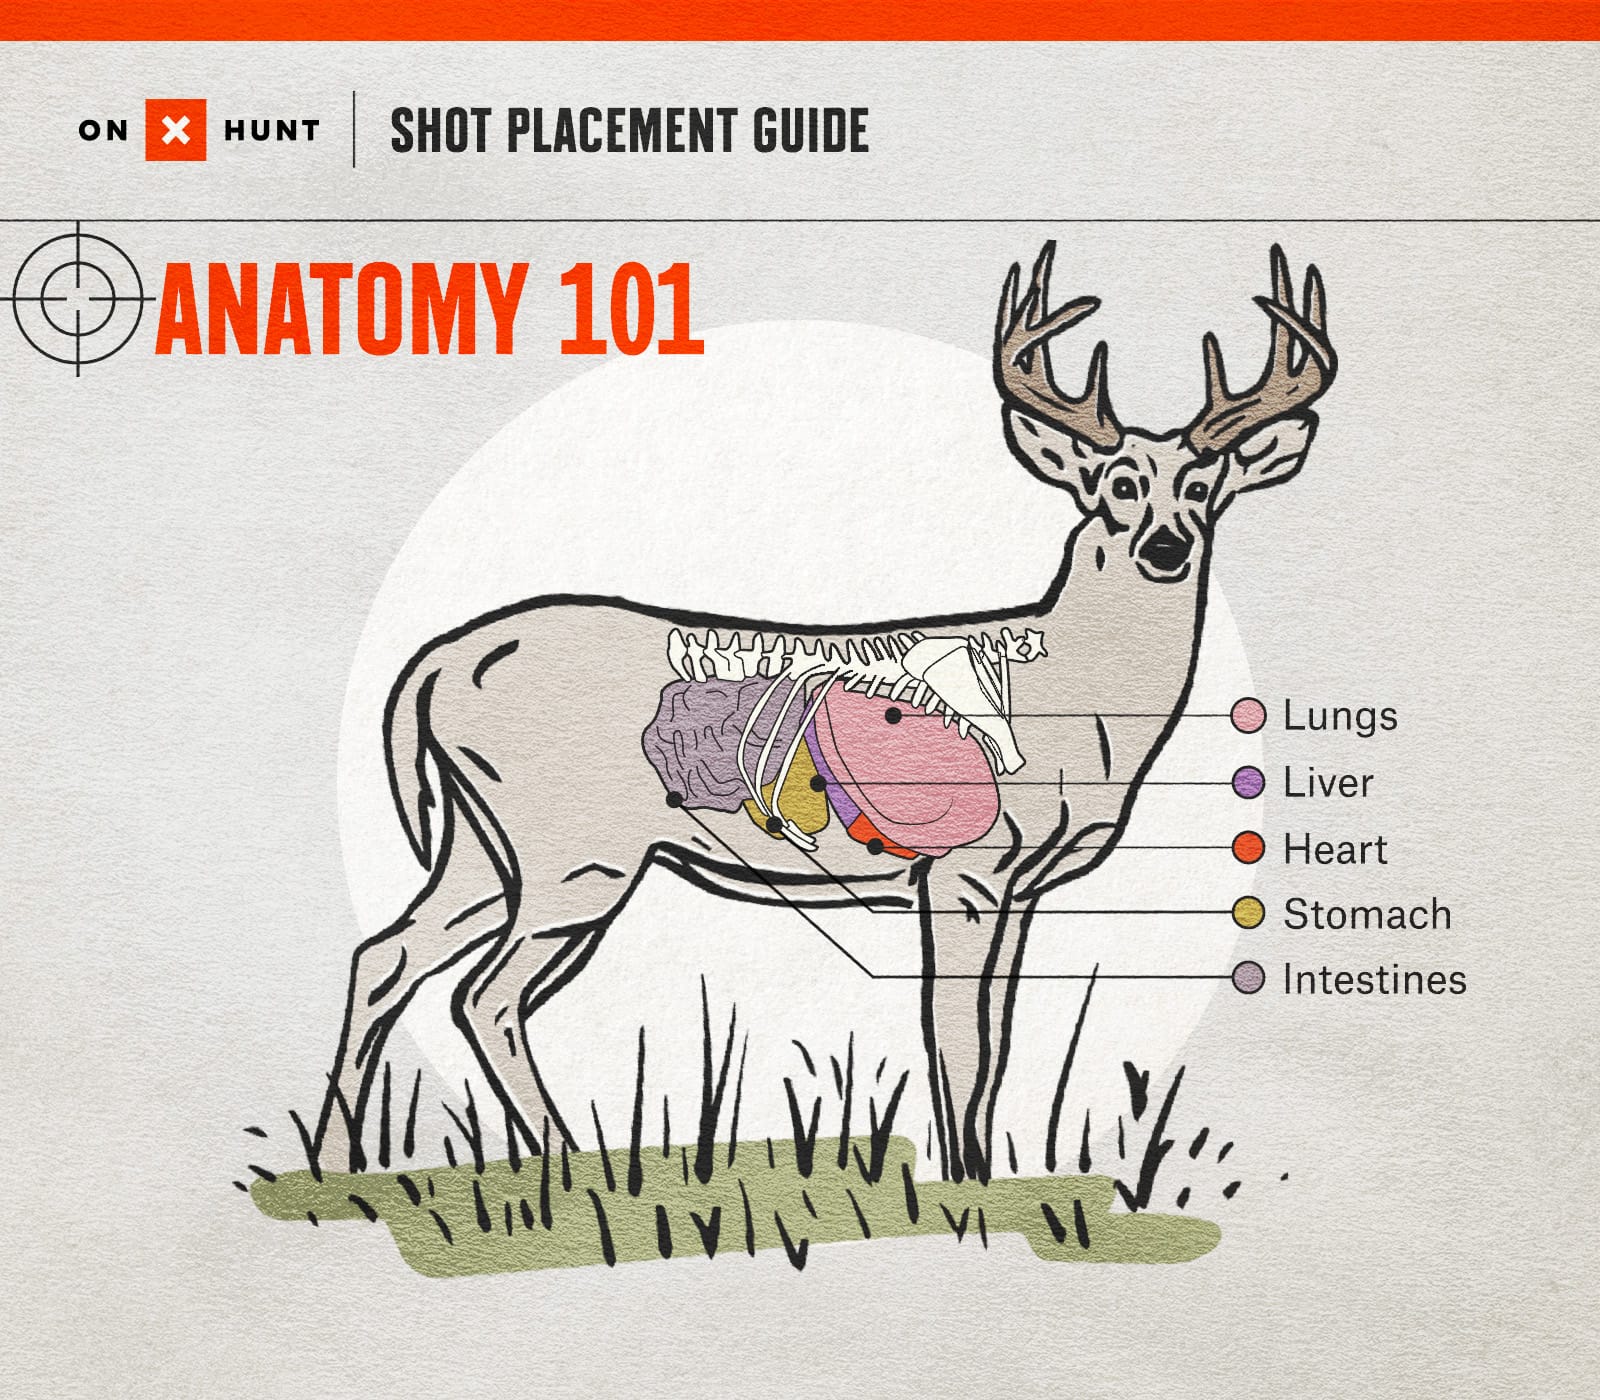
To consistently achieve optimal arrow placement on whitetail deer, a precise understanding of their internal anatomical structure is non-negotiable. This biological blueprint dictates the ideal aiming points, ensuring a swift and humane harvest. Far from a simple target, a deer’s vital system is a compact, robust configuration requiring surgical precision.
At the core of an ethical shot is targeting the heart-lung complex. The lungs, positioned just behind the shoulder blade and above the elbow, are large, paired organs extending from roughly the animal’s mid-chest to just in front of the diaphragm. They are the largest vital target. A broadhead passing through both lungs (a “double lung shot”) causes rapid systemic failure, as oxygen transport ceases. The heart, a comparatively smaller but dense muscular component, resides low in the chest cavity, nestled between the lungs, and slightly forward of the diaphragm, directly behind the deer’s leg bone when standing broadside. While a direct heart shot is instantly fatal, its smaller size makes it a less forgiving primary target.
The skeletal structure of a whitetail deer significantly influences arrow trajectory and penetration. The shoulder blade (scapula) is a large, flat bone that covers a substantial portion of the upper lung area. An arrow striking the shoulder blade directly is likely to be deflected or stopped, resulting in a superficial wound or insufficient penetration. Therefore, understanding its exact layout and aiming to avoid it is crucial. The ribs, while offering some protection, are relatively thin and can be penetrated by a well-placed, high-energy arrow and broadhead configuration. The spine, running along the deer’s back, is another critical structure. While a spinal hit can drop a deer instantly, the target zone is narrow, and a misplaced spinal shot often results in a non-fatal, debilitating wound.
It is critical to remember that vital organs are not static. During inhalation and exhalation, the diaphragm and lungs shift slightly. Additionally, a deer’s posture, such as a lowered head to feed or an alert, tensed stance, can subtly alter the perceived internal layout. Always aim for the center of the vital component system, providing a margin for error.
Beyond the heart and lungs, other organs include the liver, located further back and slightly lower than the lungs, behind the diaphragm. While a liver shot is ultimately fatal, it is a slower kill, often leading to prolonged tracking. The stomach and intestines (paunch) are located in the abdominal cavity, behind the diaphragm and below the spine. A paunch shot is unequivocally unethical and should be avoided at all costs, as it leads to a slow, painful death and contamination of meat.
Effective arrow placement on whitetail deer hinges on consistently delivering a broadhead through both lungs or the heart. This “kill zone” is roughly an 8-10 inch diameter circle (for an average adult deer) just behind the front leg when the animal is broadside. Mastering this anatomical overview is the foundational component for all subsequent shot decisions.
Mastering Shot Angles for Optimal Arrow Placement on Whitetail Deer
The dynamic environment of bowhunting rarely presents a perfect broadside shot. Therefore, understanding how different shot angles influence arrow placement on whitetail deer is essential for consistently hitting vitals and executing an ethical harvest. Each angle alters the internal layout and potential arrow trajectory, requiring precise adjustment to your aim point.
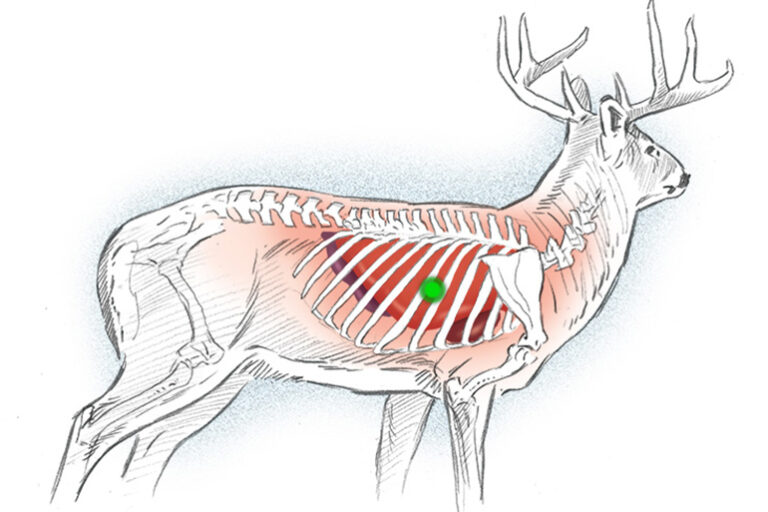
The ideal scenario is a “broadside” shot. In this configuration, the deer stands with its body perpendicular to the hunter. The aiming point for the heart-lung system is typically one-third of the way up the body from the bottom of the chest, directly behind the front leg. An arrow entering here will ideally pass through both lungs or the heart and a lung, exiting on the opposite side. This provides the widest margin for error within the vital component system.
“Quartering-away” is another highly effective shot angle. Here, the deer is angled away from the hunter, exposing more of its flank and allowing access to the vitals without immediately encountering the dense shoulder bone on the entry side. For a quartering-away shot, the aiming point shifts rearward, often targeting the opposite shoulder blade. The arrow should enter behind the last rib on the entry side and angle forward to exit through the opposite shoulder or chest cavity, ensuring a double-lung or heart-lung penetration. This angle often allows for maximum penetration through less dense tissue. The precise “layout” of the internal organs relative to the entry point changes significantly with the degree of quartering.
The “quartering-to” shot, where the deer is angled towards the hunter, is generally considered unethical for bowhunting. This angle presents the dense shoulder bone and sternum as primary barriers, significantly reducing the likelihood of vital organ penetration and increasing the risk of a non-lethal, wounding shot. Avoid this shot unless absolutely necessary and only if you are confident in your ability to thread an arrow into the vitals through very small windows, which is often not feasible with archery equipment. Prioritize ethical shot placement over taking a low-percentage shot.
“Straight-on” or “head-on” shots are almost universally condemned as unethical for bowhunting. The vitals are almost completely obscured by the sternum, shoulder bones, and heavy muscle mass, making a clean kill nearly impossible. Similarly, a “straight-away” shot (deer facing directly away from the hunter) offers a target of the spine or paunch, both low-percentage and unethical.
Optimal arrow placement on whitetail deer involves mentally projecting the arrow’s trajectory through the deer’s body from the entry point to the intended exit. This mental schematic helps visualize the internal path of the broadhead relative to the heart, lungs, and major bones. Adjust your aiming point to account for the angle, always striving for a double-lung pass-through. Proficiency in estimating range and understanding the ballistic component of your arrow setup is paramount to executing these angled shots accurately.
| Shot Angle | Recommended Aiming Point | Primary Vital Target |
|---|---|---|
| Broadside | Behind front leg, 1/3 up from chest bottom | Both Lungs, Heart |
| Slightly Quartering-Away | Mid-body behind ribs, aiming for opposite shoulder | Both Lungs |
| Hard Quartering-Away | Further back, aiming for opposite front leg/shoulder | Both Lungs |
| Quartering-To / Head-On / Straight-Away | Generally NOT recommended | High risk of non-vital hit |
Achieving Precise Arrow Placement on Whitetail Deer: A Step-by-Step Configuration
Executing perfect arrow placement on whitetail deer is a multi-stage process that integrates preparation, real-time assessment, and precise execution. This step-by-step configuration ensures maximum efficiency and ethical responsibility.
1.
Pre-Hunt Preparation and Equipment Configuration: Before entering the field, ensure your archery hunting equipment, from bow to broadhead, is meticulously tuned. This involves confirming proper arrow rest alignment, nocking point synchronization, and broadhead flight consistency. Your arrow trajectory should be consistently accurate out to your maximum ethical shooting distance. Practice extensively from various positions – standing, kneeling, and from an elevated stand – to simulate real hunting scenarios. This establishes a reliable system for shot delivery.
2.
Strategic Setup: Your tree stand or ground blind setup is a critical component influencing potential shot angles and distances. Position yourself to minimize shot angles that present heavy bone. Consider prevailing wind direction, sun position, and deer travel patterns. Ensure clear shooting lanes within your ethical range. For instance, a stand optimally configured for a 20-yard broadside shot on a deer approaching from the east might present a quartering-to shot on a deer approaching from the west. Understanding the “layout” of your hunting area is paramount.
3.
Range Estimation and Deer Assessment: Once a deer is in range, accurately estimate its distance. Use a rangefinder if available, or practice judging distances until it becomes second nature. Simultaneously, assess the deer’s body language and the potential shot angle. Is it calm, feeding, or alert? Is it broadside, quartering away, or in an undesirable position? Patience is key; wait for the optimal configuration.
4.
Identify the Ethical Kill Zone: Based on the deer’s angle, mentally project the internal vital organ layout onto its body. For a broadside or quartering-away shot, identify the precise spot that will result in a double-lung or heart-lung pass-through. As depicted in the anatomical blueprint, this is generally just behind the shoulder, slightly above the elbow, but adjust for quartering angles.
5.
Execute the Shot Sequence: With the deer relaxed and the shot angle optimal, initiate your shooting sequence:
- Draw Smoothly: Draw your bow without jerky movements, maintaining composure.
- Anchor Consistently: Achieve a consistent anchor point every time.
- Aim Precisely: Place your pin directly on the identified ethical kill zone.
- Execute Back Tension/Release: Employ proper shooting form, ideally utilizing back tension or a surprise release, to avoid anticipating the shot and punching the trigger.
- Follow Through: Maintain your form until the arrow impacts. Do not drop your bow arm.
6.
Observe and Listen: After the shot, observe the deer’s reaction, direction of travel, and listen for any audible signs of impact (e.g., “thump” of a vital hit). Note the exact spot where the deer was standing and the direction it went. This immediate post-shot overview is crucial for effective tracking. Avoid immediately pursuing the deer; allow time for the animal to expire.
This methodical approach to achieving precise arrow placement on whitetail deer minimizes variables and maximizes the probability of a swift, ethical harvest.
Essential Equipment and Ethical System Considerations for Arrow Placement
Successful and ethical arrow placement on whitetail deer is not solely dependent on marksmanship; it’s a direct result of selecting and maintaining an optimal equipment system tailored for bowhunting, coupled with an unwavering commitment to ethical principles.
The “component” selection of your broadhead is paramount. Fixed-blade broadheads, known for their robust structure and reliable penetration, are favored by many for their ability to maintain integrity through bone. Mechanical broadheads, designed to expand upon impact, offer a larger cutting diameter but rely on kinetic energy for deployment and can sometimes be hampered by heavy bone. Regardless of type, the broadhead must be razor-sharp and matched to your arrow’s spine and weight, forming a cohesive system for maximum energy transfer. Manufacturer specifications often provide guidance on optimal arrow weight and broadhead pairings for various bow configurations.
While specific regulations vary by state, general ethical bowhunting guidelines often recommend a minimum draw weight of 40-50 lbs for whitetail deer, an arrow weight of at least 350 grains, and a broadhead with a minimum cutting diameter of 7/8 inch. These specifications ensure sufficient kinetic energy and momentum for adequate arrow penetration to reach vital organs, supporting ethical arrow placement on whitetail deer. Always consult local hunting regulations for specific legal requirements.
Arrow penetration is directly related to your arrow’s kinetic energy (KE) and momentum (P), broadhead design, and shot placement. A heavier arrow, combined with a sharp, aerodynamic broadhead, will typically achieve deeper penetration. For example, an arrow weighing 450 grains traveling at 280 feet per second will carry more momentum and kinetic energy than a 350-grain arrow at the same speed, leading to a higher probability of a pass-through shot, which is critical for maximizing blood trails and ensuring a rapid expiration.
Your bow itself, whether a compound or traditional recurve/longbow, forms the core of this system. It must be consistently tuned and regularly inspected for any wear or damage. Cables, strings, cams, and limbs all contribute to the overall functional integrity of the bowhunting equipment. A well-maintained bow ensures consistent shot delivery, which is fundamental to accurate arrow placement on whitetail deer. This comprehensive system also includes your release aid, quiver, and sight – each component playing a role in your ability to make an ethical shot.
Beyond equipment, ethical considerations form the bedrock of responsible bowhunting. The concept of an “ethical kill time” refers to the speed and efficiency with which an animal succumbs after a lethal hit. A well-placed arrow through the heart and lungs typically results in rapid blood loss and organ failure, leading to a quick and humane death, often within seconds or minutes. Conversely, a poorly placed shot (e.g., paunch, leg) can prolong suffering and lead to an unrecoverable animal. Therefore, self-imposed shooting distance limits are crucial. Never attempt a shot beyond your practiced, ethical range, even if it means letting a deer walk. A committed ethical system ensures that every attempt at arrow placement on whitetail deer prioritizes the animal’s welfare and respects the resource. For further reading on bow tuning, you might consult resources on advanced archery system calibration.
Common Arrow Placement Issues & How to Avoid Them While Deer Hunting
Even experienced bowhunters can encounter common arrow placement issues that compromise an ethical harvest. Understanding these pitfalls and implementing preventative strategies is crucial for minimizing wounded game and ensuring a clean kill when deer hunting.
One of the most frequent and severe misplacements is a “spine shot.” While a direct hit to the spine can instantly immobilize a deer, a shot that grazes the spine or hits just above it often results in a “creeping” or paralyzed deer that can still drag itself away, leading to prolonged suffering and an incredibly difficult, if not impossible, recovery. This often occurs when aiming too high, perhaps misjudging distance or the deer’s posture. To avoid this, always aim for the lower third of the chest cavity, targeting the heart-lung complex below the spine. Visualize the internal structure and aim to pass through the densest part of the vital component system.
Another common and regrettable error is the “paunch shot” or gut shot. This occurs when an arrow penetrates the abdominal cavity, striking the stomach, intestines, or other digestive organs. A paunch shot is not immediately lethal and causes severe internal contamination, leading to a slow, painful death. Deer shot in the paunch rarely leave a heavy blood trail and often travel long distances before succumbing, making tracking exceptionally challenging. This issue typically arises from aiming too far back, especially on quartering-away shots where the hunter misjudges the posterior boundary of the vitals. Always err on the side of aiming forward rather than backward, ensuring your arrow’s trajectory through the whitetail’s internal layout avoids the paunch.
A “liver shot” is another undesirable outcome. While fatal, a liver shot often results in a prolonged expiration time (several hours) compared to a lung or heart shot. It usually produces a dark, clotted blood trail that can be difficult to follow. Liver shots often occur when aiming slightly too far back or too low, just behind the lung cavity. While not as unethical as a paunch shot, it still falls short of the ideal rapid kill.
If you suspect a paunch or liver shot, resist the urge to track immediately. For a paunch shot, wait at least 6-8 hours, preferably longer (10-12 hours or overnight if temperatures allow), to give the deer time to expire. Premature tracking can push a wounded deer further, making recovery nearly impossible. For liver shots, a minimum wait of 3-4 hours is advisable. Learn to identify blood sign indicative of different hits. Further resources on tracking wounded game can be found in advanced fieldcraft guides.
Avoiding these common arrow placement issues stems from several key practices:
Patience: Wait for the optimal shot angle. If the deer isn’t presenting a clean, ethical shot, don’t shoot.
Practice: Consistently practice at various distances and angles to reinforce proper form and muscle memory.
Know Your Anatomy: Reiterate your knowledge of the whitetail deer’s internal schematic. Visualize the vitals with every aiming decision.
Range and Angle Discipline: Never shoot beyond your comfortable, ethical range. Strictly adhere to appropriate shot angles, avoiding quartering-to or straight-on shots.
By diligently adhering to these principles, bowhunters can significantly reduce the incidence of poor arrow placement on whitetail deer, fostering a more ethical and successful hunting experience.
Frequently Asked Questions About Whitetail Deer Arrow Placement
What is the most ethical arrow placement on whitetail deer?
The most ethical arrow placement on whitetail deer is a shot that passes through both lungs, or through one lung and the heart. This “double-lung” or “heart-lung” shot causes rapid internal hemorrhage and organ failure, leading to a quick and humane expiration of the animal. It is achieved by aiming for the area just behind the front shoulder, approximately one-third of the way up from the bottom of the chest, on a broadside or slightly quartering-away deer.
How does shot angle affect the optimal arrow placement on whitetail deer?
Shot angle profoundly impacts optimal arrow placement by changing the internal configuration of vital organs relative to your aiming point. For a broadside deer, aim directly behind the front leg. For a quartering-away deer, shift your aim further back and angle it forward towards the opposite shoulder to ensure a double-lung pass-through. Avoid quartering-to, straight-on, and straight-away shots, as they present dense bone shields or target non-vital areas, making ethical arrow placement extremely difficult.
What broadhead component is best for reliable arrow penetration?
The “best” broadhead component depends on your bow setup and personal preference, but reliable arrow penetration is primarily achieved by sharp blades and sufficient kinetic energy/momentum. Fixed-blade broadheads are known for their robust design and consistent penetration, especially through bone. Mechanical broadheads offer larger cutting diameters upon expansion but require adequate kinetic energy to deploy effectively and penetrate deeply. Always choose a broadhead that is razor-sharp and flies true with your specific arrow and bow configuration.


What is the importance of a pass-through shot in arrow placement on whitetail deer?
A pass-through shot is crucial for maximizing the effectiveness of your arrow placement on whitetail deer. When an arrow passes completely through the animal, it creates two wound channels (entry and exit), significantly increasing the rate of blood loss. This leads to a quicker expiration and, critically, provides a much better blood trail for tracking, improving the chances of a successful and ethical recovery of the animal.
How can I improve my consistent arrow placement on whitetail deer?
Improving consistent arrow placement on whitetail deer involves dedicated practice, understanding deer anatomy, and meticulous equipment tuning. Regularly practice shooting from various distances and positions, simulating hunting scenarios. Continuously study anatomical diagrams to visualize the heart-lung schematic. Ensure your bow and arrow system (bow, arrow, broadhead, rest, sight) is perfectly tuned for consistent, accurate flight. Adhere strictly to ethical shooting distances and angles, waiting for the optimal shot opportunity.
Arrow Placement on Whitetail Deer: Frequently Asked Questions
What does the arrow placement on whitetail deer show?
Arrow placement diagrams for whitetail deer illustrate the internal anatomical structure, including the skeletal system and vital organ component layout. These visual guides highlight the heart, lungs, liver, and spine, showing their exact location relative to external body landmarks, which is essential for hunters to ensure ethical and effective shots.
How do I read the arrow placement on whitetail deer?
To read a diagram effectively, first identify the external landmarks like the shoulder, leg, and spine. Then, locate the corresponding internal vital organs (heart, lungs) and skeletal structures (rib cage, shoulder bone). Understand how arrow trajectory, influenced by your shot angle, interacts with this internal configuration to predict the arrow’s path through the deer’s body.
What are the main components in arrow placement on whitetail deer?
The main anatomical components crucial for arrow placement include the heart, lungs, liver, and spine, which are the primary vital targets. Secondary components are the skeletal structure—rib cage, shoulder blade, and humerus—which can impede or deflect an arrow. Understanding the spatial relationship and layout of these components is vital for an ethical shot.
What are common problems with arrow placement on whitetail deer?
Common problems include hitting the shoulder blade, resulting in a superficial or deflected shot, and gut shots, which are non-lethal and cause prolonged suffering due to misjudging the angle or the deer’s movement. These issues often arise from a poor understanding of the internal component structure or an improper shooting system configuration.
Can I use arrow placement on whitetail deer for DIY repair?
While ‘DIY repair’ doesn’t directly apply, you can use these diagrams for ‘DIY improvement’ of your hunting skills. Studying arrow placement diagrams allows you to self-assess your understanding of deer anatomy, practice shot visualization, and refine your aiming points, significantly enhancing your ability to execute ethical shots independently without professional guidance.
What tools do I need for arrow placement on whitetail deer?
Understanding arrow placement primarily requires visual aids: detailed anatomical diagrams, 3D archery targets with vital zone inserts, and potentially taxidermy forms or models to visualize the deer’s internal structure and component layout. Rangefinders and consistent practice are also critical tools for judging distance and maintaining shot precision.


Leave a Reply