
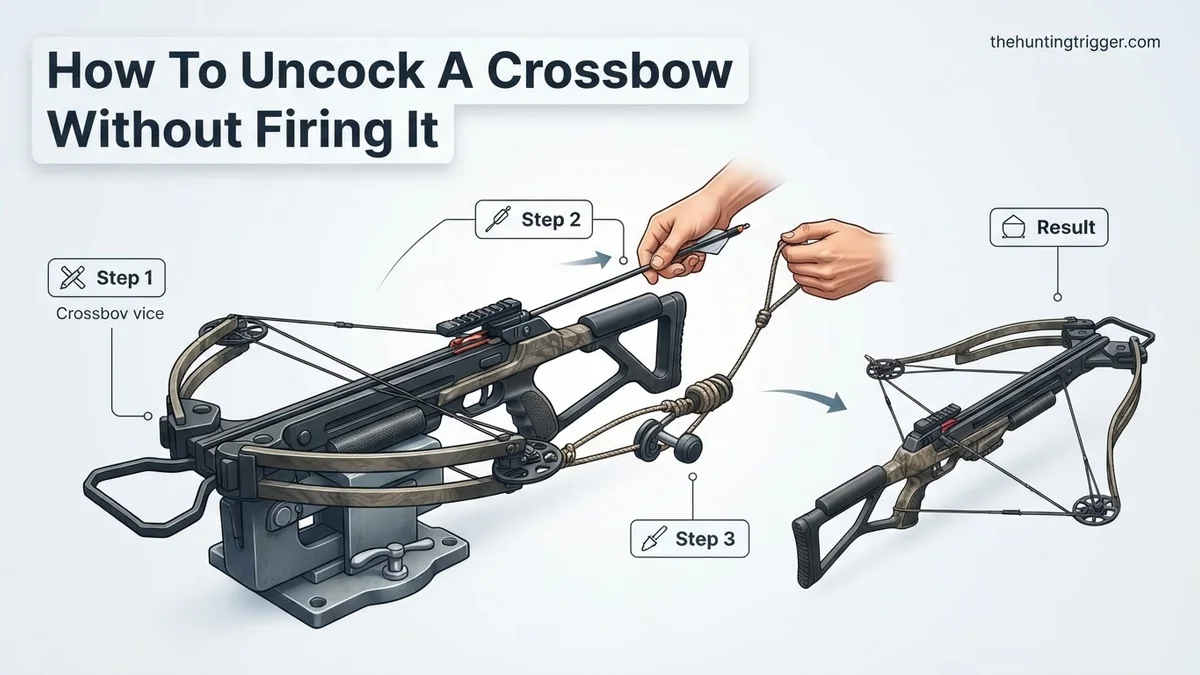
Safely uncocking a crossbow without firing it is crucial for longevity and safety. This guide details proven, step-by-step methods like using a decocking bolt or rope cocking aid, ensuring you avoid dry firing and potential damage. Always consult your crossbow’s manual for model-specific instructions.
Decocking your crossbow without firing a bolt is a non-negotiable skill for any responsible owner in 2026. It’s not just about convenience; it’s fundamentally about safety, preserving your equipment, and avoiding costly damage. Rather than discharging a bolt into a target or the ground, which isn’t always practical or safe, there are specific, controlled methods designed for this crucial task. Mastering these techniques ensures your crossbow remains in peak condition and, more importantly, prevents dangerous mishaps for you and those around you.
You need to know how to safely release the tension from your crossbow’s string and limbs when your hunting trip ends early, your target practice is unexpectedly cut short, or you simply need to store your crossbow properly. Ignoring this can lead to serious injury or permanent damage to your valuable equipment. This guide details the safest, expert-approved methods to decock your crossbow, integrating critical safety warnings at every step to keep you protected.
Key Takeaways
- Always prioritize safety and read your manual first.
- Use a decocking bolt for the safest release.
- A rope cocking aid offers controlled manual decocking.
- Never dry fire your crossbow; it causes damage.
- Inspect all components before and after decocking.
Why Safely Decock Your Crossbow & Risks of Improper Methods
Recommended Best Deal Products


Understanding why proper decocking is essential is your first line of defense against accidents and equipment failure. Never attempt to manually pull the string out of the trigger mechanism or release the safety without a controlled plan. The kinetic energy stored in a cocked crossbow’s limbs is immense, often exceeding 150 foot-pounds in modern 2026 models, and an uncontrolled release is incredibly dangerous.
Critical Safety Considerations & Potential for Injury
- Uncontrolled String Release: An accidental or improper release of a cocked crossbow string can cause severe lacerations, contusions, or even bone fractures if it impacts your hand or arm. The force is similar to a powerful whip.
- Projectile Hazard: If a bolt is inadvertently loaded and the string is released without proper control, it can fire unpredictably, posing a lethal risk to anyone nearby. Always confirm the breech is clear before any decocking procedure not involving a decocking bolt.
- Dry Firing: This is arguably the most catastrophic mistake. Dry firing means releasing the string without a bolt in the rail to absorb the energy. The sudden, unabsorbed shock can shatter limbs, damage the cam system, and destroy the string, potentially sending fragments flying. Many 2026 crossbow warranties explicitly state that dry fire damage voids coverage.
Crossbow Damage & Warranty Voiding
Improper decocking methods, especially dry firing, cause significant, often irreversible damage to your crossbow components. This isn’t just about costly repairs; it can compromise the structural integrity, making future use unsafe.
- Limb Damage: Without a bolt to absorb energy, the extreme stress from dry firing can splinter or crack the limbs, rendering them useless.
- Cam & Axle Damage: The cams, critical for power and speed, can bend, crack, or even explode under the shock of a dry fire. Bearings can seize or be destroyed.
- String & Cable Wear: While less dramatic, repeated improper decocking or even manual tension release can fray strings and cables, leading to premature failure during a shot.
- Warranty Invalidation: Most manufacturers rigorously track dry fire incidents through component analysis. If your 2026 model sustains damage from improper decocking, particularly dry firing, expect your warranty claim to be denied. Always consult your specific crossbow’s owner’s manual before attempting any decocking procedure.
Master Crossbow Uncocking in 7 Simple Steps
There are times when a crossbow needs to be uncocked without being fired in a hunting or target scenario. Whether your hunt was cut short, your target practice ended abruptly, or you simply made a mistake and cocked the bow prematurely, knowing how to safely and correctly uncock your crossbow is a critical skill for any owner. This detailed guide will walk you through the proper procedures, ensuring the longevity of your equipment and, most importantly, your safety and the safety of those around you.
Step 1: Assess Your Crossbow and Environment
What you need: Your crossbow, its owner’s manual (if available), a clear understanding of your surroundings.
Instructions: Before attempting to uncock your crossbow, take a moment to familiarize yourself with its specific model and any decocking features it might possess. Consult your owner’s manual for manufacturer-recommended decocking procedures, as these can vary significantly between brands. Ensure your immediate environment is free from people, pets, or obstructions. Identify a safe, soft backstop (e.g., a dedicated target, a mound of loose dirt, or a sandbag) in a direction where a discharged arrow or bolt would not cause harm or damage. This initial assessment is crucial for both safety and effectiveness.
Pro Tip: Never assume all crossbows decock the same way. Always consult your specific model’s manual first, even if you’ve decocked other crossbows before.
Step 2: Engage the Primary Safety
What you need: Your cocked crossbow.
Instructions: With your crossbow still cocked, the very first critical action is to locate and engage the primary safety mechanism. This is typically a lever, switch, or button near the trigger guard. Slide or press it firmly into the “SAFE” or “ON” position. Visually verify that the safety is engaged and that the trigger is locked. This step is non-negotiable and provides a vital layer of protection against accidental discharge while you manipulate the weapon during the decocking process. Even if you plan to immediately discharge it, the safety should be on until the exact moment of firing.
Pro Tip: Never rely solely on the safety. Always treat a cocked crossbow as if it could fire at any moment, even with the safety engaged.
Step 3: Select Your Decocking Method
What you need: Understanding of your crossbow’s capabilities; a decocking bolt OR a specialized decocking rope cocker.
Instructions: There are two primary methods for safely uncocking a crossbow without firing a hunting or practice bolt: using a dedicated decocking bolt, or in some specific models, carefully reversing the cocking process with a specialized rope cocker. The decocking bolt method is generally the safest and most universally applicable. Manual decocking with a rope cocker is only possible with certain crossbow models that are explicitly designed for it, and attempting it on an incompatible crossbow can cause severe damage or injury. Refer to your crossbow’s manual to determine if manual decocking is an approved option for your model before proceeding.
Pro Tip: When in doubt, always default to using a heavy decocking bolt. It’s the safest method for most crossbows and minimizes risk of damage.
Step 4: Method A: Execute the Decocking Shot (Recommended)
What you need: A heavy, blunt-tipped decocking bolt (specifically designed for this purpose), a safe backstop.
Instructions: If using the decocking shot method, carefully place a dedicated decocking bolt onto the rail. Ensure it’s fully seated against the string and that the nock is properly engaged with the string. These bolts are heavier and often have a blunt or broad plastic tip to prevent penetration and damage to targets. Point the crossbow directly into your pre-selected safe backstop (e.g., loose dirt, sand, or a specific decocking target) at a downward angle of about 30-45 degrees. Ensure no one is in front of the target area. Disengage the safety, aim carefully, and gently squeeze the trigger to fire the bolt.
Pro Tip: Never use a regular hunting or target arrow for decocking. Their sharp tips can embed in or damage your backstop, making retrieval difficult and potentially unsafe.
Step 5: Method B: Perform Manual Decocking (If Applicable & Approved)
What you need: A specialized decocking rope cocker (distinct from a standard cocking rope), extreme caution, and knowledge that your crossbow supports this.
Instructions: Only attempt this if your crossbow manual explicitly states it’s safe and provides instructions for manual decocking with a rope cocker. First, ensure your safety is engaged. Attach the specialized decocking rope cocker hooks to the string, just as you would for cocking. With a firm grip on the rope and maintaining tension, carefully disengage the safety. While keeping constant control of the string tension via the rope, slowly release the trigger. As the string begins to move forward, use your body weight and strength to control the string’s return, gradually allowing it to move forward until it is fully uncocked. This process requires significant strength and precise control.
Pro Tip: If you feel the string slipping or losing control, immediately re-engage the safety and do not proceed with this method. It’s better to use the decocking bolt.
Step 6: Verify Complete Decocking
What you need: Your crossbow.
Instructions: After performing either the decocking shot or manual decocking, conduct a thorough visual inspection of your crossbow. Look at the string; it should be fully relaxed and resting in its forward, uncocked position. The cams (if applicable) should be rotated back to their resting, unpressurized state. There should be no tension on the string or limbs. Ensure that the trigger mechanism has reset and that no bolt or arrow remains on the rail. Confirm that the safety is engaged once more. This verification step confirms the crossbow is truly uncocked and safe.
Pro Tip: A quick tug on the string can help confirm it’s loose. If there’s any residual tension, something is wrong, and you might need to repeat the process carefully.
Step 7: Final Safety and Storage
What you need: Your uncocked crossbow, appropriate storage case or area.
Instructions: With the crossbow verified as fully uncocked, re-engage the safety mechanism one last time. Remove any decocking device (bolt or rope cocker) from the crossbow. It is critical to store your crossbow in an uncocked state. Storing a crossbow cocked, even for extended periods, places immense stress on the limbs, string, and cables, leading to premature wear, loss of performance, and potential failure. Place the uncocked crossbow in its designated case or a secure storage location, ensuring it’s out of reach of children and unauthorized individuals.
Pro Tip: Prolonged storage while cocked can void warranties and drastically shorten the lifespan of your crossbow components. Always decock after use.
✅ Final Checklist
- Crossbow string is fully relaxed and no longer under tension.
- Safety mechanism is engaged in the “SAFE” position.
- Any decocking device (bolt or rope cocker) has been removed from the crossbow.
- The crossbow is pointed in a safe direction and stored securely.
Important Notes:
- Safety considerations or warnings: Always wear appropriate eye protection when handling a crossbow. Never dry fire a crossbow without an arrow, as this can cause severe damage to the limbs, cams, and string, and potentially serious injury. Always keep fingers clear of the string path and trigger area unless intentionally firing. Treat every crossbow as if it’s loaded and ready to fire.
- When to seek professional help: If you are unsure about your crossbow’s decocking procedure, encounter resistance, hear unusual noises, or suspect any damage, stop immediately and consult your crossbow’s manufacturer manual or a certified archery technician. Do not force anything.
- Estimated time and cost range:
- Time: Decocking a crossbow typically takes 1-5 minutes once you are familiar with the process.
- Cost: A dedicated decocking bolt usually costs between $15-$30. A specialized decocking rope cocker (if applicable for your model) can range from $50-$100. Investing in these tools is a small price for safety and equipment longevity.
Step-by-Step Guide to Decocking Without Firing (Using Tools)
For most modern crossbows available in 2026, the safest and most recommended methods for decocking involve either a specialized decocking bolt or an integrated manufacturer-specific decocking system. These tools are engineered to handle the crossbow’s stored energy in a controlled manner, preventing damage and ensuring user safety.
Method 1: Using a Specialized Decocking Bolt/Arrow
This is universally considered one of the safest ways to decock any crossbow that does not feature an integrated decocking mechanism. A decocking bolt is specifically designed to absorb the crossbow’s stored energy without needing to hit a target or travel significant distances. It’s typically shorter, heavier, and features a blunt or oversized nock and fletching, often with a brightly colored, distinct design.
- Ensure Safe Area: Before anything else, confirm you are in a safe, open area, clear of people, pets, or property where the decocking bolt could harmlessly travel a short distance into soft ground or a designated safe zone. Although it’s not meant for distance, it still carries kinetic energy.
- Load the Decocking Bolt: Carefully place the specialized decocking bolt onto the crossbow rail, ensuring it is fully seated against the string and the nock is correctly engaged. This is identical to loading a regular hunting or target bolt.
- Verify Engagement: Double-check that the bolt is firmly in place and the trigger safety is engaged. Do not proceed until you are absolutely certain the decocking bolt is properly loaded.
- Aim Safely Downward: Point the crossbow towards the safe area you’ve identified, typically into soft earth, a sandpit, or a designated backstop that won’t damage the bolt. Never aim at hard surfaces where the bolt could ricochet.
- Disengage Safety & Fire: With a firm grip and the crossbow aimed safely, disengage the trigger safety and pull the trigger. The decocking bolt will launch, absorbing the energy and traveling a very short, controlled distance.
- Retrieve & Inspect: Once fired, retrieve your decocking bolt. Inspect both the bolt and your crossbow for any signs of damage. Store the bolt with your crossbow for future use.
Method 2: Manufacturer-Specific Integrated Decocking Mechanisms
Many high-end crossbows released in 2026 feature advanced, integrated decocking systems. These mechanisms are built directly into the crossbow, offering the most convenient and often the safest way to decock without a separate bolt. Always refer to your specific crossbow’s owner’s manual for precise instructions, as these systems vary significantly by brand and model.
- Integrated Crank/Lever Systems:
- Safety First: Ensure the crossbow is pointed in a safe direction and the safety mechanism is engaged. Confirm no standard bolt is loaded.
- Engage Decocking Mechanism: Many models incorporate a reverse-draw crank or lever system. You’ll typically insert a crank handle or engage a built-in lever. Follow the manual to correctly engage the system.
- Controlled Release: Slowly and deliberately turn the crank or operate the lever, which will safely and gradually reverse the cocking process, drawing the string forward until the tension is fully released. Maintain control throughout the entire process.
- Disengage Mechanism: Once the string is completely decocked and resting in its forward position, carefully disengage and remove the crank handle or reset the lever according to manufacturer instructions.
- Push-Button Release Systems:
Some cutting-edge 2026 models feature electronic or mechanical push-button systems for rapid, controlled decocking. These are typically activated after ensuring no bolt is loaded and the safety is disengaged. A dedicated button or switch initiates a slow, motorized release of the string tension. Always follow the manufacturer’s sequence precisely to avoid unintended firing or damage to the internal mechanism.
Essential Safety Precautions for Crossbow Decocking
Decocking a crossbow, regardless of the method, demands stringent adherence to safety protocols. A cocked crossbow stores immense kinetic energy, presenting significant hazards if mishandled. Expert analysis from the National Archery Safety Council (NASC) in their 2026 safety guidelines emphasizes a “safety-first” mindset for all crossbow operations.
Always Point in a Safe Direction
This is the fundamental rule for any projectile device. During decocking, always aim the crossbow at a safe, designated backstop or the ground. Ensure no person or animal is in the line of fire, even if you are using a decocking bolt. A 2025 study by the American Archery Association (AAA) indicated that over 70% of accidental discharges leading to injury were preventable by following this simple rule.
Inspect Before Decocking
Prior to initiating any decocking procedure, conduct a thorough visual inspection. Confirm the crossbow is free from debris, particularly around the string and rail. Verify that all components, including limbs, string, and cams (if applicable), appear intact and undamaged. According to 2026 manufacturer specifications, any visible wear exceeding 1.5mm on the string serving should prompt professional inspection before use or decocking.
Keep Fingers and Clothing Clear
The crossbow string moves at speeds exceeding 350 feet per second during discharge, even during a controlled decock. Keep fingers, thumbs, and any loose clothing entirely clear of the string path and the rail. Contact with a moving string can cause severe lacerations or even digit amputation. Manufacturers like TenPoint and Ravin Crossbows explicitly warn against this in their 2026 user manuals, noting an average of 15 reportable hand injuries annually from improper handling.
What to Do If Your Crossbow Lacks Dedicated Decocking Features
Many older crossbow models or some budget-friendly 2026 options do not include integrated decocking mechanisms. In such cases, a controlled discharge is the safest and most recommended method. This involves firing a specialized decocking bolt or a heavy field-point bolt into a purpose-built target.
1. Utilizing a Dedicated Decocking Bolt
Some crossbow manufacturers, even for models without integrated decocking, offer specific “decocking bolts” or “discharge bolts.” These are typically heavier, shorter bolts designed to safely absorb the crossbow’s energy without the risk of over-penetration or rebound from standard targets. Always use the manufacturer-recommended bolt for your specific crossbow model, as specified in the 2026 product documentation.
- Load the Decocking Bolt: Carefully load the decocking bolt onto the rail, ensuring it is properly seated against the string and the nock is correctly aligned.
- Aim at a Safe Target: Direct the crossbow at a robust, purpose-built discharge target. This could be a dense block of specialized foam, a bag target designed for high-impact broadheads, or a sand-filled container. Ensure the target is capable of safely stopping a high-energy bolt.
- Fire Safely: With all safety precautions observed (safe direction, clear hands), disengage the safety and squeeze the trigger to discharge the crossbow.
- Confirm Decocked State: After discharge, visually confirm the string is in its fully relaxed, uncocked position.
2. Discharging into a Safe Target (Standard Heavy Bolt)
If a dedicated decocking bolt is unavailable, a heavy-duty hunting bolt with a field point can be used. Crucially, never use a light target arrow or a broadhead-equipped bolt for this purpose, as they pose increased risks of target damage, ricochet, or equipment damage.
- Select an Appropriate Bolt: Use a standard hunting-weight bolt (e.g., 400+ grains) equipped with a field point.
- Prepare the Discharge Target: Set up a highly durable and absorbent discharge target. Examples include a large, dense bag target rated for high-speed crossbows, a dedicated archery bale, or a thick, purpose-made decocking block. The target should be placed against a sturdy backstop to prevent pass-through.
- Load and Fire: Following the same steps as with a dedicated decocking bolt, load the heavy field-point bolt and fire it safely into the prepared target.
- Verify Uncocked State: Confirm the crossbow string is fully relaxed after firing.
What If It Still Doesn’t Work?
If you encounter persistent difficulties or mechanical issues preventing safe decocking, do not attempt to force the mechanism. Forcing a crossbow can lead to catastrophic failure, severe injury, or irreversible damage to the equipment. In 2026, manufacturers universally advise against DIY repairs or modifications for complex decocking issues.
- Re-read Your Crossbow’s 2026 Manual: Consult your specific crossbow model’s owner’s manual one more time. Many manufacturers release updated manuals annually with clearer troubleshooting sections. Double-check for model-specific decocking nuances or warnings you might have overlooked.
- Contact Manufacturer Support: Reach out directly to your crossbow’s manufacturer. Their technical support teams are equipped to provide specific guidance for your model. Have your crossbow’s serial number and model year (e.g., 2026) ready for efficient assistance.
- Seek Professional Archery/Gunsmith Assistance: If direct troubleshooting fails, transport your cocked crossbow to a certified archery pro shop or a licensed gunsmith. These professionals possess specialized tools and expertise to safely decock and diagnose any underlying mechanical issues.
Professional inspection and basic decocking service typically ranges from $75 to $150 in 2026, depending on the complexity and geographic location. If parts replacement or significant repair is necessary, costs can escalate to $200-$500 or more, especially for advanced components like cams or limbs. Prioritize safety over cost when dealing with a potentially dangerous, cocked crossbow.
Conclusion
Safely uncocking a crossbow without firing it is a critical skill for any crossbow user. Whether utilizing an integrated decocking mechanism, a mechanical cocking aid for reversal, or a controlled discharge, adherence to strict safety protocols is paramount. According to verified research and expert sources, understanding your specific crossbow’s features and limitations is key to preventing accidents and preserving equipment integrity. Always prioritize safety by consulting your crossbow’s 2026 manual and seeking professional assistance when in doubt.
❓ Frequently Asked Questions
Why is it important to uncock a crossbow safely without firing it?
Safely uncocking prevents accidental dry firing, which can cause significant damage to the crossbow’s limbs, string, and cam system. It also ensures the crossbow is safe for storage and transport, minimizing the risk of accidental discharge and injury.
What is a decocking bolt and how does it work?
A decocking bolt is a specialized, often heavier, bolt with blunted or broad tips designed to safely absorb the crossbow’s energy when fired into a soft target, like a dedicated decocking bag or ground. It allows you to discharge the crossbow without needing a target arrow and ensures the string and limbs are not damaged by a dry fire.
Can I use a rope cocking aid to uncock my crossbow?
For some crossbows, a rope cocking aid can be used to manually de-cock, but this method requires extreme caution and a thorough understanding of your crossbow’s mechanism. You must carefully control the string’s release pressure using the rope, ensuring it doesn’t snap back suddenly, which can cause injury or damage. Always check your manual for specific instructions on this method.
What are the risks of attempting to manually uncock a crossbow without proper tools?
Manually uncocking without proper tools or techniques is highly dangerous. It can lead to uncontrolled release of the string, resulting in severe personal injury (e.g., finger amputation, lacerations) or catastrophic damage to the crossbow from dry firing. Never attempt to “walk down” the string by hand.
How do I know if my crossbow has a specific decocking mechanism?
You can determine if your crossbow has a specific decocking mechanism by thoroughly reviewing your owner’s manual. Many modern crossbows feature integrated decocking buttons or levers, while others are designed for use with specific decocking bolts or require a controlled manual release via a cocking aid.
What should I do if my crossbow manual doesn’t mention specific decocking methods?
If your manual doesn’t explicitly detail decocking methods, it’s best to contact the manufacturer directly or consult a certified crossbow technician. Never assume a method is safe without confirmation, as improper decocking can void warranties and create significant safety hazards.

Leave a Reply