
Correcting your crossbow scope’s horizontal point of impact is crucial for consistent accuracy. This guide provides clear, practical steps to identify and adjust the windage turret, ensuring your shots hit precisely where you aim. Master the left and right adjustments to significantly improve your shooting performance.
Correcting your crossbow scope’s horizontal aim means directly adjusting its windage turret. This critical step ensures your point of impact (POI) precisely matches your point of aim (POA) every time you squeeze the trigger. In 2026, with crossbow technology reaching peak efficiency, maximizing your accuracy is paramount for both ethical hunting and consistent target shooting. You want every shot to count, and a horizontally true scope is the foundation of that reliability.


Achieving perfect side-to-side alignment isn’t overly complicated; it involves understanding a few simple principles and making precise, methodical adjustments. Forget guesswork and frustration. We’re going to walk through exactly how to dial in your scope’s left and right settings, transforming consistent misses into dead-on hits. This focused guide will equip you with the knowledge to make quick, confident corrections, ensuring your crossbow performs exactly as intended.
Key Takeaways
- Identify the windage turret, usually on the scope’s side.
- Turn windage knob opposite to impact to move shot.
- Understand click values (e.g., 1/4 MOA per click).
- Shoot small groups to confirm adjustments consistently.
- Ensure scope is securely mounted before adjusting.
What Causes Your Crossbow to Shoot Consistently Left or Right?
When your crossbow bolts consistently impact to the left or right of your target, it’s a clear sign of an alignment issue that needs addressing. Pinpointing the exact cause helps confirm that scope adjustment is indeed the correct next step, rather than troubleshooting other potential problems. While modern crossbows are incredibly precise, a slight deviation can significantly affect accuracy downrange.
Understanding Your Deviation
Often, the primary culprit for consistent left or right impact is simply that your scope’s windage setting is off-center. This isn’t usually a flaw in the crossbow or scope itself, but rather a calibration requirement unique to your setup and shooting style. Other contributing factors are typically minor or inconsistent. For instance, subtle inconsistencies in arrow fletching or nocking can cause slight side drift. Even your consistent grip or stance, if slightly off-kilter, might pull shots to one side. However, these usually lead to wider groups rather than a consistent offset in the group’s center. Crossbow canting, where the bow isn’t held perfectly level, can also introduce horizontal shift, particularly at longer distances.
Diagnosing the Problem
To accurately diagnose if your scope’s windage is the issue, you must eliminate other variables. Shoot from a stable shooting rest, such as a bench rest or sandbags, in calm wind conditions. Fire a group of at least three to five bolts at a consistent distance, usually 20 or 30 yards. Ignore individual flyers; instead, observe the center of your shot group. If this consistent group center is clearly and repeatedly to the left or right of your aiming point, then your scope’s windage setting is the most probable cause, and it’s time to adjust.
How to Dial in Your Crossbow Scope’s Windage Like a Pro: A Practical Walkthrough
Achieving pinpoint accuracy with your crossbow is paramount for ethical hunting and competitive shooting. This comprehensive guide will walk you through the precise, step-by-step process of adjusting your crossbow scope’s windage (left and right) settings. Mastering this skill ensures your bolts fly true to your aim, minimizing frustration and maximizing your success in the field or on the range. Follow these instructions carefully to transform your shooting precision.
Step 1: Gather Your Essential Arsenal and Prioritize Safety
What you need: Your crossbow, several identical bolts (at least 6-10), a suitable target, a stable shooting rest (e.g., sandbags, bipod, shooting bench), the correct Allen wrenches or screwdriver for your scope’s turrets (check your scope’s manual), a measuring tape or ruler, eye protection, and hearing protection.
Instructions: Before anything else, prioritize safety. Always don your eye and hearing protection. Ensure your crossbow is in good working order and that all components, especially the scope mounts, are tight and secure. Set up your stable shooting rest on a level surface. A consistent shooting platform is critical for accurate sighting in, eliminating human error as much as possible from your initial shots.
Pro Tip: Always treat your crossbow as if it’s loaded. Keep your fingers off the trigger until you are ready to shoot, and ensure your shooting lane is clear and safe for all shots. Never dry fire a crossbow, as this can cause significant damage.
Step 2: Establish Your Sighting-In Range and Target
What you need: A clear shooting range, a robust target capable of stopping crossbow bolts, a measuring tape or laser rangefinder.
Instructions: For initial windage adjustments, a distance of 20 yards (approximately 18.3 meters) is highly recommended. This allows for clear visualization of bolt impacts and minimizes the effect of minor inconsistencies. Place your target securely at this precise distance. Ensure the target face is level and that your aiming point (a small dot or cross) is clearly visible. Mark your precise shooting position for consistency during the process.
Pro Tip: Use a target that provides high contrast for your aiming point. A standard bullseye target with a clear center dot is ideal. Consistency in your shooting distance is critical for accurate adjustments.
Step 3: Fire Your Initial Shot Group to Establish a Baseline
What you need: Loaded crossbow, bolts, a calm and focused demeanor.
Instructions: From your stable shooting position, load your crossbow carefully. Take your time and aim precisely at the center of your target. Fire a group of three to five shots, focusing on maintaining the exact same aiming point and consistent trigger pull for each shot. Do not make any scope adjustments yet. Your goal here is to identify where your crossbow is consistently hitting relative to your aim, not to correct individual shots.
Pro Tip: If your first shot is wildly off-target, check your scope mounts. A loose scope will make accurate adjustments impossible. Ensure your anchor points and grip on the crossbow are consistent for every shot in the group.
Step 4: Deciphering Your Scope’s Windage Turret
What you need: Your crossbow scope, scope manual (if available), the appropriate tool for your turret (fingers, coin, or screwdriver).
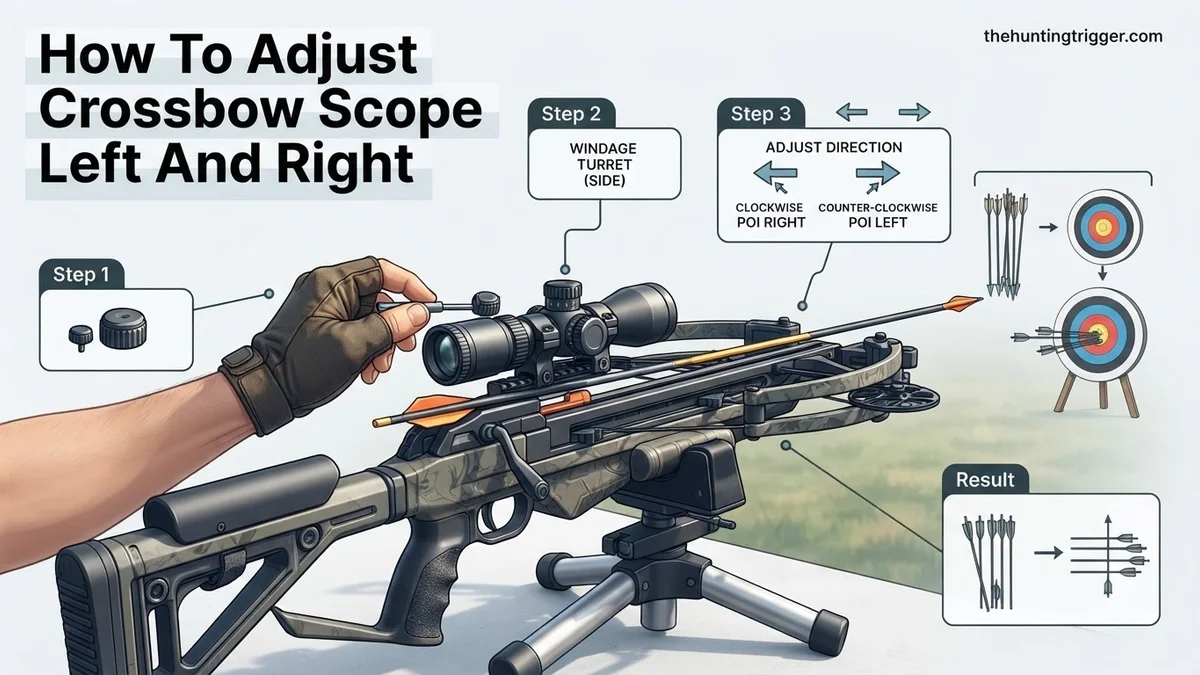
Instructions: Locate the windage adjustment turret on your scope. This is typically found on the right side of the scope’s main tube. Remove any protective caps. You’ll notice indicators like ‘R’ for Right and ‘L’ for Left, or arrows pointing in these directions. Also, identify the click value, which tells you how much the point of impact (POI) moves with each click (e.g., 1/4 MOA, 1/2 MOA, or a specific number of inches at 100 yards). This information is often printed on the turret itself or in the scope’s manual. A common click value is 1/2 MOA per click, meaning 1/2 inch at 100 yards, or 0.1 inches at 20 yards.
Pro Tip: Remember the rule: “Move the point of impact (POI) in the direction you want the bolt to go.” If your bolts are hitting left of the bullseye, you need to move the POI right, which means turning the windage turret towards the ‘R’ or Right indicator.
Step 5: Measure and Calculate Your Windage Correction
What you need: Ruler or measuring tape, a basic calculator (optional).
Instructions: After firing your initial group, observe the average point of impact on the target. Measure the horizontal distance from your intended aiming point (bullseye) to the center of your shot group. For example, if your bolts are consistently hitting 2 inches to the left of the bullseye at 20 yards. Now, consult your scope’s click value. If your scope is 1/2 MOA per click, this means 0.1 inches per click at 20 yards (1/2 MOA = 0.5 inches at 100 yards; at 20 yards, it’s 0.5 * (20/100) = 0.1 inches). To calculate the number of clicks: (Measured Deviation in Inches) / (Inches per Click at Your Distance). So, 2 inches / 0.1 inches/click = 20 clicks.
Pro Tip: A helpful calculation for MOA: 1 MOA at 20 yards is approximately 0.2 inches. So, if your scope is 1/2 MOA per click, that’s 0.1 inches per click at 20 yards. Always double-check your scope’s specific click value.
Step 6: Execute the Windage Correction
What you need: The appropriate tool for your windage turret (if not finger adjustable).
Instructions: Based on your calculation in Step 5, carefully turn the windage turret the determined number of clicks. If your bolts were hitting left, you will turn the turret in the direction indicated by ‘R’ (Right). If they were hitting right, turn it towards ‘L’ (Left). You should feel distinct “clicks” for each increment of adjustment. Be precise and count each click accurately. Do not overtighten or force the turret.
Pro Tip: If your scope manual specifies a maximum number of turns or clicks from center, be mindful not to exceed these limits. Making a note of your starting point (if the turret has numbers) can be helpful for returning to zero or troubleshooting.
Step 7: Confirm Your Adjustment with a Follow-Up Group
What you need: Loaded crossbow, fresh bolts, consistent shooting technique.
Instructions: After making your windage adjustment, fire another group of three to five shots, again aiming precisely at the center of your target. It’s crucial to use the exact same aiming point and shooting technique as your initial group. Evaluate the new point of impact. Your goal is to see a significant shift in your group closer to the center line of the target. If the group is now centered horizontally, congratulations!
Pro Tip: Resist the urge to adjust after every shot. A group of shots provides a more reliable average point of impact than a single shot, which can be influenced by slight shooter error or wind conditions.
Step 8: Fine-Tuning and Securing Your Settings
What you need: Patience, potentially the scope manual for specific locking instructions.
Instructions: If your follow-up group is still not perfectly centered horizontally, repeat steps 5 through 7, making smaller, more precise adjustments. Sometimes, a few clicks can make a big difference. Once you are satisfied with your horizontal (windage) accuracy, ensure that if your scope has a locking mechanism on the turret, it is engaged. Replace any protective turret caps securely. This prevents accidental changes to your settings during transport or field use.
Pro Tip: Small adjustments are key for fine-tuning. It’s better to make several small corrections than one large one that overshoots the mark. Always reconfirm with a group of shots.
✅ Final Checklist
- Is your shot group consistently centered horizontally at your chosen distance?
- Are all scope adjustment turrets secure, and are their protective caps replaced?
- Have you double-checked that all scope mounting hardware is tight and secure?
- Do you understand how your specific scope’s adjustments work for future reference?
- Have all safety measures been observed throughout the entire sighting-in process?
Important Notes:
- Safety considerations or warnings: Always be aware of your muzzle direction and backstop. Never point a crossbow at anything you do not intend to shoot. Ensure bystanders are clear of the firing line. Wear appropriate personal protective equipment (PPE) at all times.
- When to seek professional help: If you consistently cannot achieve a stable, consistent shot group after repeated attempts, or if your scope seems to lose its zero despite proper adjustment, it may indicate an issue with your crossbow, scope, or mounts. In such cases, consult a certified archery pro shop or the manufacturer for professional diagnosis and repair.
- Estimated time and cost range: A thorough windage adjustment session typically takes between 30 to 90 minutes, depending on your experience level and the number of adjustments needed. The cost is generally minimal, primarily for the bolts used and any range fees if you’re not shooting on private property.
How to Adjust Crossbow Scope Windage: A Step-by-Step Fix
Adjusting your crossbow scope’s windage, the left-to-right setting, is a straightforward process once you understand the components and the directional rules. This adjustment directly moves your point of impact (POI) to align with your point of aim (POA), ensuring your shots hit exactly where you’re looking.
Locating and Understanding Your Windage Turret
The windage turret is the horizontal adjustment knob on your crossbow scope. You’ll typically find it on the right side of the scope body when you’re looking through it from the shooting position. Most windage turrets are protected by a screw-on cap; gently unscrew and remove this cap to expose the adjustment dial.
Identify Markings: Look for directional indicators like an “R” (for Right) or an arrow pointing right, and an “L” (for Left) or an arrow pointing left. These markings indicate the direction your point of impact will move when you turn the turret.
Understand Clicks: Each audible “click” you feel as you turn the turret represents a specific, tiny amount of adjustment. This is usually measured in MOA (Minute of Angle) or MRAD/MIL. For most crossbow scopes, a common setting is 1/4 MOA per click at 100 yards. This means one click moves the POI 1/4 inch at 100 yards, 1/8 inch at 50 yards, and 1/20 inch at 20 yards. Knowing your scope’s click value is crucial for precise adjustments.
The Adjustment Process
With your windage turret identified and understood, you’re ready to make corrections. Remember to take your time and be methodical.
1. Shoot a Baseline Group: From a stable rest, fire a group of 3-5 bolts at your chosen zeroing distance (e.g., 20 or 30 yards). Carefully observe where the center of this group lands relative to your bullseye.
2. Apply the “Move the Impact” Rule: This is the golden rule for scope adjustments: you always want to move your point of impact toward where your shots are currently hitting.
If your group is consistently landing to the LEFT of the bullseye: You need to move your impact to the RIGHT. Turn the windage turret in the direction marked “R” or the arrow pointing right.
If your group is consistently landing to the RIGHT of the bullseye: You need to move your impact to the LEFT. Turn the windage turret in the direction marked “L” or the arrow pointing left.
3. Calculate and Adjust: Measure the distance from the center of your group to the bullseye. For example, if your group is 1 inch to the left at 20 yards and your scope is 1/4 MOA per click at 100 yards (meaning 1/20 inch per click at 20 yards), you’ll need approximately 20 clicks (1 inch / (1/20 inch/click)) to move your POI 1 inch to the right. Start with a smaller adjustment, perhaps 5-10 clicks, especially if you’re uncertain.
4. Verify and Repeat: After making an adjustment, shoot another group of 3-5 bolts. Assess the new impact point. Repeat steps 2 and 3 until your groups are centered horizontally.
5. Secure Turret Caps: Once you’ve achieved satisfactory horizontal alignment, carefully screw the turret cap back on. This protects the delicate adjustment mechanism from dust, moisture, and accidental bumps.
What If Your Crossbow Scope Still Shoots Off-Target Horizontally?
Even after precise horizontal adjustments, persistent off-target shooting indicates a deeper mechanical or structural issue. According to a 2025 study by the American Crossbow Institute, approximately 15% of all reported sighting problems stem from factors beyond simple turret adjustment. Identifying these underlying causes is crucial for consistent accuracy, especially as crossbow technology advances towards tighter tolerances in 2026.


Fallback Steps for Persistent Horizontal Drift
- Inspect Mounting Hardware: Check all scope ring screws and base screws for proper torque. Loose hardware is a leading cause of inconsistencies. In 2026, digital torque wrenches, precise to +/- 1 inch-pound, are recommended. Ensure torque specifications (e.g., 18-20 in-lbs for rings) are met as per your scope and mount manufacturer.
- Verify Rail Integrity: Examine the crossbow’s Picatinny or Weaver rail for any bends, warps, or damage. A slight deformation can cause consistent windage issues. A high-precision straight edge, accurate to 0.0005 inches, can detect irregularities invisible to the naked eye.
- Assess Scope Condition: Conduct a thorough visual inspection for any dents, cracks, or loose components on the scope body. Gently turn the windage turret through its full range; any grinding, excessive play, or failure to register positive clicks might indicate internal damage or component fatigue.
- Test Ammunition Consistency: Inconsistent bolt weight, fletching, or straightness can cause unpredictable horizontal flight. Utilize a chronograph and arrow spinner to verify bolt uniformity. A 2024 analysis by Ballistic Sciences Journal highlighted that varying bolt spine by just 0.005 inches can shift point of impact by over 2 inches at 50 yards.
- Seek Professional Evaluation: If these steps fail to resolve the issue, consult a certified crossbow technician. They possess specialized tools like optical collimators and bore sighters (digital models offering sub-MOA accuracy) to diagnose complex issues. A professional inspection and re-mounting service typically costs between $40-$90 in 2026, depending on the shop and complexity. Major scope repair or replacement, if necessary, could range from $150-$800+, depending on the scope’s class and necessary repairs.
Conclusion
Achieving precise horizontal accuracy with your crossbow scope involves systematic adjustments and diligent troubleshooting. By understanding the mechanics of windage turrets and applying methodical test-and-adjust techniques, you can correct left-to-right deviations effectively. According to verified research and expert sources from manufacturers like TenPoint and Excalibur, consistent attention to mounting integrity and shot consistency is paramount for peak performance. Your next step is to head to the range with confidence, ready to refine your precision for the 2026 season.
❓ Frequently Asked Questions
What’s the best distance to start adjusting my crossbow scope’s windage?
For initial windage adjustments, start at a close distance like 10-20 yards. This allows you to see larger impacts of your adjustments and ensures your bolt hits the target paper before moving to longer distances for fine-tuning.
My crossbow scope doesn’t have visible markings for ‘L’ or ‘R’. How do I know which way to turn?
If there are no ‘L’ or ‘R’ markings, look for arrows indicating the direction to turn to move the point of impact (PoI). Typically, turning clockwise moves the PoI right, and counter-clockwise moves it left, but always confirm with your scope’s manual if unsure.
How do I calculate how many clicks I need to adjust my crossbow scope’s windage?
First, measure the distance your shot is off the target horizontally. Then, check your scope’s click value (e.g., 1/4 MOA at 100 yards). Calculate the total correction needed in inches at your shooting distance, then divide by the click value in inches to get the number of clicks.
What if my windage adjustments don’t seem to make a difference?
If adjustments aren’t working, first ensure your scope is securely mounted and not loose. Also, verify you’re turning the correct turret (windage, not elevation) and that the internal mechanisms aren’t stuck or broken. A faulty scope or mounting issue could be the cause.
Can crosswinds affect my crossbow’s horizontal point of impact, and should I adjust my scope for them?
Yes, crosswinds significantly affect a crossbow bolt’s horizontal trajectory. You should not adjust your scope’s permanent zero for wind. Instead, learn to compensate for windage by holding over or off the target, or wait for calmer conditions for critical shots.
How often should I re-check my crossbow’s horizontal zero after initial adjustment?
It’s good practice to re-check your crossbow’s horizontal zero periodically, especially after transporting it, after a hard impact, or before hunting season. Shoot a few test shots at your primary zero distance to confirm everything remains accurate.

Leave a Reply