Sighting in a red dot scope is a skill every shooter should master. A well-sighted scope means you hit what you aim at—whether for sport, hunting, or self-defense. But many beginners find the process confusing. With a few clear steps and some practical tips, anyone can set up a red dot for accurate shooting.
This guide explains each part of the process, offers advice from experience, and warns against common mistakes.
Table of Contents
What Is A Red Dot Scope And Why Sight It In?
A red dot scope is a non-magnifying optic that shows a small red dot as your aiming point. These scopes are popular for their speed and simplicity. You look through the lens, put the dot on your target, and shoot. But if your red dot is not sighted in, your shots will not land where you expect.
Sighting in, also called zeroing, matches the point of aim (the dot) with the point of impact (where the bullet hits). This ensures your shots are accurate at a chosen distance. Even a small misalignment can mean missing your target by inches or more, especially at longer ranges.
What is the purpose of AO on a scope
Tools And Materials Needed
Before you start, collect a few tools. Having the right equipment makes the process smoother and more precise.
- Red dot scope (installed on your firearm)
- Firearm (rifle, shotgun, or pistol)
- Ammunition (use the same type you plan to shoot regularly)
- Targets (paper targets with clear bullseyes work best)
- Shooting rest or sandbags (for stability)
- Boresighter (optional but speeds up the process)
- Screwdriver or adjustment tool (for your scope’s windage/elevation knobs)
- Rangefinder or measuring tape (to set your target distance)
- Marker or tape (for marking your shots)
Bringing all these to the range saves time and avoids frustration. Many new shooters forget to bring extra ammo or the correct tool for scope adjustments.

Choosing The Right Distance
One of the first decisions is what distance to sight in your red dot. Your choice affects accuracy for different types of shooting.
Most shooters use these distances:
- 25 yards/meters – Common for pistols and short-barreled rifles.
- 50 yards/meters – Good for carbines and general-purpose rifles.
- 100 yards/meters – Used for rifles with longer barrels or for hunting.
A red dot scope is designed for quick target acquisition, not long-range precision. For most users, 50 yards is a practical choice. It balances close and mid-range use.
If you only shoot indoors or at short ranges, 25 yards is enough. If you hunt or shoot at outdoor ranges, 50 or even 100 yards is better. Remember: your bullets will hit higher or lower than your aim point at other distances due to bullet drop. Start with the most common distance for your use.
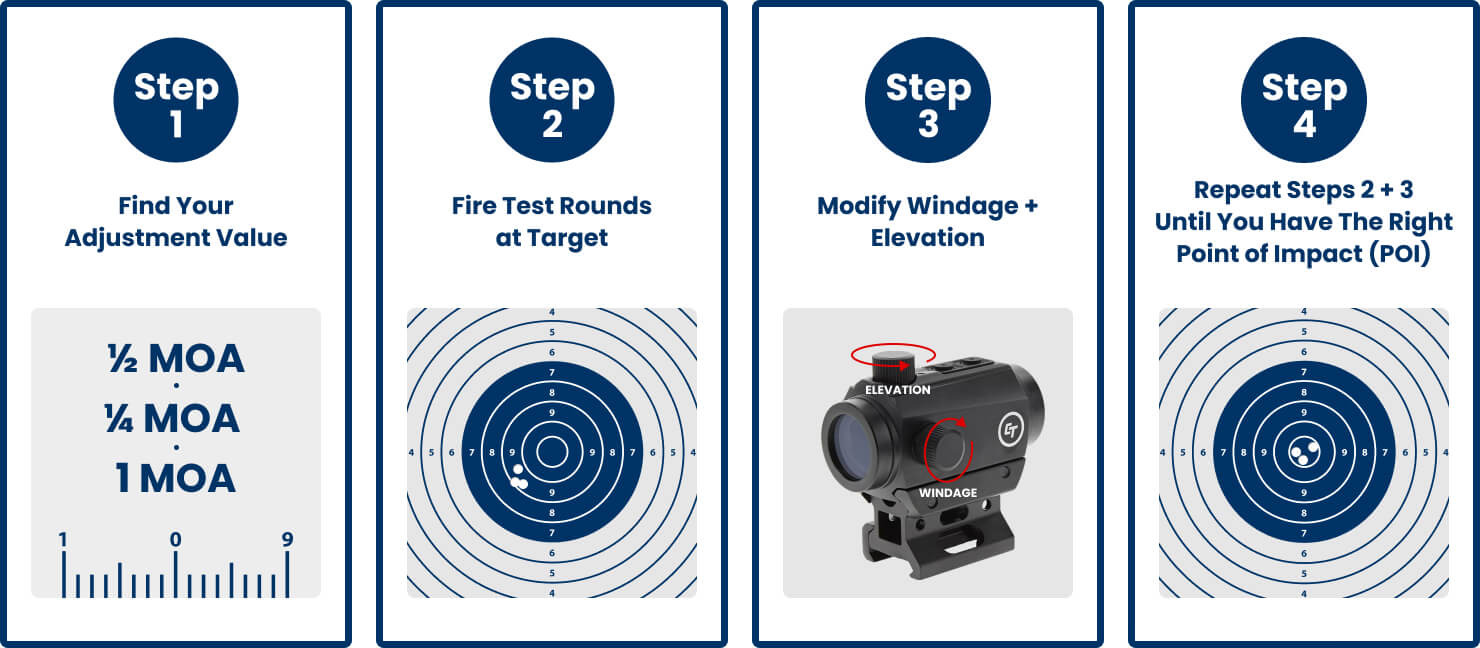
Step-by-step Guide To Sighting In
Getting your red dot zeroed is a careful process. Rushing leads to wasted ammo and frustration. Here’s the best way to get it done right.
1. Set Up Your Shooting Position
Place your firearm on a stable rest. This could be a sandbag, bipod, or shooting rest. Stability is crucial—if your gun moves between shots, you won’t know if it’s you or the scope causing the problem.
Sit or lie down in a comfortable position. Make sure you can reach your scope’s adjustment knobs easily. Take a few dry runs to practice aiming before you start shooting.
2. Pre-zero With A Boresight (optional But Helpful)
A boresighter is a tool that helps line up your barrel and your red dot before firing any shots. Insert it into your barrel and adjust the scope until the dot matches the boresighter’s point. This usually gets you “on paper” (hitting the target) with your first shots.
If you don’t have a boresighter, you can do a manual boresight:
- Remove the bolt from your rifle (if possible).
- Look down the barrel at the target’s center.
- Without moving the gun, adjust the scope so the red dot is also on the center.
- This step saves ammo and time, especially for new shooters.
3. Fire A Three-shot Group
Load your firearm and fire three slow, careful shots at the center of the target. Use the same aiming point for each shot. This “group” shows where your shots are landing relative to your aim.
Do not adjust the scope after each shot. Adjustments based on single shots can lead to chasing errors.
4. Check The Target And Measure
Walk to your target and check where the group landed. Mark the center of the group. Measure how far the center is from the bullseye in both directions:
- Up or down (elevation)
- Left or right (windage)
For example, your group may be 3 inches low and 2 inches right of center.
5. Adjust The Red Dot
Return to your shooting position. Most red dot scopes have windage and elevation knobs. They adjust the dot’s position in small increments, often 1 MOA (minute of angle) per click. Check your scope’s manual for details.
- Elevation moves the dot up or down.
- Windage moves it left or right.
If your group is low, move the dot down—this makes your barrel point higher. If your group is right, move the dot left. Always move the dot in the direction you want the shots to go.
A helpful tip: Some scopes label the adjustment direction (“UP,” “RIGHT”). If not, look for arrows or test with small turns. If you turn the wrong way, you’ll notice after the next group.
6. Fire And Adjust Again
Shoot another three-shot group, aiming at the center again. Check where this group lands. Repeat the measuring and adjusting process as needed.
Most shooters need two or three adjustment rounds to get perfectly centered. Be patient—rushing leads to mistakes. Only adjust after a group, not single shots.
7. Confirm And Lock Down
When your shots are consistently hitting the center, you’ve sighted in your scope. Tighten any mounting screws if needed. Some scopes have locking turrets—use them to prevent accidental changes.
Shoot a final group to confirm your zero. If you change ammo brands or types, repeat the process. Different ammo can hit in slightly different places.
Common Mistakes And How To Avoid Them
Many shooters make the same errors when sighting in. Knowing these ahead of time saves time, money, and frustration.
- Not using a stable rest – Shooting offhand makes it hard to see if errors are from you or the scope.
- Making adjustments after single shots – Always use groups to measure accuracy.
- Forgetting to use the same ammo – Different ammo types can have different points of impact.
- Ignoring parallax – Some red dots have small parallax errors at very close or far ranges. Check by moving your head side to side while aiming.
- Not re-checking zero – After bumps, drops, or travel, always check your zero before important shooting sessions.
A non-obvious tip: always record your adjustments and results. Keeping a log helps you repeat the process faster next time, especially if you switch scopes or firearms.
How do you adjust side focus parallax for precision shooting
Comparing Red Dot Scope Features
Not all red dots are the same. Some features can make sighting in easier or harder. Here’s a quick comparison:
| Feature | Entry-Level Scope | Mid-Range Scope | High-End Scope |
|---|---|---|---|
| Click Value (MOA) | 2 MOA | 1 MOA | 0.5 MOA |
| Adjustment Type | Tool Required | Finger Adjustable | Locking Turrets |
| Parallax-Free Distance | 50 yds | 100 yds | Unlimited |
If you are just starting, a mid-range scope with 1 MOA adjustments and finger-adjustable turrets is easiest to use.
Real-world Example: Sighting In At 50 Yards
Let’s walk through an example. You install a Sig Sauer Romeo5 red dot on your AR-15. You want to zero at 50 yards.
- Set up your target at 50 yards and stabilize your rifle.
- Fire a group. The shots land 2 inches below and 1 inch left of center.
- Your scope adjusts 0.5 MOA per click (1 click ≈ 0.25 inch at 50 yards).
- To move 2 inches up, turn the elevation knob 8 clicks up.
- To move 1 inch right, turn the windage knob 4 clicks right.
- Fire another group and check. If needed, fine-tune with a few more clicks.
This example shows why knowing your scope’s adjustment value is important.
How do you align crosshairs using a laser bore sighter
How Red Dot Scopes Compare To Other Optics
Red dots are fast and simple, but how do they compare to iron sights or magnified scopes? Here’s a quick look:
| Optic Type | Speed | Precision | Learning Curve |
|---|---|---|---|
| Red Dot | Very Fast | Moderate | Easy |
| Iron Sights | Fast | Basic | Moderate |
| Magnified Scope | Slow | High | Harder |
Red dots are best for close and mid-range shooting. For long-range, magnified scopes are better.
Practical Tips For Best Results
- Always bring extra batteries for your red dot. Many shooters forget this.
- Use clear, high-contrast targets with visible bullseyes.
- If your shots are not grouping well, check for loose mounts or screws.
- Clean your lens before starting. A dirty lens can distort the dot.
- Wear proper eye and ear protection.
- If possible, sight in on a calm day. Wind can move your shots.
One advanced tip: after sighting in, practice shooting from different positions (standing, kneeling) to see if your zero holds. Some shooters notice small shifts when changing positions.
When To Re-zero Your Red Dot
You don’t need to sight in every time you shoot. But you should re-zero if:
- You change your ammo brand or weight.
- You remove and remount your scope.
- Your firearm is dropped or knocked hard.
- You shoot in a very different climate (extreme heat/cold can affect zero slightly).
Hunters and competition shooters often check zero before every important event.
FAQ: Frequently Asked Questions
How Many Shots Does It Take To Sight In A Red Dot Scope?
Usually, you need about 9 to 15 shots to sight in, using three-shot groups. More shots may be needed if you make large adjustments or if your shooting rest is not stable.
Can You Sight In A Red Dot At Night?
Yes, but it’s harder. Use a well-lit range and reflective targets. Make sure the dot brightness is set low enough not to glare. Daylight or good indoor lighting is better for beginners.
Do You Need A Boresighter To Sight In?
No, but a boresighter saves time and ammo. It helps get your first shots on paper, but you still need to fine-tune with live fire.
Will Changing Ammo Affect My Zero?
Yes. Different brands and bullet weights can change your point of impact by 1 inch or more at 50 yards. Always sight in with the ammo you plan to use most.
What Is Parallax In A Red Dot Scope?
Parallax is a small aiming error that happens when you move your head and the dot shifts off the target. Most quality red dots are parallax-free at a certain range, but close-up or far-out shots may still see some error. Always check your dot from the center of the optic.
Final Thoughts
Sighting in a red dot scope is a key skill for any shooter who wants confidence and accuracy. By using a stable rest, understanding your scope’s adjustments, and following a careful process, you can zero your red dot quickly and with less frustration.
Take your time, use the right tools, and don’t forget to check your zero often. A well-sighted red dot means faster, more accurate shooting every time.
Leave a Reply