
Mounting a bipod on a rifle is a popular way to improve stability and accuracy, especially during target shooting or hunting. Many shooters want to do this themselves but worry about damaging their equipment or making mistakes. If you follow the right method, adding a bipod can be safe, simple, and rewarding.
This guide explains how to put a bipod on a rifle correctly. It covers the main types of bipod attachments, the tools you need, and the steps to follow. You’ll also find practical advice, common mistakes, and answers to typical questions.
Table of Contents
Why Use A Bipod?
A bipod gives your rifle a steady base. This reduces movement when aiming and shooting, leading to tighter groups and more confidence. Many modern rifles support different bipod styles, and most shooters see a clear difference in accuracy after using one.
Key benefits of a bipod include:
- Better accuracy: Less movement means more precise shots.
- Reduced fatigue: The bipod holds the weight, not your arms.
- Faster target acquisition: You can line up shots more quickly.
Choosing The Right Bipod
Before fitting a bipod, think about your rifle’s setup and your shooting style. The attachment method is the main factor.
Main Attachment Types
There are three common ways bipods attach to rifles:
| Attachment Type | Common Rifles | Ease of Installation |
|---|---|---|
| Sling Swivel Stud | Hunting, some sporting rifles | Easy |
| Picatinny Rail | Modern tactical rifles | Medium |
| M-LOK/KeyMod | Custom, modular rifles | Medium |
Sling swivel stud bipods are the most common for hunting rifles. Modern tactical rifles often use a Picatinny rail. Newer rifles may have M-LOK or KeyMod systems, which offer more flexibility.
Bipod Size And Features
Bipods come in different heights and with extra options. Choose a height that matches your shooting position. For benchrest shooting, a 6-9 inch bipod works well. For prone or field positions, 9-13 inches is more common.
Some bipods have tilt, pan, or quick-detach options. These can help with uneven ground or frequent transport.

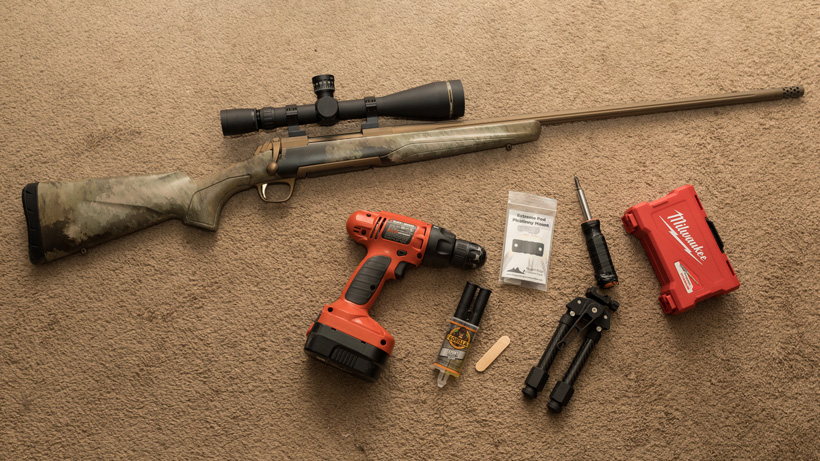
What You Need
Before mounting a bipod, gather these items:
- Bipod (the right type for your rifle)
- Attachment hardware (may come with bipod)
- Screwdriver or Allen key (matches hardware)
- Torque wrench (optional, for precise tightening)
- Rifle cleaning cloth (to avoid scratches)
- Loctite or thread locker (optional, for permanent setups)
Proper way to mount a rifle scope
How To Put A Bipod On A Rifle?
Follow these practical steps:
- Unload the rifle. Safety always comes first. Double-check that the chamber is empty before you begin.
- Clear your workspace. Use a flat, clean surface and lay down a soft cloth.
- Inspect your rifle. Look for an existing attachment point. If you have a sling swivel stud, you’ll see a metal nub under the fore-end. For Picatinny rails, look for the grooved section.
- Fit the bipod to the attachment point:
- For sling swivel stud: Open the bipod’s clamp, place it over the stud, and tighten the screw or knob.
- For Picatinny rail: Slide the bipod’s clamp onto the rail. Tighten the screw or lever until secure.
- For M-LOK/KeyMod: Attach the included adapters to the slots, then fasten the bipod.
- Check alignment. The legs should fold forward and not touch the barrel. Adjust the bipod position if needed.
- Tighten screws. Use the correct tool to tighten, but do not over-tighten. A torque wrench is useful, but hand-tight is fine for most.
- Test the fit. Extend the legs and place the rifle on a flat surface. The bipod should feel stable and not wobble.
- Optional: Add thread locker if you want a permanent fit. This stops screws from loosening over time.
Here’s a comparison of typical bipod mounting times:
| Bipod Type | Time to Install | Tools Needed |
|---|---|---|
| Sling Swivel Stud | 3-5 minutes | Small screwdriver |
| Picatinny Rail | 5-7 minutes | Allen key or screwdriver |
| M-LOK/KeyMod | 7-10 minutes | Allen key |

Common Mistakes And Tips
Many shooters make the same errors when putting a bipod on a rifle. Here are two issues beginners often miss:
- Over-tightening screws can damage the stock or strip the threads. Always tighten until snug, not beyond.
- Mounting too close to the trigger. The bipod should be as far forward as possible for maximum stability.
Other helpful tips:
- If your rifle does not have the right attachment point, adapters are available.
- Always test the bipod’s fit with the rifle unloaded.
- For a temporary setup, avoid thread locker so you can remove the bipod easily.
Maintaining Your Bipod
A bipod needs little maintenance, but a few simple steps keep it working well.
- Wipe the legs and joints after each use, especially if shooting outdoors.
- Check screws and fittings before each trip.
- Lubricate moving parts lightly if they become stiff.
This keeps your bipod reliable and extends its life.
Frequently Asked Questions
How Do I Know Which Bipod Fits My Rifle?
Check your rifle’s fore-end for a sling stud, rail, or mounting slot. Match the bipod to the attachment type. Most product descriptions list compatible rifles.
Can I Install A Bipod Without Tools?
Some quick-detach bipods need no tools, but most require a screwdriver or Allen key. Always check the manufacturer’s instructions.
Will A Bipod Affect My Accuracy?
A properly mounted bipod improves accuracy by reducing movement. Make sure the bipod does not touch the barrel, as this can cause changes in shot placement.
What If My Rifle Has No Mounting Point?
Adapters are available for most rifles. For example, a sling stud adapter can be added to a wood or synthetic stock.
Is It Safe To Leave A Bipod On All The Time?
Yes, but check screws often. Regularly inspect for wear or loosening. Some shooters remove the bipod for carrying or storage to avoid extra weight.
Finally
Mounting a bipod is a simple upgrade that can make a big difference. With the right tools and method, you can do it yourself and enjoy greater stability on your next shooting trip.
Leave a Reply