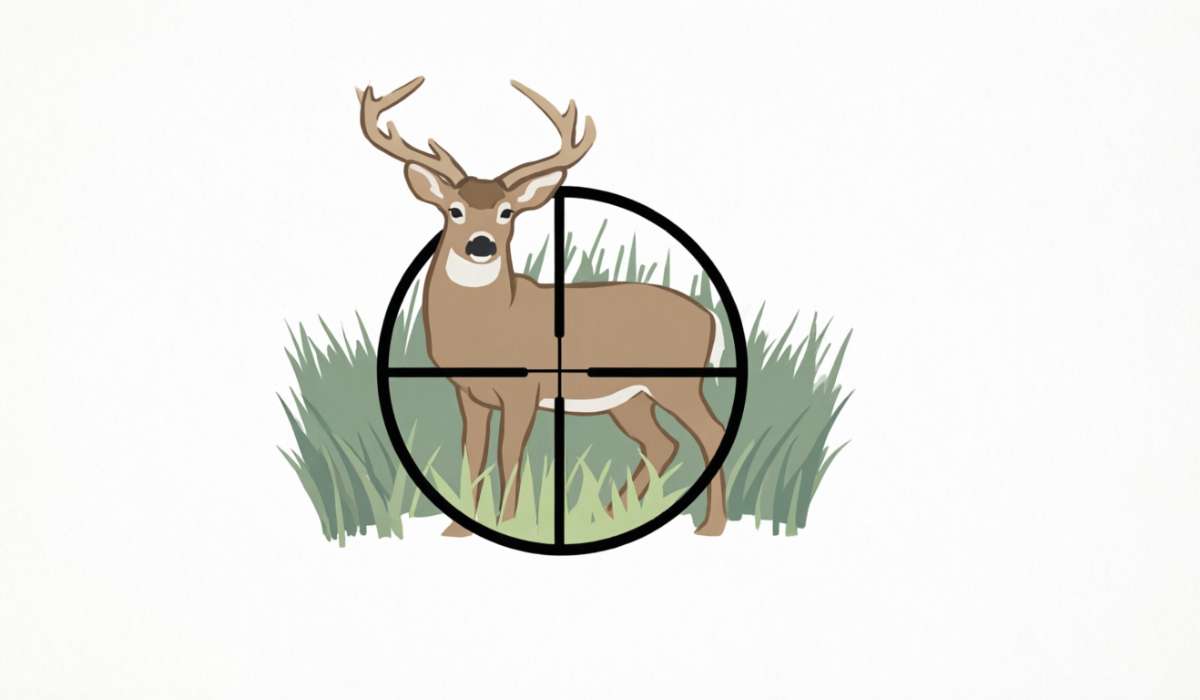
Reading a crossbow scope is more than just looking through glass. For many new shooters, the lines, dots, and numbers inside a scope can look confusing at first. But once you learn how to read a crossbow scope, aiming becomes faster, more accurate, and much more enjoyable.
Whether you want tighter groups at the range or more ethical shots in the field, understanding your scope is essential.
Many crossbow hunters and target shooters miss out on the full potential of their scopes simply because they never learn to read all the markings and features. Some rely only on the center crosshair, while others guess at the meaning of extra dots or lines. This often leads to missed shots, frustration, and lost confidence. The good news: reading a crossbow scope is a skill you can master with a little guidance and practice.
In this guide, you’ll learn how to read a crossbow scope step by step. You’ll see what each marking means, how to use them for different distances, and which mistakes to avoid. You’ll also learn how different types of scopes work, what “speed ring” and “reticle” mean, and how to pick the right settings for your crossbow.
By the end, you’ll handle your scope with the confidence of a seasoned shooter.
Table of Contents
What Is A Crossbow Scope And Why Is It Important?
A crossbow scope is a special sighting device mounted on your crossbow to help you aim more accurately. Unlike simple iron sights, a scope gives you a clearer, magnified view of your target. It also shows you where your arrow will land at different distances, thanks to special markings called reticles.
Using a scope can make a big difference in your shooting. Most modern crossbows shoot very fast, but the arrow still drops as it travels. A scope helps you adjust for this drop, so you can hit your target—even at longer ranges.
In hunting, a good scope means more ethical, clean kills. For target shooters, it means tighter groups and better scores.
It’s important to know that not all scopes are the same. Some have fixed magnification, while others let you zoom in and out. Some have illuminated reticles for low light, while others use simple black lines. Understanding your scope’s features is the first step to reading it correctly.
Understanding Scope Basics: Parts And Terminology
Before you can read a scope, it helps to know the basic parts and terms. Here are some key elements you’ll find on almost every crossbow scope:
- Objective lens: The large lens at the front of the scope. It gathers light.
- Ocular lens: The lens closest to your eye.
- Turrets: The knobs on the top and side, used for adjusting windage (left/right) and elevation (up/down).
- Reticle: The pattern of lines, dots, or marks inside the scope. This is your aiming guide.
- Magnification ring: Found on variable scopes, lets you zoom in or out.
- Speed ring: Lets you match the scope to your crossbow’s arrow speed (usually marked in feet per second, fps).
- Parallax adjustment: Rare on crossbow scopes, but helps keep focus at different ranges.
Knowing these terms makes reading your scope much easier. For example, if your scope has a speed ring, you’ll need to set it based on your crossbow’s speed. If you see extra marks in the reticle, those are for different distances.
Types Of Crossbow Scope Reticles
Different scopes use different reticle designs. The reticle is the “picture” you see when looking through the scope. Each type helps you aim at various ranges. Here are the most common:
Multi-line Reticle
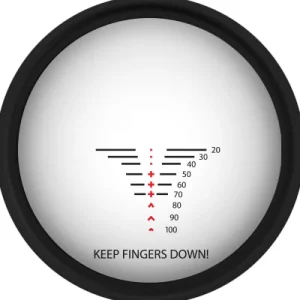
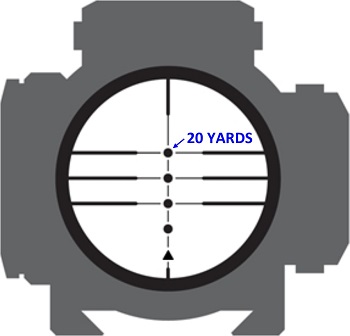
This is the most popular type for crossbow scopes. You’ll see several horizontal lines (usually 3–5) stacked below the center crosshair. Each line represents a different distance.
- The top line (center) is usually set for 20 yards.
- The next line down is often for 30 yards.
- The third line is for 40 yards, and so on.
Multi-dot Reticle
Instead of lines, you’ll see dots stacked vertically. Each dot matches a set distance. Some shooters find dots easier to use, especially in low light.
Illuminated Reticle
These reticles light up with red or green (sometimes blue) LEDs. This helps in early morning, dusk, or when aiming at dark targets.
Ballistic Reticle
A more advanced design, with lines, dots, and sometimes numbers. These are calibrated for specific arrow speeds and weights.
Rangefinder Reticle
Some scopes include extra marks to help you judge distance or arrow drop. These can look complex but are useful for experienced shooters.
Here’s a quick comparison of the most common reticle types:
| Reticle Type | Visual Layout | Best For | Typical Distances Marked |
|---|---|---|---|
| Multi-Line | Horizontal lines | General hunting, target shooting | 20, 30, 40, 50 yards |
| Multi-Dot | Vertical dots | Low light, fast shooting | 20, 30, 40, 50 yards |
| Illuminated | Lines/dots with light | Early morning, dusk | Varies by model |
| Ballistic | Complex lines/dots | Advanced shooters | Customizable |
How To Read A Crossbow Scope: Step By Step
To read a crossbow scope well, you need to combine basic knowledge with hands-on practice. Here’s a detailed step-by-step approach:
1. Know Your Scope’s Calibration
Most crossbow scopes are pre-set at the factory for a specific arrow speed, usually around 300–400 fps. If your crossbow shoots faster or slower, the lines or dots may not match the true distances. That’s why some scopes have a speed ring. Set this ring to match your crossbow’s speed (find this in your crossbow manual or on the limbs).
For example, if your crossbow shoots at 350 fps, turn the speed ring to 350. This will make the reticle lines more accurate for your setup.
2. Understand The Reticle Markings
Look through the scope at a plain background. You’ll see:
- A center crosshair or dot (usually for 20 yards)
- Additional horizontal lines or dots below (for 30, 40, 50 yards, etc.)
Some scopes have numbers next to the lines; others don’t. If your scope does not have numbers, check the manual or test at the range to see which line matches each distance.
3. Sight-in Your Scope
Sighting in means adjusting the scope so your arrow hits exactly where you aim. Here’s how:
- Shoot from 20 yards using the center crosshair.
- If the arrow hits high or low, use the elevation turret to adjust up or down.
- If the arrow hits left or right, use the windage turret to adjust.
- Repeat until your arrow hits the bullseye at 20 yards.
This sets your center crosshair for 20 yards. The other lines or dots will now be close to their marked distances.
4. Test Each Mark At The Range
Move back to 30, 40, and 50 yards. Use the lower lines or dots for each distance. If your arrows hit high or low at these ranges, you may need to fine-tune the speed ring or note the “real” distances for each line.
Here’s an example:
- At 30 yards, use the second line. If the arrow lands 2 inches low, remember to aim slightly higher next time.
- At 40 yards, use the third line. If it’s perfect, you can trust this mark for hunting or competition.
5. Adjust For Real-world Conditions
In the field, you might face wind, angled shots, or tired hands. Practice with your scope in real hunting or shooting situations. Learn how much holdover you need if the animal is uphill or downhill. Many beginners forget that shooting at angles changes arrow drop.
6. Use Parallax And Focus If Available
Some high-end scopes have parallax adjustment and focus rings. These help keep your target sharp at different distances. Most crossbow scopes are set for 50 yards, so targets closer or farther might look blurry. Adjust if needed.
7. Remember: Every Arrow Is Slightly Different
Small changes in arrow weight or fletching can affect your point of impact. Always use the same arrows when sighting in your scope. If you switch brands or types, check your settings again.
Practical Example: Reading A Multi-line Crossbow Scope
Let’s say you have a scope with four horizontal lines. After sighting in at the range, you find:
- Top line: Dead-on at 20 yards
- Second line: Perfect at 30 yards
- Third line: Hits the bullseye at 40 yards
- Fourth line: Good at 50 yards
If your target is at 35 yards, aim slightly below the third line or halfway between the second and third. Practice at odd distances so you can judge these “in-between” shots.
If you hunt in low light, turn on the reticle illumination (if your scope has it). Just remember, bright lights can sometimes create glare or spook animals—use the lowest setting that works.
Will a rifle scope work on crossbows
Common Mistakes When Reading A Crossbow Scope
Many beginners (and some experienced shooters) make the same errors:
- Not matching the scope’s speed setting to the crossbow’s actual speed. This makes all the lines inaccurate.
- Ignoring arrow differences. Heavy or light arrows fly differently. Always sight in with your hunting or competition arrows.
- Forgetting to sight in. Even the best scope is useless if not adjusted to your crossbow.
- Guessing at distances. Use a rangefinder for accurate distance readings. Estimating by eye often leads to missed shots.
- Relying only on the center crosshair. Learn to use all the marks in your reticle for best accuracy.
How Scope Magnification Affects Reading
Some crossbow scopes have fixed power (for example, 4x), while others are variable (such as 1. 5–5x). Higher magnification helps you see distant targets but narrows your field of view. Lower magnification is better for quick shots at close range.
Here’s a simple comparison of fixed vs. variable scopes:
| Scope Type | Magnification Range | Best Use Case | Drawbacks |
|---|---|---|---|
| Fixed Power | 4x (example) | Consistent shooting, beginners | Less flexible for changing ranges |
| Variable Power | 1.5x–5x | Hunting, mixed distances | More expensive, more to adjust |
When reading the scope, remember that changing magnification can affect how the reticle matches your arrow’s flight, especially if the scope is not “first focal plane. ” Most crossbow scopes are “second focal plane,” so the marks are correct only at one magnification setting (usually the lowest).
Non-obvious Tips For Mastering Your Crossbow Scope
Many shooters overlook these advanced but practical tips:
- Mark your scope or rail: Use a small piece of tape to mark your favorite settings or distances, especially if you switch arrows or speed.
- Record your settings: Write down your scope settings and arrow type in a notebook. This helps if you change something and need to return to your best setup.
- Check after bumps: If you drop your crossbow or bang it hard, check your sight-in again. Scopes can get knocked off zero, even if they look fine.

How To Read A Crossbow Scope For Different Uses
Hunting
- Use a rangefinder to know the exact distance.
- Set your speed ring before the hunt.
- Practice with your hunting arrows and broadheads—these can fly differently than field points.
Target Shooting
- Use the same arrows for sighting in and competition.
- Practice at all distances, not just 20 or 30 yards.
- Challenge yourself with moving or angled targets to improve real-world skills.
3d Archery Or Field Shooting
- Learn to estimate in-between distances.
- Use the reticle marks for quick shots at unknown ranges.
- Practice in different light conditions, as shadows can change how you see your reticle.
When To Upgrade Or Change Your Scope
If you find your shots are still off after careful setup, consider:
- Upgrading to a scope with a speed ring if yours does not have one.
- Choosing an illuminated reticle for low light.
- Getting a variable magnification scope for more flexibility.
Not every shooter needs the most expensive scope, but the right features can make reading and using your scope much easier.
Frequently Asked Questions
How Do I Know Which Line Or Dot To Use For My Shot?
Test your scope at different distances at the range. The top line or dot is almost always for 20 yards. The next lines or dots are for 30, 40, and 50 yards, but you must confirm this with your crossbow and arrows.
What Does The Speed Ring Do On A Crossbow Scope?
The speed ring lets you adjust the reticle to match your crossbow’s arrow speed. This makes the distance marks more accurate. Set the ring to your crossbow’s speed, usually found in the manual.
Can I Use Any Arrows With My Scope?
You should always sight in with the same arrows you plan to use for hunting or competition. Changes in arrow weight, length, or tip can change your point of impact.
Why Are My Shots Still Off Even After Sighting In?
Check if your scope is loose, if you’ve changed arrows, or if the speed ring is set wrong. Also, make sure you’re using the correct line or dot for the distance.
Is It Possible To Use A Rifle Scope On A Crossbow?
Some shooters try this, but it’s not ideal. Crossbow scopes are designed for the unique arrow drop and speeds of crossbows. Rifle scopes do not have the correct reticle marks or settings.
Leave a Reply